TUTORIAL
How to: Node.js Unit Testing with Mocha and Chai
by Marryam Mubariz
Have you ever felt frustrated when your Node.js code breaks unexpectedly? Or are you worried that you might have missed a bug before launching your app? Don't worry, you're not alone. That's where Mocha and Chai come in — they're tools that help make sure your code works correctly.
In this guide, I'll show you how to use Mocha and Chai to test your Node.js code. We'll start from the basics so you can follow along even if you're new to testing. You'll learn how to set up these tools, write your first test, and check if all parts of your code are being tested.
By the end, you'll know how to catch problems early, make your code more reliable, and feel more confident about your work. First, let's take a look at the tools we'll use: Mocha and Chai.
Project Overview
TOTAL TIME: 1-2 Hours
SKILL LEVEL: Entry-Level
ESTIMATED COST: N/A
YIELD: Unit Testing With Mocha and Chai
Before You Begin
Before you begin this tutorial on Node.js unit testing with Mocha and Chai, make sure you have a basic understanding of JavaScript and Node.js. You should have Node.js and npm installed on your system.
Familiarize yourself with your chosen text editor or IDE (we recommend Visual Studio). Also, ensure you're comfortable using the terminal or command prompt, as we'll be running commands throughout the tutorial.
What You'll Need: Resources/Tools
Node.js (installed on your system)
npm (Node Package Manager, usually comes with Node.js)
Mocha (JavaScript test framework)
Chai (assertion library for JavaScript)
Nyc (code coverage tool)
A text editor or IDE of your choice (Recommended Visual Studio)
Terminal or command prompt
package.json file (for managing project dependencies)
What is Mocha?
Mocha is a popular JavaScript test framework that runs on Node.js and in the browser. It's designed to make asynchronous testing simple and fun. Mocha provides a structured way to organize your tests using "describe" and "it" functions.
It offers flexible reporting, allowing you to see detailed results of your tests. With Mocha, you can test both synchronous and asynchronous code easily. It's widely used in JavaScript for writing and running unit tests.
What is Chai?
Chai is a popular assertion library for JavaScript that works great with testing frameworks like Mocha. It provides a more readable and expressive way to write test assertions. With Chai, you can easily check if your code's output matches your expectations.
It offers different styles of writing assertions, like "expect" or "should," which make your tests easier to understand and write. Chai helps make your unit tests clearer and more powerful.
How to Guide: Node.js Unit Testing with Mocha and Chai
In this blog, I'll show you how to set up and use Mocha and Chai for unit testing in Node.js. We'll start by setting up our project and installing the necessary dependencies. I'll guide you through installing Mocha, which will be our test runner, Chai for more expressive assertions, and Nyc for code coverage reporting.
As we progress, we'll look at testing different scenarios and edge cases. I'll guide you through writing tests for situations like handling one or zero arguments and show you how these tests can help improve your code's robustness.
Finally, we'll explore code coverage using Nyc. I'll show you how to set up a coverage script and run it to visualize how much of your code is being tested. This will help you identify areas of your code that might need more thorough testing.
Let's take a closer look at each of these steps.
Step 1: Install Dependencies (Mocha, Chai, and Nyc)
The first thing we'll do is head over to our package.json file. You'll see we currently have no dependencies for this project, so let's install the necessary dependencies that we will use, which are Mocha, Chai, and Nyc.
We can simply run the following command to install Mocha, Chai, and Nyc as dev dependencies:
This might take a minute or two to install, but once complete, you can see the dev dependencies listed in our package.json file.
Let's quickly run through what each of these packages will do for us in this tutorial.
Mocha is the test runner, so we use it to issue the commands to run the tests we're creating.
Chai is an additional assertion library that works well with Mocha and is commonly used together. You'll see how that provides a bit more flexibility when we're writing our test cases.
Nyc is a code coverage generator that visually shows us how much of our code has been covered by our unit tests.
After installing the dependencies, our package.json file will automatically update to include these new dev dependencies.
Step 2: Creating the Test Environment
Next, we need to update the script section in our package.json file. Currently, the script to run our tests doesn't do anything, but we can replace it with a call to Mocha by specifying the mocha test, where the test is the folder that will hold all our unit tests.
If we run npm run test now, the script will execute, but since there are no test files yet, we will see an error indicating that no test files are found.
So, let's create a test file now. In our test folder, we'll create a new file named app.spec.js.
We name our test files to correspond with the actual source file we're testing. In this case, our source folder contains app.js, so we name our test file app with the optional .spec extension to indicate that it is a test file.
If we run Mocha again, you'll see that it executes, but with zero passing tests because we haven't written any tests yet.
Before writing our first unit test, we need to set up our test file with the necessary imports. Here's what we'll do:
We'll start by importing assert. This will be used to make assertions about our test cases.
Our app.js file has a simple function called add that takes two arguments and adds them together. We need to import this function into our test file.
To accomplish this, open your app.spec.js file and add the following imports at the top:
Step 3: Writing Your First Unit Test
After our dependencies are imported, we can write our first unit test. We'll use two key functions provided by Mocha: describe and it.
The describe function is used to group related tests. It's typically used to test one specific function or a set of related functions. The it function, nested within describe, creates a test case that checks a specific aspect of the function's logic.
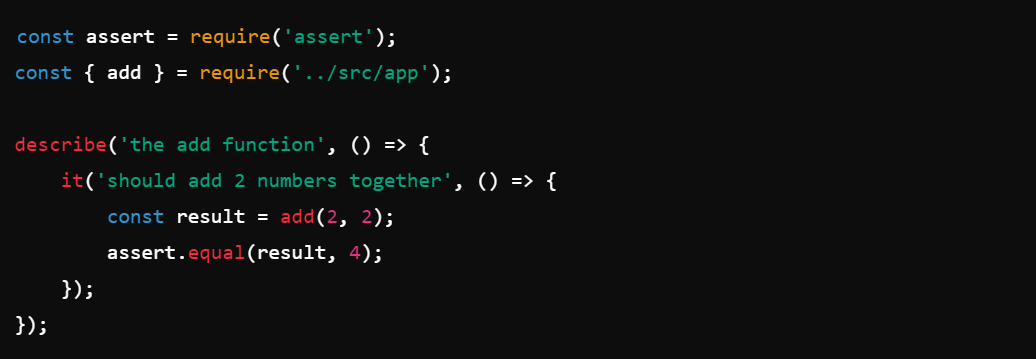
Let's start by using the describe function to create a block of unit tests for the add function we imported from our app.js file:
The first argument is a string describing what we're testing. You can use any text you like here; I've chosen "the add function."
The second argument is a function. We're using an arrow function here, although it's worth noting that the Mocha documentation generally discourages using arrow functions for various reasons. For our purposes, it won't cause any issues in this example.
Inside the describe block, we'll create an it function:
The it function is where we write our specific test. Its first argument is a string describing what this particular test should do. We're saying it "should add two numbers together" because that's the purpose of our add function. The second argument is another function where we'll put our actual test code.
Now, let's write the test:
Here's what's happening in this test:
We call our add function with arguments 2 and 2 and store the result in a variable called result.
We expect that adding 2 and 2 should give us 4.
To check this, we use the assert object we imported earlier. Specifically, we use its equal method.
assert.equal takes two arguments and checks if they're exactly equal. We're checking if the result is equal to 4.
The equal function on the assert object compares these two values, and if they're not equal, the test will fail.
Now, let's run our test again using the npm run test in your terminal:
You'll see a green checkmark (✓) next to the test description if the test passes. This indicates that the add function correctly returned 4 when we added 2 and 2.
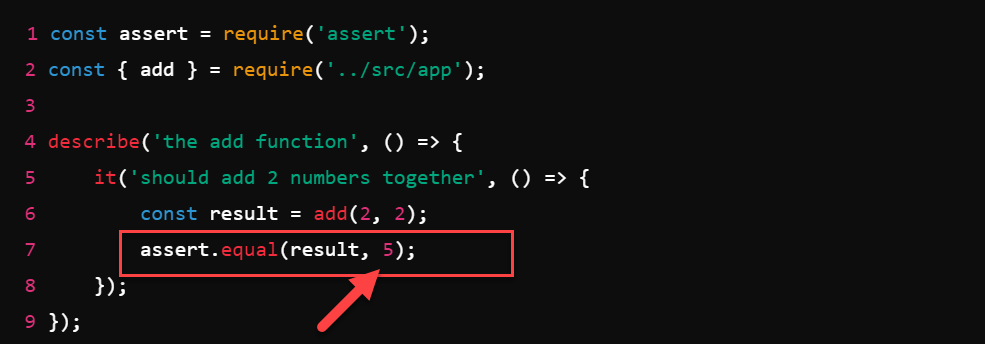
Now, if we modify the assertion to expect the result to be 5 and run the test again, you'll see that the test fails.
The error message will indicate that we expected the result to be 5, but the actual result from the add function was 4.
This is the basis of all unit tests. You're going to run a function or run some code that you've imported from your primary source, and then you're going to check that the result you're expecting matches the result that the function produces.
Now that we've seen how to use Node's built-in assert module, let's explore how the Chai library enhances our testing capabilities.
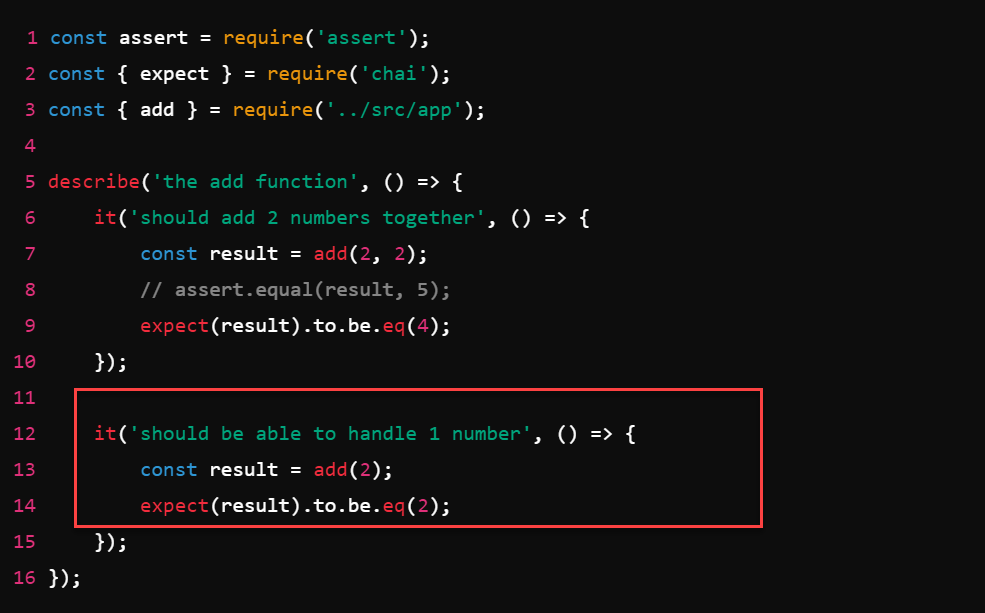
We'll start by importing Chai into our testing. Specifically, we'll import the 'expect' function from Chai using destructuring:
Now, let's modify our test to use Chai's expect function:
If you save that and run the tests again, you can see our tests are now passing again, and we've rewritten our first unit test using the Chai assertion library.
When we examine the properties and methods available on the expect function, we'll notice a significant expansion in the types of assertions we can make. This increased variety allows for greater flexibility and precision in our tests.
One of the key advantages of Chai is its readable syntax. The assertions you write with Chai tend to be more intuitive and closer to natural language than the assert object's more programmatic style. For example:
These assertions read almost like English sentences, making your tests more understandable and self-documenting.
Step 4: Testing Different Scenarios (e.g., Handling One or Zero Arguments)
Unit testing gets really interesting when we consider how someone might use our function. It's not just about testing the normal way it's supposed to work, but also checking what happens when it's used in unexpected ways.
Let's look at our add function. We made it to add two numbers, but what if someone only gives it one number? Does it behave in the way we'd expect it to? So, let's write another unit test for that.
In this test, we're only giving the add function one number (2) instead of two. We're guessing that if we only put in 2, it should give us back 2.
When we run our tests again, we'll notice that our new test fails. Let's check what's happening:
We expected the result to be 2, but instead, we got something unexpected - it's not even a number. This might seem strange at first, but there's a good reason for it.
In our add function, when we only pass in one number (2 in this case), here's what happens:
The first argument, “a” gets the value 2.
The second argument, “b” doesn't get any value, so JavaScript sets it to undefined.
Now, when our function tries to add these together (2 + undefined), JavaScript doesn't know how to handle this. It can't add a number and something that's not a number, so it gives us a special result called "Not a Number" or NaN.
This test failure is actually very helpful. It shows us that our add function doesn't work quite right when it only gets one number. This is exactly the kind of problem we want to catch with our unit tests so we can fix it and make our function more robust.
To pass our unit test, we need to improve our add function. Right now, it does not handle missing arguments well. Let's fix that.
One solution would be to provide default values to `a` and `b` so that we don't get that undefined value if the user forgets to pass in two arguments.
Now, if someone forgets to pass in two arguments:
If they only provide one number, that number will be a, and b will be 0.
If they don't provide any numbers, both a and b will be 0.
Let's run our unit test again. Great! The second unit test is now passing. When we call add(2), it's like calling add(2, 0), which correctly returns 2. This is a perfect example of how unit tests can help us improve our code.
Our add function seems strong now, but what if we pass in values that aren't numbers?
For instance, if the add function is called with a string, adding strings to numbers won't give a useful result. So, we should return a default value like 0 if a string is added to a number.
Let's write a unit test for that. We'll say it should return zero if either argument isn't a number.
In this test, we're trying to add the number 2 to the word "test." We expect the result to be 0 because that seems like a reasonable way to handle invalid input.
When we run this test, it fails. Instead of getting 0 as we expected, we get "2test". This happens because JavaScript tries to be helpful:
It sees we're trying to add a number (2) to a string ("test").
So it converts the number 2 into a string "2".
Then it combines the strings, giving us "2test".
This isn't what we want our add function to do. We want it to add numbers, not combine strings. We need to update our `add` function to handle non-numbers.
We can add a check to see if the arguments passed are numbers. If typeof a is not equal to 'number' or typeof b is not equal to 'number,' then return 0. If both are numbers, return a + b. This way, we make sure our arguments are numbers, and if not, we return 0.
Let's run our tests again, and you can see now the fourth test is actually passing as the `add` function is now returning a zero.
Step 5: Measuring Code Coverage with Nyc
When we set up our project, we also installed a library called Nyc. Nyc is really useful because it shows us how much of our code is covered by our unit tests. It gives us a visual representation of this coverage.
To use Nyc, we need to add a new script to our package.json file. Let's call this script "coverage," but you can name it whatever you like. Here's what we'll add:
Now, when we run npm run coverage in the terminal, a couple of things happen:
Mocha runs all our unit tests, just like before.
But then, Nyc gives us some extra information at the bottom of the output.
This extra information tells us about our code coverage. It shows us:
How many of our statements are covered by tests
How many branches (like if/else statements) are covered
How many functions are tested
How many lines of code are covered
In our case, we're seeing 100% coverage across the board for our app.js file. This means our tests are checking every part of our code. This is great, but it's not surprising because:
Our functions are pretty simple.
We've written quite a few tests to cover different scenarios.
Having this coverage information is helpful. It lets us see if we've missed testing any parts of our code, which can help us write more comprehensive tests and create more reliable software.
I've just briefly introduced you to unit testing with Mocha and Chai. I hope you've seen how powerful unit testing can be, even for a simple function like adding two numbers. It really makes you think more deeply about how your function will be used in a real project.
Unit testing might seem like extra work at first, but it's a powerful tool that can save you time and headaches in the long run by catching bugs early and making your code more dependable.
Conclusion
I hope you see just how powerful and important unit testing can be. Even for a simple function like 'add,' we've discovered how thorough testing helps us catch unexpected behaviors and improve our code's robustness.
Throughout this process, we've seen how unit testing helps us identify bugs early, ensures our functions behave correctly with various inputs, improves code quality, and serves as documentation for how our code should work.
I encourage you to practice these techniques in your own projects - start small and gradually expand. It may seem like extra work at first, but trust me, it'll save you time and headaches in the long run. If you're eager to learn more, check out our comprehensive JavaScript course, which offers a deeper dive into testing and other essential skills.
Visit our main tutorials page for more tutorials on JavaScript, testing, cloud services, networking, cybersecurity, and other web development topics.


