TUTORIAL
How to Map a Network Drive
by Marryam Mubariz
Finding shared files on a network can be a real headache, but learning how to map a network drive makes it so much easier. The drive letter you assign to the shared folder makes it easily accessible, like any local file on your system.
This simple network drive mapping tutorial will show you how to map a drive in Windows 10. It's perfect for organizing or preparing for your Network+ certification.
Setting up a network drive can save you time and make your work life smoother. Let's dive into why mapping network drives can make your work more efficient.
Project Overview
EXPERIENCE LEVEL: Entry-level
TIME TO COMPLETE: 15 minutes - 30 minutes
ESTIMATED COST: N/A
YIELD: Map a network drive
What You'll Need: Resources/Tools
Windows OS (any version, with a focus on Windows 10/11)
Access to a shared folder or network drive
Network credentials (if different from your login credentials)
Basic computer and network knowledge
Before You Begin
This tutorial explains how to map a network drive in Windows step-by-step. It covers basic techniques to help users quickly access shared network resources and streamline their workflow.
Before mapping a network drive, ensure your computer is connected to the network where the shared folder exists. You must also confirm that you have the necessary access permissions for the network location you intend to map.
Why Do We Need to Map Network Drives?
It's all about convenience and efficiency. It's like giving your computer a shortcut to files stored elsewhere. Instead of remembering long addresses, just click on a letter (like Z:), and boom - you're there.
It makes sharing files with others super easy. Plus, it feels like those far-away files are right on your own computer. This simple trick saves time and makes collaboration easier.
How to Map a Network Drive (Step-by-Step Guide)
Mapping a network drive simplifies access to shared files and helps you save valuable time. Follow these steps to get started and improve your workflow.
Method 1: Using File Explorer
The easiest way to start is by opening File Explorer, a tool designed to do exactly what we want—find a file!
Step 1: Open File Explorer
Select the folder icon in your taskbar or type "File Explorer" into the Windows search bar.
Step 2: Click on "This PC"
Once File Explorer is open, navigate to the left-hand side and select "This PC." This view shows all your local drives and will soon include your mapped network drive.
Step 3: Click on "Map Network Drive."
Look at the toolbar at the top of the File Explorer window. You should see a "Computer" or "Drive tools" tab. Click on it, then from the menu that appears, select "Map Network Drive.
Step 4: Choose a Drive Letter
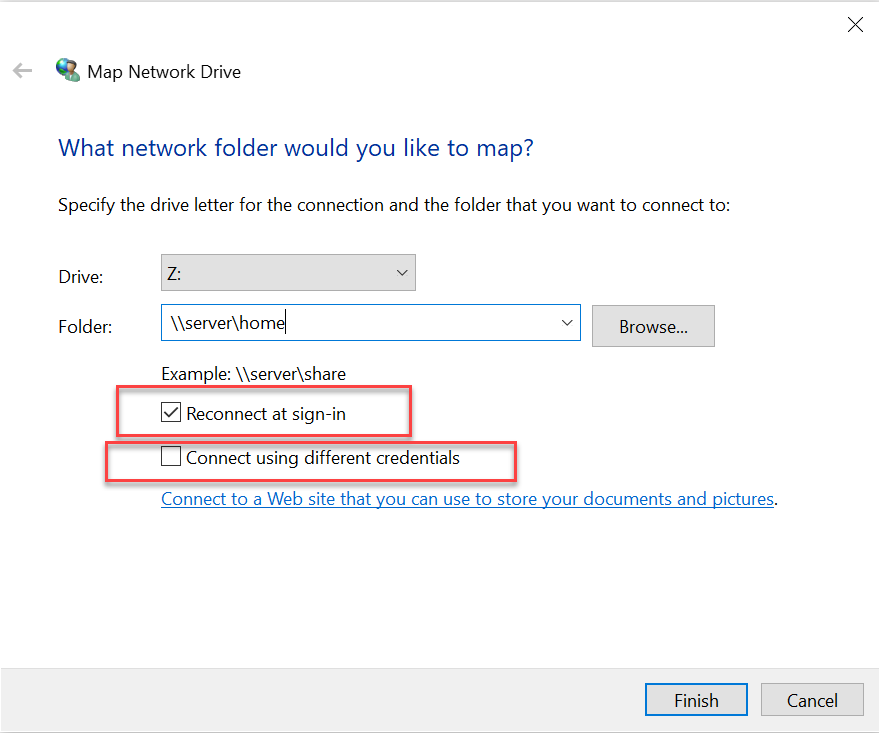
A new window will pop up. From the drop-down, Select the drive letter you'd prefer to assign to the network location. You can choose any available letter; common choices include letters towards the end of the alphabet, like X:, Y:, or Z:.
Step 5: Enter the Folder Path
In the "Folder" field, type in the network path of the shared folder you want to map. This typically looks like a server shared folder.
If you're not sure of the exact path, click "Browse" to find the folder within your network. It would be helpful to expand on what the user is searching for, such as the folder name or server.
Step 6: Optional Settings
You'll see two checkboxes:
"Reconnect at sign-in": Check this if you want the drive to be available every time you log into your computer.
"Connect using different credentials": Select this if you need to use different login information to access the network folder.
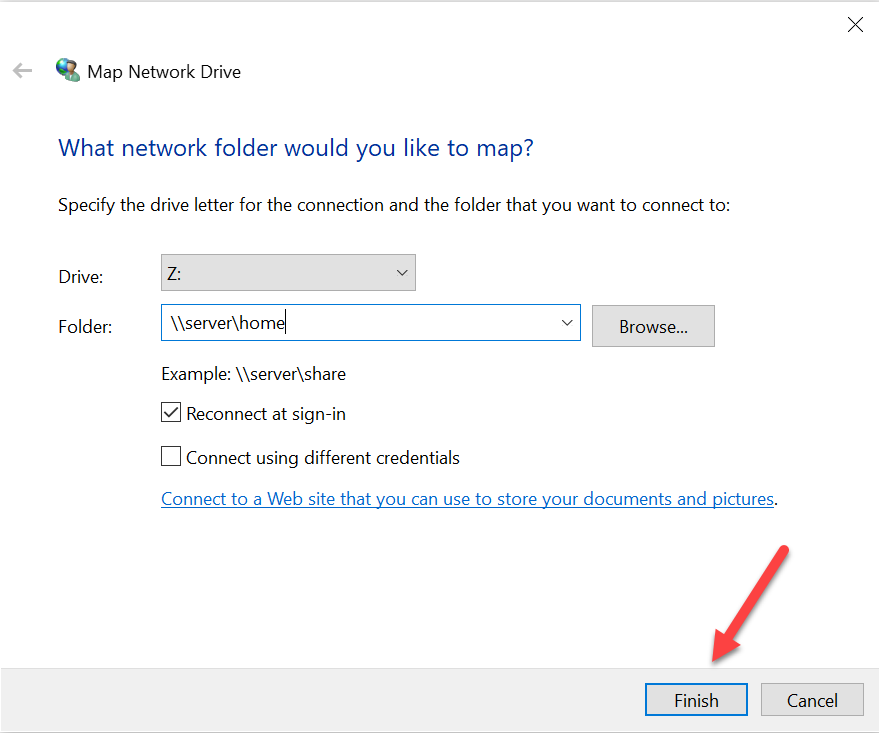
Step 7: Finish the Setup
Click "Finish." The network drive will now appear in File Explorer under "This PC," just like your local drives.
Method 2: Using the Command Prompt
If you prefer working with a command-line interface, the Command Prompt provides a fast way to map network drives.
Step 1: Open Command Prompt
Simply press Win + R, type cmd, and hit Enter, or look for "Command Prompt" in the Start menu.
Step 2: Use the Net Use Command
Inside the Command Prompt window, enter the following command:
Replace [letter] with the letter you want to assign (e.g., Z:) and \\server\sharedfolder with the network path.
For example:
Press Enter to execute the command.
Step 3: Verify the Mapping
If successful, you'll see a message saying, "The command completed successfully." You can now access the network drive from File Explorer.
Method 3: Using PowerShell
PowerShell is another way to map network drives, and it is especially useful for automation and scripting tasks.
Step 1: Open PowerShell
Open PowerShell from the Start menu.
Step 2: Use the New-PSDrive Cmdlet
Enter the following command in PowerShell:
Command: New-PSDrive -Name "X" -PSProvider FileSystem -Root "\\server\sharedfolder" -Persist
Replace "X" with your desired drive letter and "\\server\sharedfolder" with the network path.
Step 3: Confirm the Mapping
If successful, PowerShell will display information about the newly created drive. You can now access it from File Explorer.
Additional Tips and Tricks
1. Quick Mapping Through Network
If you have network discovery enabled, you can quickly map a drive by:
Opening File Explorer and clicking on "Network."
Locating and right-clicking on the desired shared folder.
Selecting "Map Network Drive" from the context menu.
2. Using Wildcards for Drive Letters
When using the net use command, you can use an asterisk (*) instead of specifying a drive letter. This tells Windows to assign the next available drive letter automatically:
Command: net use * \\server\sharedfolder
3. Viewing All Mapped Drives
To see all currently mapped network drives, open Command Prompt and type:
Command: net use
This command displays a list of all mapped drives along with their network paths.
4. Disconnecting Network Drives
To remove a mapped network drive:
In File Explorer: Right-click on the drive and select "Disconnect".
In Command Prompt: Use net use [drive letter]: /delete.
In PowerShell: Use Remove-PSDrive -Name "[drive letter]".
5. Troubleshooting Connection Issues
If you're having trouble connecting to a network drive, try these steps:
Ensure you have the correct path and permissions
Check your network connection
Temporarily disable your firewall to see if it's blocking the connection
Use the full UNC path (\\server\sharedfolder) instead of the server name alone
Conclusion
In this guide, we covered three easy methods to map a network drive in Windows: File Explorer, Command Prompt, and PowerShell.
Using File Explorer, you simply go to "This PC," select "Map Network Drive," choose a drive letter, and enter the network path.
For those who prefer the command line, the Command Prompt method allows you to use the net use command to map the drive.
Similarly, PowerShell provides an alternative to the New-PSDrive cmdlet, which is ideal for scripting and automation.
Mapping a network drive saves time, reduces hassle, and improves efficiency, whether you're a remote worker or part of a larger organization. By mastering these methods, you’ll make shared resources as accessible as your local files.
Ready to simplify your workday? Explore more tutorials and become a networking expert with our CompTIA Network+ course.


