TUTORIAL
How to Create PostgreSQL Tables with pgAdmin
Experience Level: Entry-level
Time to Complete: 1-2 hours
Cost: N/A
Yield: Create PostgreSQL Table with pgAdmin
Before You Begin
In this project, we'll guide you through creating PostgreSQL tables using pgAdmin. Over the course of 1-2 hours, we'll teach you the CREATE TABLE syntax, show you how to define columns with appropriate data types, and implement crucial constraints like PRIMARY KEY, UNIQUE, and NOT NULL.
Together, we'll build a multi-table membership system, explore how to use REFERENCES for table relationships, and share best practices for documentation and future-proofing your database design. By the end, you'll be able to create your own PostgreSQL tables confidently.
Skills Needed
Before diving into creating PostgreSQL tables with pgAdmin, ensure you have the following:
Basic understanding of database concepts. While this tutorial is beginner-friendly, familiarity with basic database terminology will be helpful.
A clear idea of the data you want to store. We'll be creating a membership system in this tutorial, but you can adapt the concepts to your specific needs.
Access to a PostgreSQL server. You can use a local server on your machine or a remote server if you have the necessary credentials.
Tools and Materials
PostgreSQL: The open-source relational database system we'll be using.
pgAdmin: The graphical user interface for PostgreSQL.
Text editor: This is used to draft and save SQL commands (Visual Studio Code)
Internet connection: This is for accessing documentation and troubleshooting.
PostgreSQL database: A database where you have permissions to create tables.
This tutorial: Keep it open for step-by-step guidance.
How to Create PostgreSQL Tables Using pgAdmin
Have you ever dreamed of building your own database but felt overwhelmed? Well, it's time to turn that dream into reality. In this beginner-friendly guide, we'll show you step-by-step instructions on how to create PostgreSQL tables using pgAdmin.
We'll start with the basics, including how to write the CREATE TABLE command, add columns, select data types such as SERIAL and VARCHAR, and apply important constraints like PRIMARY KEY and UNIQUE.
You'll also learn how to connect tables using REFERENCES so you can build a more complex and linked database.
To clarify everything, we'll show you how to create your tables using the Query Tool in pgAdmin.
Join me on this exciting journey to turn you into a competent database designer in no time.
An Overview of How to Create PostgreSQL Tables with pgAdmin [Video]
In this tutorial, instructor Jonathan Barrios guides you through creating PostgreSQL tables using pgAdmin. He covers the CREATE TABLE syntax, defines columns with appropriate data types, and implements crucial constraints.
You'll learn to build a multi-table membership system, use REFERENCES for table relationships, and understand the importance of documentation and future-proofing.
By the end, you'll be ready to create your own PostgreSQL tables confidently.
Why PostgreSQL Tables Matter
Suppose you're building a cool new app and need a place to store all that juicy data. That's where PostgreSQL tables come in.
They're like the digital filing cabinets of your database, keeping everything organized and easily accessible. And the best part? You get to be the architect of this data wonderland.
Now that we know why PostgreSQL tables are important, let's learn how to make them using pgAdmin
How to Create PostgreSQL Tables with pgAdmin
For beginners, creating PostgreSQL tables with pgAdmin is straightforward. Open pgAdmin and connect to your database.
Use the Query Tool to enter your CREATE TABLE statement. Begin with "CREATE TABLE table_name" followed by parentheses. Inside, list your columns, each with a name, data type (like SERIAL or VARCHAR), and any constraints (such as PRIMARY KEY or NOT NULL).
Separate columns with commas, but don't add one after the last column. After closing the parentheses, add a semicolon. Execute the query, then refresh your database to see your new table. You can verify its structure using a SELECT * FROM table_name query.
To get started, let's break down the CREATE TABLE syntax to understand each part.
Step 1: Understanding the “CREATE TABLE” Syntax
In SQL, the “CREATE” keyword helps you make database objects like tables, indexes, and views. When you make a table, you set up its structure by deciding on the columns and their data types. This keyword is the first step in organizing and accessing your data.
In PostgreSQL, the “CREATE TABLE” command is essential for making new tables. The basic format is 'CREATE TABLE table_name,' where you change 'table_name' to the name you want for your table.
For CREATE TABLE, here is the basic syntax:
Let's break down the “CREATE TABLE” statement. It's not as scary as it sounds, I promise.
CREATE TABLE: This is where the magic starts. It's like saying, "Hey, PostgreSQL, I want to make a new table!"
table_name: table_name is the name of the table you want to create. Get creative here. Name something on your table that makes sense for what it'll store.
Inside the parentheses, we list our columns. Each column gets a name, a data type, and any constraints we want to add.
Don't forget those commas between columns. But here's a pro tip: no comma after the last column. It's like the cool kid that doesn't follow the rules.
Column Structure: Name, Data Type, Constraints:
Each column in a PostgreSQL table has:
Name: The identifier for the column.
Data Type: Specifies the type of data the column can hold (e.g., INTEGER, VARCHAR, DATE, and TIMESTAMP).
Constraints: Rules that limit the type of data that can be stored in the column (e.g., NOT NULL, UNIQUE).
Step 2: Defining Columns and Data Types
When defining a table, you'll specify columns with their names, data types, and constraints. For example, a column might be "customer_id SERIAL PRIMARY KEY", where "customer_id" is the name, "SERIAL" is the data type, and "PRIMARY KEY" is the constraint.
customer_id SERIAL PRIMARY KEY: The customer_id column is of type SERIAL, which means it will auto-increment with each new record. It is also the primary key of the table, ensuring each value is unique and not null.
Add Some Other Columns
If you want to include additional columns such as first name, last name, email, and phone number in the customers table, you can use the following syntax.
first_name VARCHAR(50) NOT NULL: The first_name column can store up to 50 characters and cannot be null.
last_name VARCHAR(50) NOT NULL: The last_name column can store up to 50 characters and cannot be null.
email VARCHAR(100) UNIQUE NOT NULL: The email column can store up to 100 characters. It must be unique and cannot be null.
phone_number VARCHAR(15): The phone_number column can store up to 15 characters. It can be null.
created_at TIMESTAMP DEFAULT CURRENT_TIMESTAMP: The created_at column is of type TIMESTAMP and defaults to the current timestamp when a new record is created.
Common Data Types
Data types are like personality traits for your columns. Let's look at some common ones:
SERIAL: The SERIAL data type is often used for primary keys. It is an auto-incrementing integer data type in PostgreSQL. It automatically generates a unique identifier for each row, ensuring that every record has a unique ID.
VARCHAR: Perfect for text that might vary in length, like names or addresses.
INTEGER: When you need whole numbers. (Suitable for numerical data.)
TIMESTAMP: Date and time. For keeping track of when things happen.
Selecting the right data type is vital for ensuring data integrity and optimizing database performance.
Step 3: Understanding and Implementing Constraints
Constraints are like the bouncers of your database. They make sure only the right data gets in.
Let's look at some of the important constraints:
PRIMARY KEY: It is a constraint that uniquely identifies each record in a table. It ensures that the column(s) marked as PRIMARY KEY contain unique values and cannot be null. Usually, we use this on ID columns.
NOT NULL: Ensures that a column cannot have a NULL value.
UNIQUE: It Makes sure no two rows have the same value in this column.
Defining Username with Constraints
When defining a column, you can apply constraints to enforce data rules. For example:
Now our table has some rules. In the above example, the username column is defined with both UNIQUE and NOT NULL constraints.
The UNIQUE constraint ensures that no two rows can have the same username, preventing duplicate entries.
The NOT NULL constraint requires every row to have a value in this column, disallowing empty usernames.
Together, these constraints maintain data integrity by guaranteeing that each username is both unique and present, which is crucial for user identification in the system.
Step 4: Creating Your First PostgreSQL Table: A Membership Table
Now, we're going to create a membership table in PostgreSQL. Before we start typing, let's think about what our membership table needs. We'll want to store the following:
A unique identifier for each member
Username
Password
Email
When they joined
Their last visit
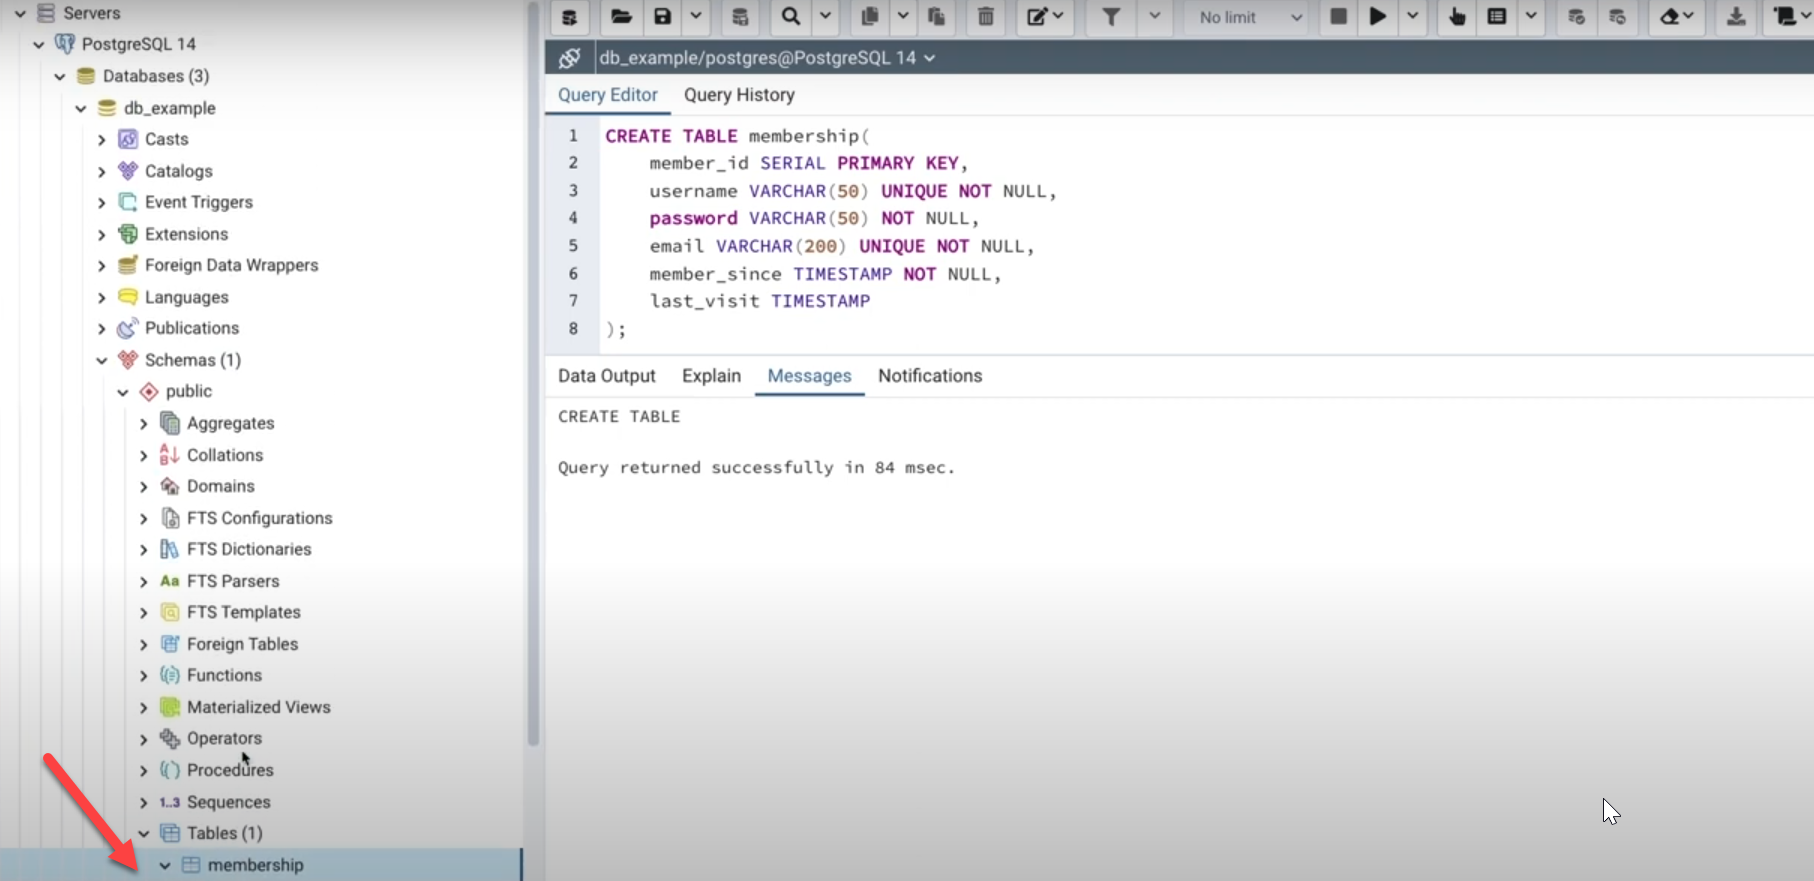
Open up pgAdmin, connect to your database, and open a new query window. It's time to create some SQL magic. Let's start with the basic structure:
The CREATE TABLE Statement
We begin with the CREATE keyword, followed by TABLE, and choose a name like "membership."
Adding Our Primary Key
Every table needs a unique identifier. Let's add a member_id column using the SERIAL data type. This automatically increments for each new member.
We add the PRIMARY KEY constraint to ensure uniqueness.
Username Column Next
Let's add a username column:
We're using VARCHAR(50) because usernames can vary in length. UNIQUE ensures no duplicate usernames, and NOT NULL means every member must have a username.
Password and Email
Let's add columns for password and email:
Similar to the username, we use VARCHAR(50) for the password. We only apply the NOT NULL constraint, as passwords don't need to be unique.
Notice we made the email UNIQUE too. We don't want multiple accounts with the same email.
Timestamp Columns
Finally, add columns to track when a member joined and their last visit. We create "member_since" and "last_visit" columns using the TIMESTAMP data type. "member_since" is set to NOT NULL, while "last_visit" can be NULL.
Now, hit the run button and watch the magic happen. Refresh your database in pgAdmin. You should see your new membership table.
If you want to double-check? Run this query:
You'll see an empty table with all your columns. Perfect! You've just created your first PostgreSQL table.
Step 5: Creating More Tables (Gold Member and Member Rewards)
After creating our initial membership table, we expand our database structure by adding two more tables: Gold Member and Member Rewards.
These tables enhance our membership system by allowing us to track special member statuses and rewards.
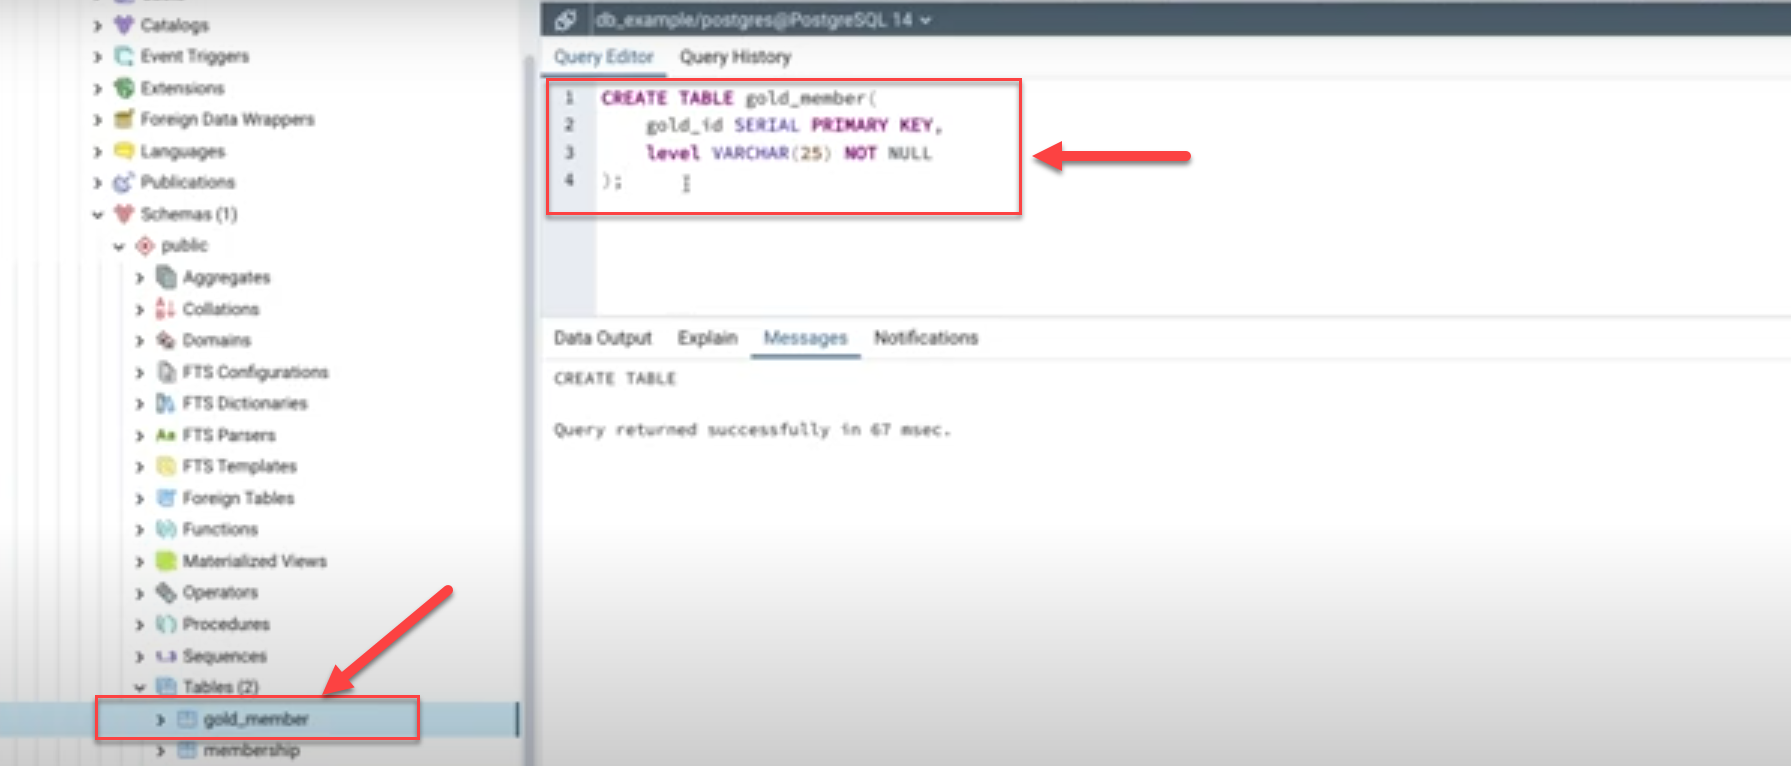
Gold Member Table
The Gold Member table is designed to store information about members with premium status. It includes a unique identifier (gold_id) and a level field to indicate the tier of gold membership.
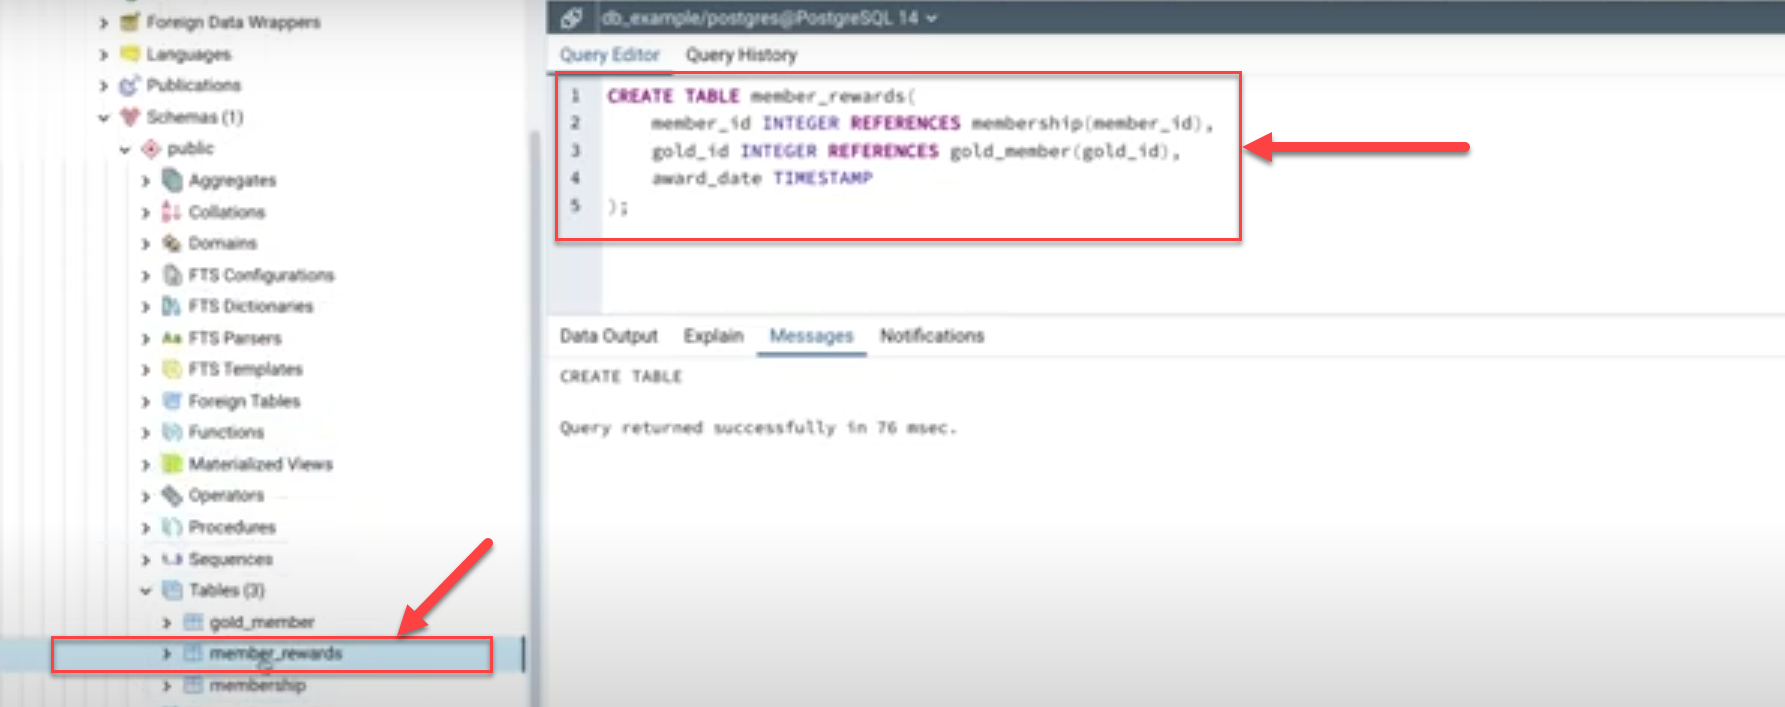
Member Rewards Table
The Member Rewards table serves as a bridge between the Membership and Gold Member tables. It uses foreign keys to reference both tables, creating relationships between them. This table also includes a timestamp field to record when rewards are given.
In the member_rewards table, the member_id column points to the member_id column in the membership table, and the gold_id column points to the gold_id column in the gold_member table.
These are foreign key relationships that help keep the data consistent between tables.
When you create tables that reference each other, be sure to use the REFERENCES keyword to set up the foreign key links. This helps ensure the data stays accurate and allows for efficient queries across related tables.
Creating tables is just the beginning. In future tutorials, we'll cover how to add, update, and even delete data (carefully, of course!).
Step 6: Importance of Documentation and Long-term Planning in Table Design
When creating tables, don't just think about what you need right now. Put on your fortune-teller hat and imagine what your database might need a year or even five years later. Will you suddenly need to store a user's favorite color? Or maybe their pet's name?
Here's the deal: it's way easier to plan for extra columns now than to try and squeeze them in later when your table is bursting with millions of rows. And don't even get me started on trying to change relationships between tables once they're all cozied up with data.
So, do yourself a favor:
Document Everything: Write down why you chose each column, data type, and constraint. In the future, you (or your poor colleague who inherits your database) will be eternally grateful.
Think Big: Consider how your data might grow. Maybe 'VARCHAR(50)' is enough for usernames now, but what if you suddenly go viral and get users with super long, creative names?
Be Flexible: Design your tables to adapt to new features or requirements without a complete overhaul.
Remember, a well-designed database is like a well-organized closet. It may take more time to set up initially, but oh boy, does it make life easier in the long run!
So plan and document thoroughly, and your database will be as future-proof as possible.
Conclusion
Let's wrap this up with a bang! We've journeyed through the essentials of PostgreSQL table creation, from mastering the CREATE TABLE statement to exploring crucial data types like SERIAL and VARCHAR. Along the way, we've provided numerous PostgreSQL table examples to illustrate these concepts.
We've explored vital constraints like PRIMARY KEY and UNIQUE, showing how they maintain data integrity in your PostgreSQL create table commands.
These constraints ensure each record is uniquely identifiable and prevent duplicate entries, forming a solid foundation for reliable data management and efficient querying in your database.
We even built a multi-table membership system, showcasing how to structure more complex databases.
We've also learned about REFERENCES, which allow us to create relationships between tables, ensure data integrity, and enable complex queries. Remember, documentation and future-proofing are your best friends in database design.
Now it's your turn to shine. Fire up pgAdmin and start experimenting. Create tables for your hobbies or interests - the more you practice, the more comfortable you'll become.
Ready to learn more about PostgreSQL? Check out our comprehensive PostgreSQL tutorial series. We cover everything from basic queries to advanced database management with practical, real-world examples.
For more IT tutorials, visit our training page. We offer a wide range of topics, including cloud services, networking, cybersecurity, and various certifications.


