TUTORIAL
How to Build an AI-Powered Web App from Scratch
by Marryam Mubariz
Project Overview
EXPERIENCE LEVEL: Entry-level
TIME TO COMPLETE: 1-2 hours
ESTIMATED COST: Not applicable
YIELD: Build an AI-powered web App from Scratch
In this guide, we'll walk you through building "Hungry Bear," a fun and practical app that uses ChatGPT to suggest meal ideas when you're stuck on what to eat.
We'll start in Google Colab, move to Visual Studio Code, and finally deploy on Streamlit Cloud. In the process, you'll get a taste of OpenAI's API, create a user-friendly interface with Streamlit, and even dip your toes into version control with GitHub. And the best part? You don't need any front-end experience to make it happen!
So, whether you're a coding newbie or a seasoned developer looking to explore AI integration, this tutorial is for you.
What You'll Need
To complete this AI-powered web app design, you'll need the following:
Basic skills in Python
Google Account: For accessing Google Colab
OpenAI Account: To obtain an API key for ChatGPT integration
Python: Basic knowledge of Python programming
GitHub Account: For version control and deployment
Visual Studio Code: As your local Integrated Development Environment (IDE)
Streamlit: We'll install this Python library for creating the web app interface
Internet Connection: For accessing online resources and deploying your app
Before you Begin
Before diving into this AI-powered web app project, make sure you have a Google account to access Google Colab. You'll also need to sign up for an OpenAI account to obtain an API key.
Familiarize yourself with basic Python programming concepts. While no front-end experience is required, a basic understanding of web applications will be helpful.
Lastly, create a GitHub account for version control and prepare to install Visual Studio Code on your local machine.
Have you ever wanted to build an AI-powered web app but felt overwhelmed by the complexity? Well, get ready to turn that dream into reality.
An Overview of How to Build an AI-Powered Web App from Scratch [Video]
In this tutorial, CBT Nuggets trainer Jonathan Barrios shows you how to create an AI chatbot as a subset of ChatGPT, as well as create a Streamlit web app that does something specific. Jonathan reviews the app's design, code, and launch.
What is Streamlit?
Streamlit is a powerful tool for creating data apps using Python code, even without front-end experience. The Streamlit Community Cloud is an open-source platform for developing, deploying, and discovering these apps.
It's a free community where you can explore others' work and host your creations. We'll use this awesome skill to build “Hungry Bear,” an application that uses ChatGPT to suggest meal ideas when you're wondering what to eat for dinner or lunch.
How to Build an AI-Powered Web App from Scratch
Ready to get started? We'll start by setting up your development environment in Google Colab.
After that, we'll import libraries, authenticate, and build a working prototype. Once it's functional, we'll switch to Visual Studio Code to create production-ready code. Instead of Heroku or AWS, we'll deploy our finished app to Streamlit Cloud for easy sharing and access.
Along the way, you'll gain experience with GitHub for version control and learn to manage dependencies using a requirements.txt file. The final step is deploying your app on Streamlit Cloud, ensuring your API key is securely stored.
Let's start coding our app!
Step 1: Set Up Your Development Environment
We're kicking things off in Google Colab, so no need to worry about local installations just yet. Here's what we're going to do:
Go to colab.research.google.com and start a new notebook.
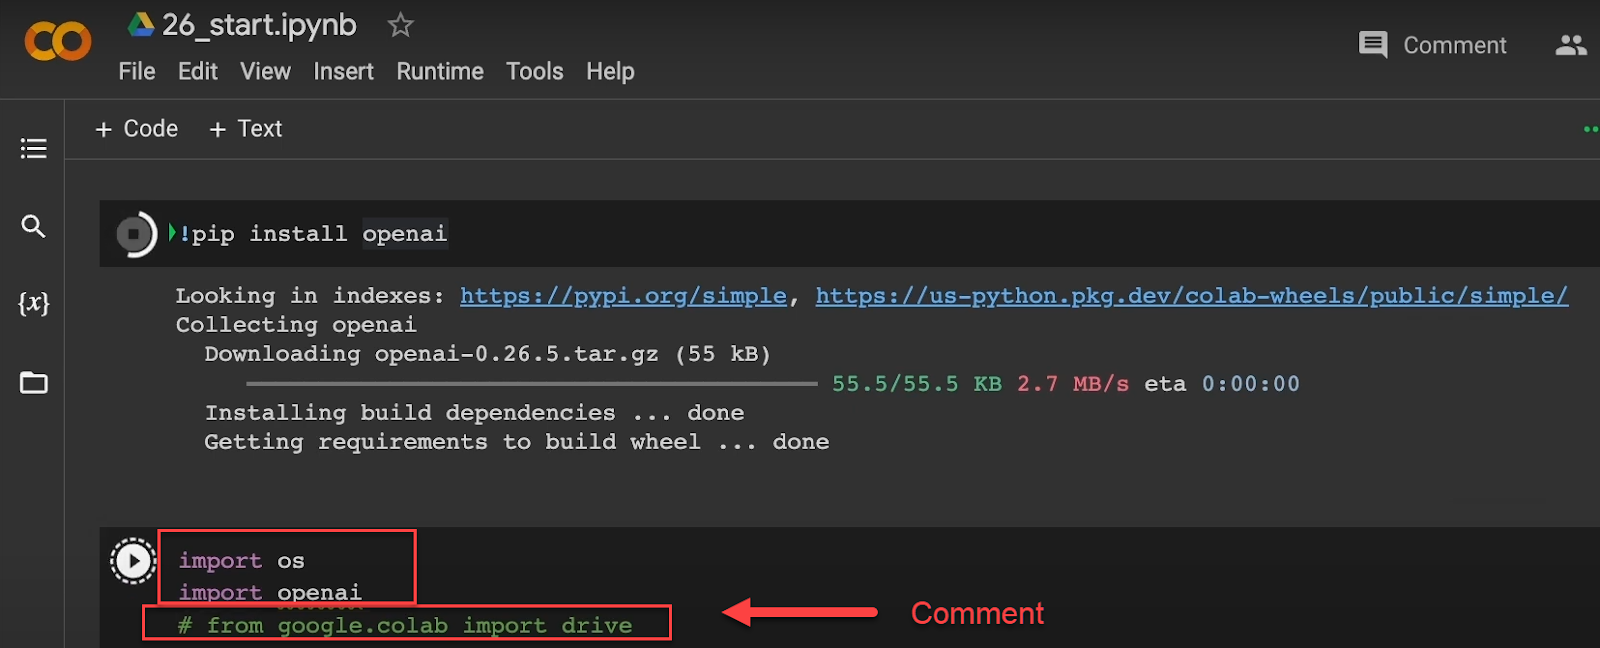
Next, install the OpenAI library. In your first code cell, type: “!pip install openai”. We are using the exclamation mark to use the shell in the background.
In the next cell, we'll import the necessary libraries: “os” and “openai.” While we have the option to import Google's Colab drive, we won't need it for now.
If you want to use the drive later, you can import it with “from google.colab import drive”, but we'll use Colab's sidebar for file uploads instead.
Sign up at openai.com and get your API key. This key is crucial for accessing OpenAI's powerful language models.
Now, let's get that key into our Colab environment. Look for the folder icon on the left sidebar of your Colab notebook. Click it, and you'll see an option to upload files.
Use this to upload a text file containing your API key.
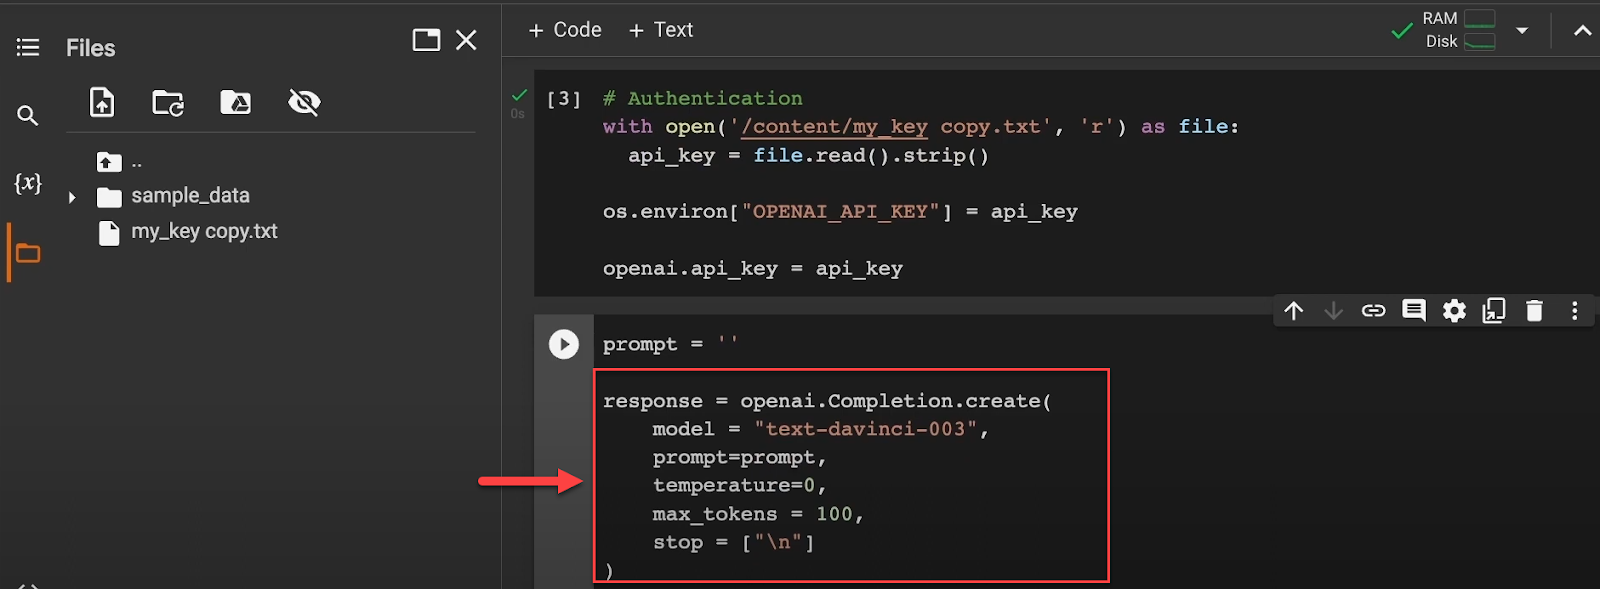
After uploading your API key file to Colab, copy its path. We'll use this path to read the file contents. Using the 'with open()' statement, we'll open the file in read mode ('r').
This approach allows us to securely access the API key without hardcoding it or using Google Drive import statements, keeping our code clean and our key protected.
Now that we've imported the “os” module, we'll store our API key as an environment variable for added security. We'll set “OPENAI_API_KEY” to our key value. Then, we'll use this environment variable to authenticate with OpenAI.
We have completed the authentication process by calling OpenAI and specifying our API key.
Now that we've set up our environment and authenticated with OpenAI, it's time to set up the response.
First, we need to create a response using OpenAI's Completion API.
Let's break this down:
We're using the "text-davinci-003" model, which is one of the most capable language models available.
The prompt is empty for now; we'll fill it later.
Temperature is set to 0, which makes the output more focused and deterministic.
We've set max_tokens to 100, limiting the response to 100 words.
The stop parameter tells the model to stop generating text when it encounters a new line.
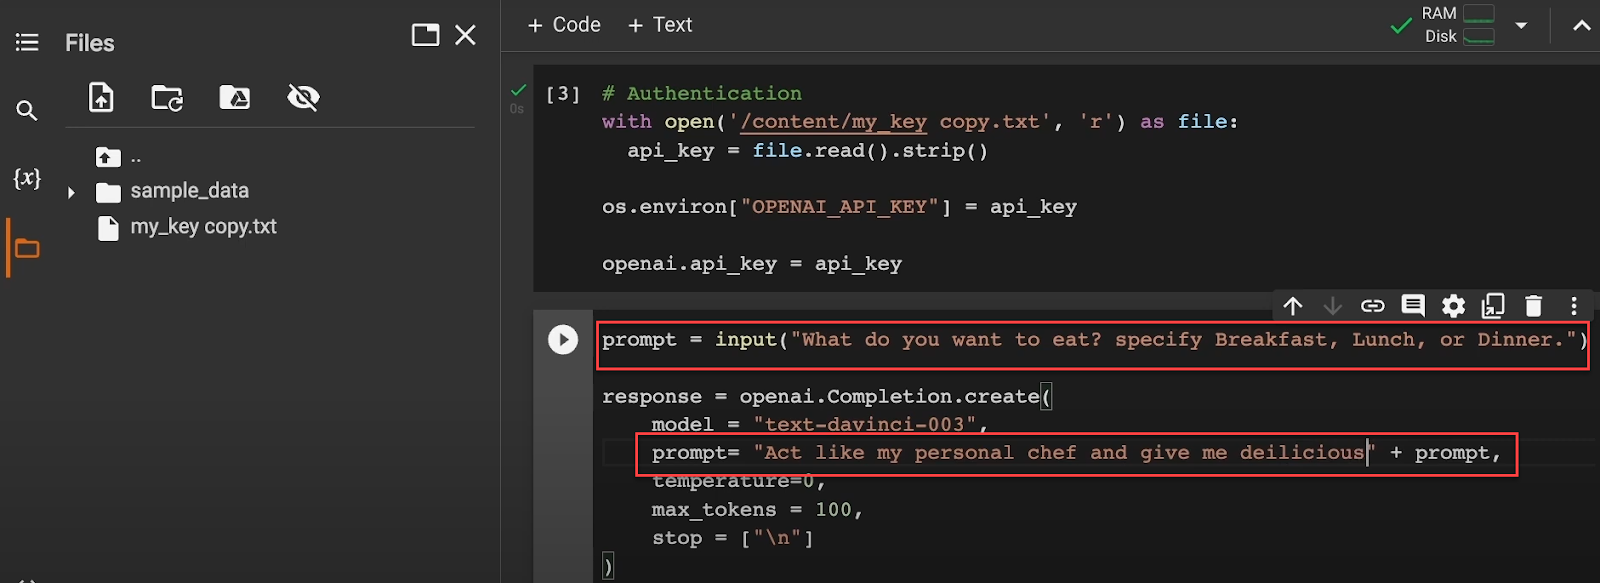
Now, let's create our prompt. We'll ask the user what they want to eat:
This prompt tells the AI to act like a personal chef and provide food suggestions based on the user's input.
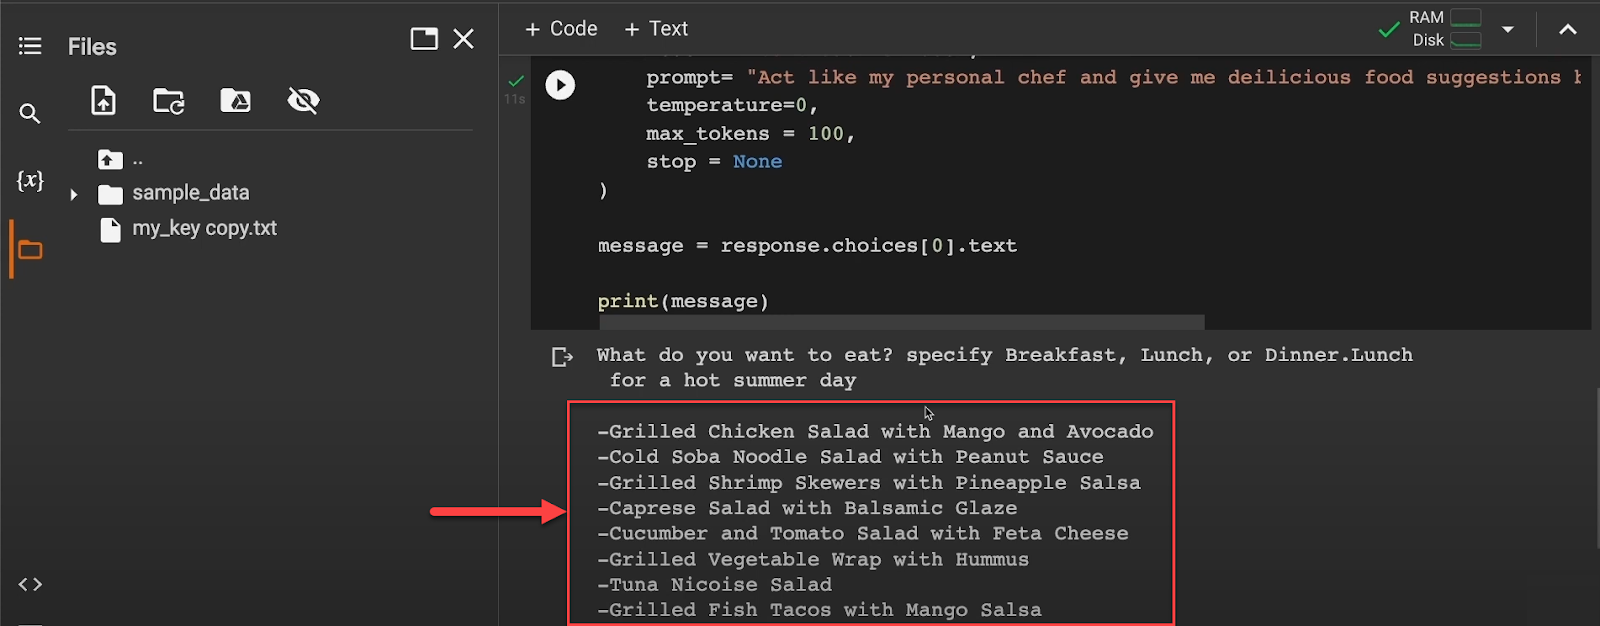
With our prompt ready, we can now generate and display the AI's response:
When you run this code, it will ask you what you want to eat, then use the OpenAI API to generate personalized food suggestions based on your input.
We've built a basic prototype of our app, but it's not yet production-ready. Our current setup uses environment variables linked to Google Drive, which isn't suitable for a live environment.
For a proper deployment, we'll need to use secure, server-side environment variables on platforms like Streamlit Cloud or Heroku to protect sensitive information.
Step 2: Create Your Streamlit App
Now that our prototype is functioning in Google Colab, it's time to elevate our project by writing production code and transforming it into a full-fledged Streamlit app.
We'll move our code to a local IDE (I'm using Visual Studio Code), create a new Python file for our app named app.py, and set up a GitHub repository. Then, we'll integrate Streamlit and prepare for deployment on Streamlit Cloud.
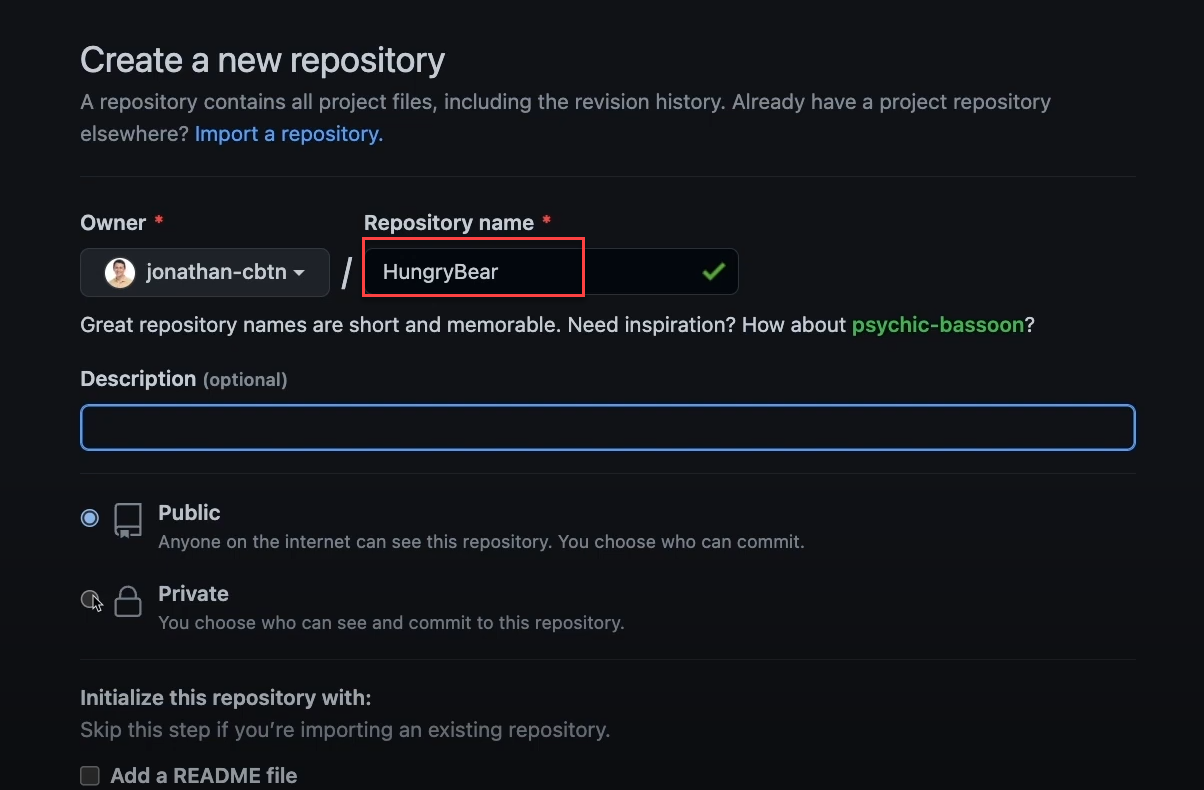
To set up our project, we'll create a GitHub repository called Hungry Bear using the website's interface.
After creating a private GitHub repository with a README file, we'll clone it to our local machine. You can use SSH (if set up) or HTTPS for cloning.
If using HTTPS, you must enter your GitHub username and password. Copy the appropriate URL, then navigate to your desired project directory in your local file system to clone the repository.
To clone the repository, open your terminal and navigate to your desired project directory. Run “git clone” followed by the GitHub URL you copied.
Once cloned, use cd to enter the new "Hungry Bear" directory. If you have installed Visual Studio Code's command line tools, type “code .” (code space period). This command opens my Visual Studio Code directly within that folder.
If you don't have that setup, you can do multiple things. You can click on that folder and drag it into Visual Studio Code, or you can go to Visual Studio Code and then open and find that folder.
Now, we'll create “app.py” and convert it into a Streamlit app. This will be the main file for your Streamlit app.
Here, we’ll import “openai” and “streamlit” as st.
We won't need OS because we're not going to use Drive. We're going to use Streamlit Cloud to host the keys, so we don't need to use Drive.
We also need to authenticate with OpenAI to use its services. Instead of using the Google method, we’ll configure the API key directly in Streamlit Cloud. This keeps the key private and secure. For this purpose, use the following code.
This code will fetch the API key stored in Streamlit Cloud.
After fetching the API key, let's enhance our app's appearance by adding a title and header.
Next, we'll add a text area to give instructions to the user. We'll prompt them to specify if they want breakfast, lunch, or dinner recommendations.
It provides a clear idea of what to write in the text box and guides the user effectively.
Step 3: Implement AI Integration
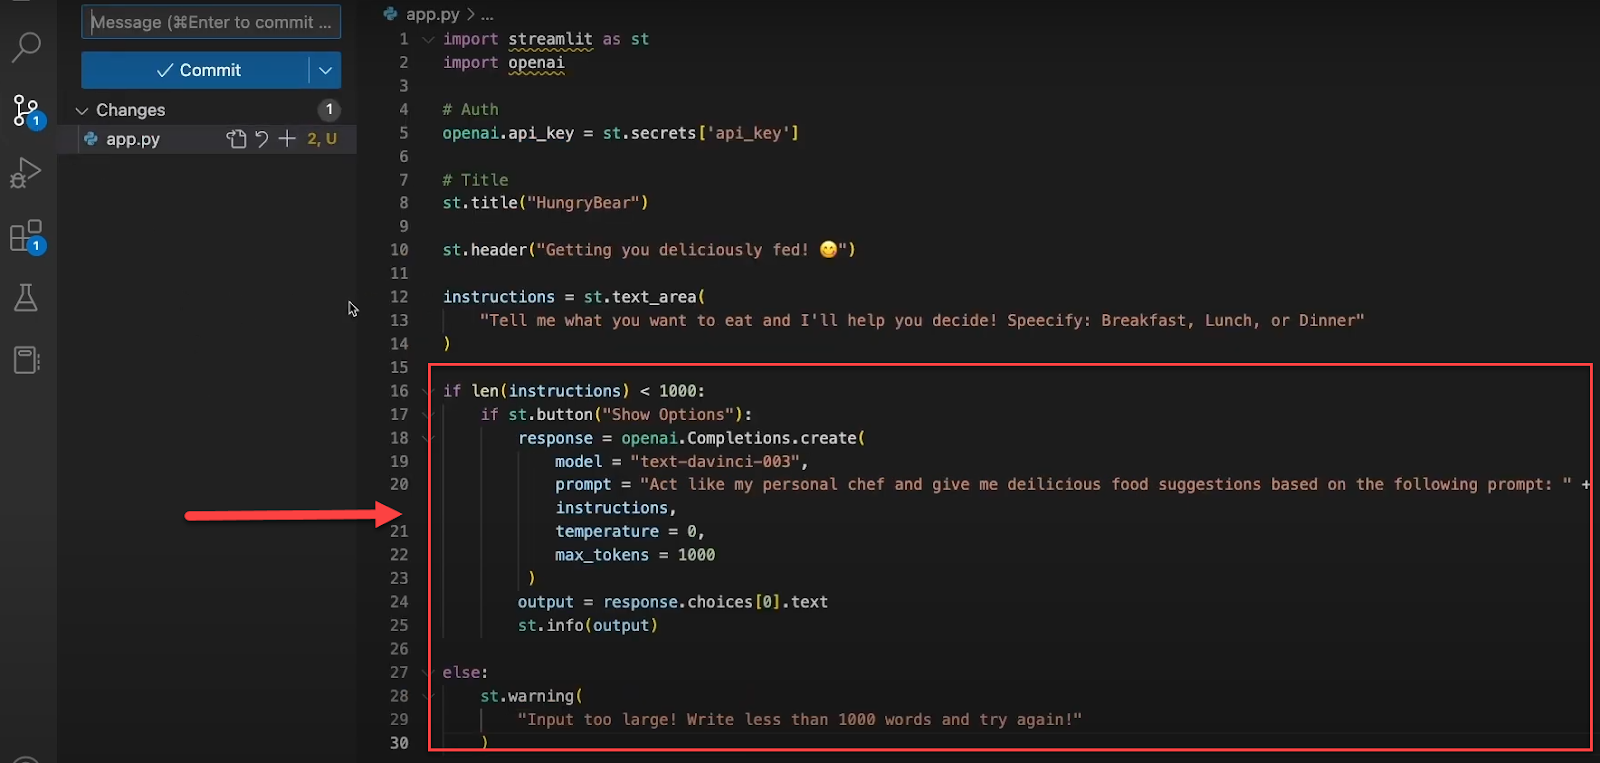
For the app's logic, we'll use some simple if statements. First, we'll check the length of the user's input to ensure it's not too long. We want to keep it under a thousand characters, not a whole paragraph. If the input is too long, we'll show a warning message.
Next, we'll add a button that says "Show options." When the user clicks this button, the app will process their input. Here's a simple breakdown of what we're doing:
Check Input Length: Ensure the user's input is less than a thousand characters.
Show Warning: If the input is too long, display a warning message.
Create a Button: Add a "Show options" button that the user can click to get recommendations.
Here's how it looks in the app:
The user types their food preference in a text box.
They click the "Show options" button.
The app checks the input length and either processes it or shows a warning if it's too long.
We'll also integrate OpenAI to get food recommendations. We specify the model (Davinci 3 for the best results) and set up the prompt to act like a personal chef. We'll add the user's input to this prompt and get the response from OpenAI.
Step 4: Version Control and GitHub
Now that we're in Visual Studio Code with our project open, it's time to push our code to GitHub. You can use any of the following options to push your code into GitHub.
Option 1: Using GitHub Website
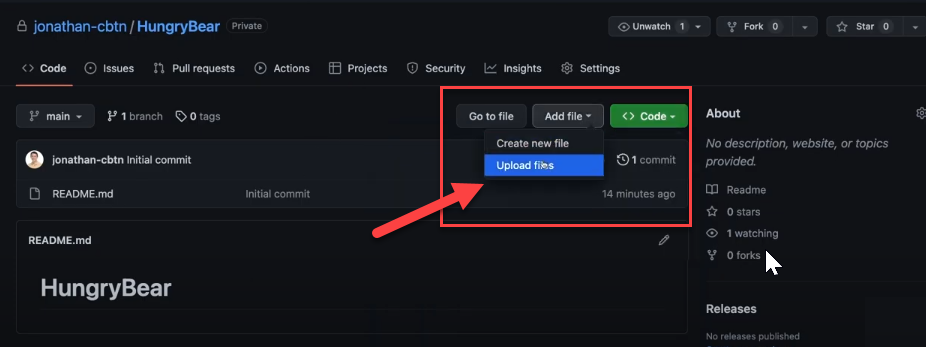
If you're new to Git or encounter any issues, don't worry. You can always use GitHub's web interface as an alternative. Simply go to your repository on GitHub, click "Add file," and upload your project files directly through the browser.
Option 2: Using VS Code
If you're comfortable with Git, you can use VS Code's built-in source control features. Start by making an initial commit: stage your changes, write a commit message like "Initial commit," and then commit. After committing, sync your changes to push them to GitHub.
Once you've pushed your changes, refresh your GitHub repository page. You should now see your "Hungry Bear" project files listed there. This step ensures your code is safely stored on GitHub and ready for collaboration or deployment.
Creating and Managing Dependencies
We need to create a requirements.txt file to ensure our app can be easily deployed and run on other systems. It will help ensure that all necessary packages are installed when your app is deployed. We'll get to that in a little bit.
While we could use “pip freeze” to generate this file automatically, it often includes many unnecessary packages. Since we're not using a virtual environment, we'll create the file manually.
We only need two dependencies for our Hungry Bear app: Streamlit and OpenAI.
Here's how to create the file:
In VS Code, create a new file named requirements.txt. Add these lines to the file and save it.
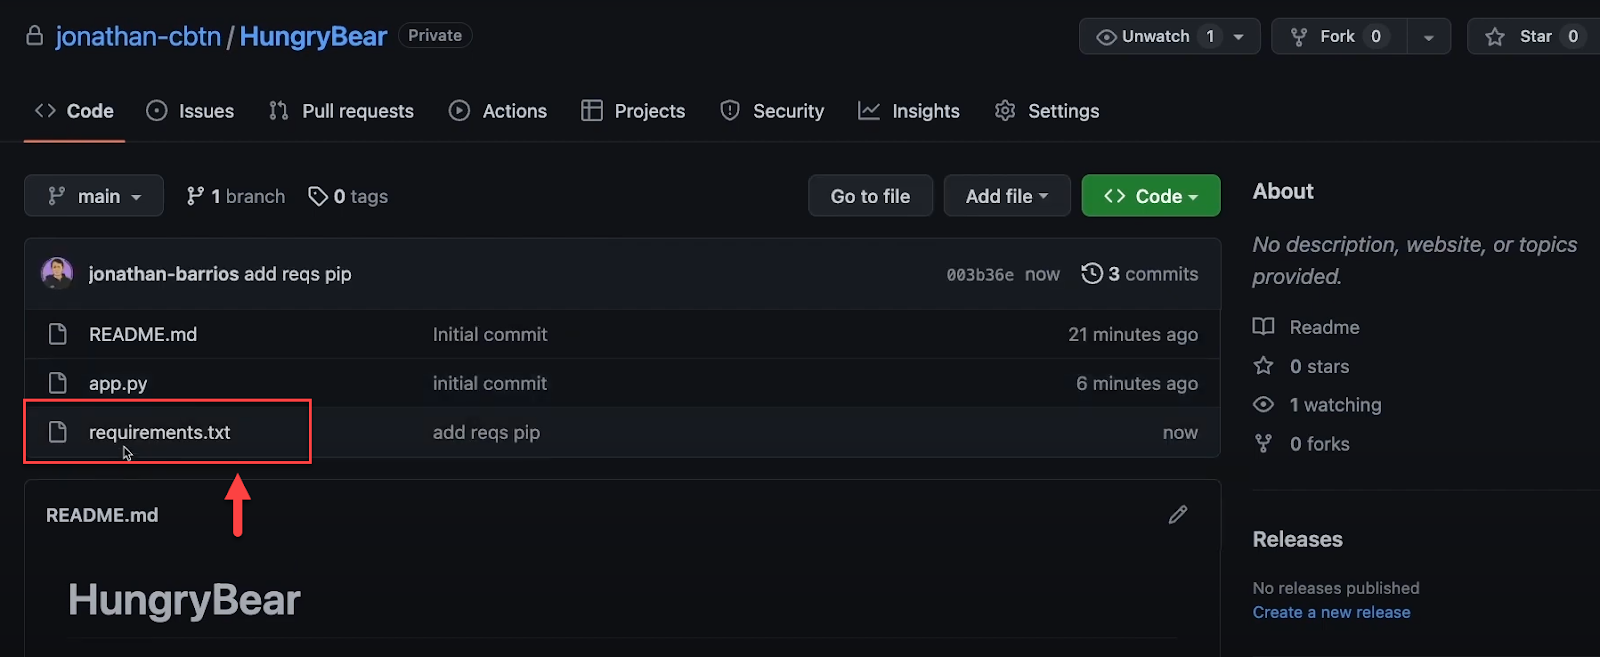
If we go back to that repository and reload this, you should see the “requirements.txt” file.
After creating “requirements.txt,” we need to push this change to our GitHub repository:
Stage the new file in VS Code's source control. Commit with a message like "Add reqs pip."
Sync changes to push to GitHub. Verify on GitHub that the requirements.txt file is now in your repository.
Step 5: Deploy on Streamlit Cloud
Now that our code is on GitHub, let's deploy it on Streamlit Cloud:
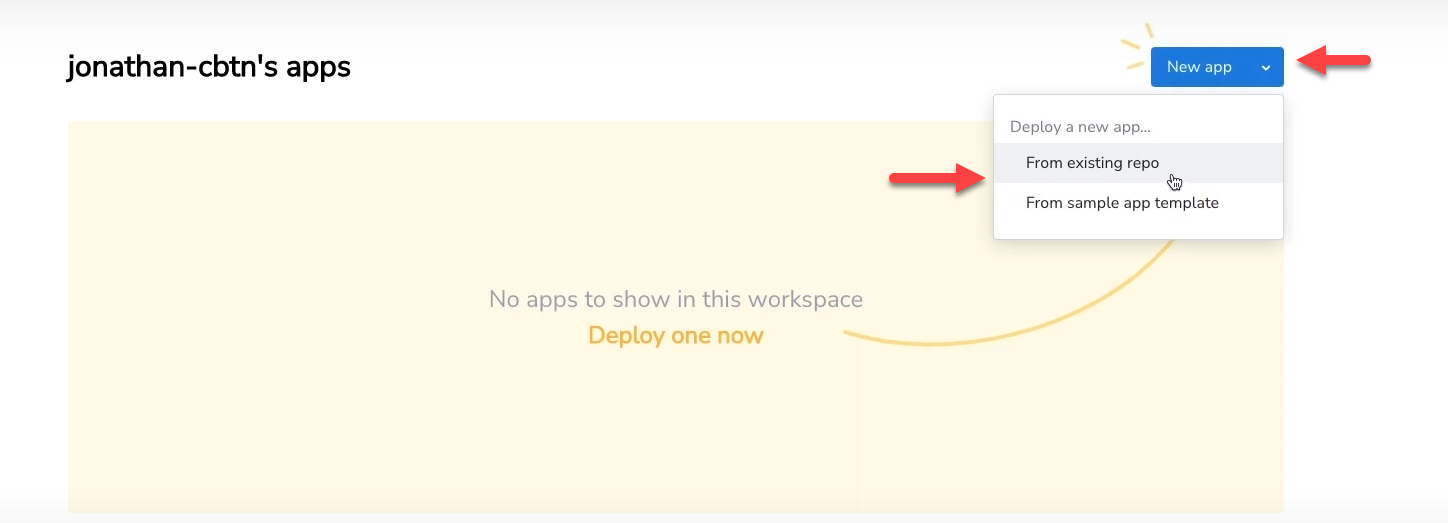
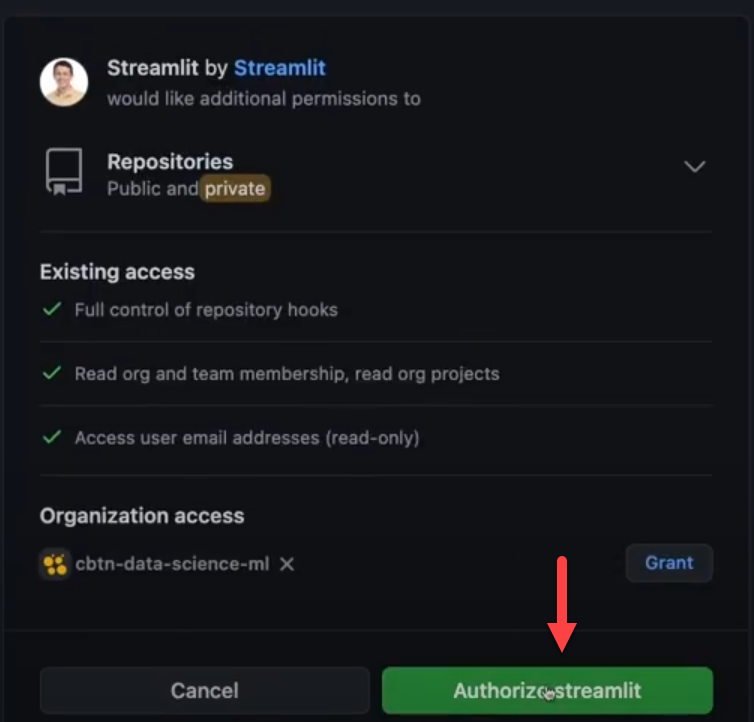
Go to Streamlit Cloud and click "New app." Select "From existing repo" and choose your Hungry Bear repository.
In the app's advanced settings, locate the "Secrets" section.
Add a new secret named "API_key" and paste your OpenAI API key as its value. Save the secret.
This securely stores your API key, keeping it hidden from public view.
By storing the API key as a secret in Streamlit Cloud, we ensure that our app can access it without exposing sensitive information in our code or repository.
With everything set up, it's time to click "Deploy" and watch your Hungry Bear app come to life on the web.
And there you have it! We've created a simple yet powerful AI-powered food suggestion app. When you run this code, it will ask you what you want to eat, then use the OpenAI API to generate personalized food suggestions based on your input.
Conclusion
Congratulations on building your first AI-powered web app from scratch! We've journeyed from Google Colab to Streamlit Cloud, creating a fun and practical application.
This project taught us how to design web apps and gave us a taste of the exciting possibilities at the intersection of AI and web development. If you're hungry for more, check out our comprehensive Python and Data Science course to deepen your skills.
Visit our main page for more IT tutorials and online training. We cover a wide range of topics, including cloud services, networking, cybersecurity, and various certifications.

