TUTORIAL
How to Do API Testing with Postman
by Marryam Mubariz
In this guide, we'll cover practical steps for API testing with Postman. We'll start with making an API request, understanding HTTP basics, and using Postman Collections and Variables.
We'll explore HTTP methods (GET, POST, PATCH, DELETE) and handle request parameters like query and path variables. We'll cover API authentication, working with JSON, and using random test data.
We'll automate tests with JavaScript, use Postman's Collection Runner, set up monitors for continuous testing, and introduce Newman for CLI-based runs and HTML reports.
Project Overview
SKILL LEVEL: Entry-Level
TIME TO COMPLETE: 2-3 Hours
ESTIMATED COST: N/A
YIELD: API testing with Postman
What You'll Need: Resources/Tools
Postman: Main API testing platform
API Documentation: For understanding the API structure
Node.js: Required for Newman
Newman: Command-line runner for Postman collections
HTML Extra Reporter: For generating detailed test reports
JavaScript: For writing automated tests
Postman Console: Built-in debugging tool
Postman Collection Runner: For running multiple requests
Postman Monitors: For scheduled automated testing
CI/CD Tools: For integrating API tests into development pipelines
Before you Begin
Before you begin, ensure you have Postman installed and a basic understanding of APIs. You'll need an API to test (we'll use a sample book API) and Node.js to run Newman later.
Some JavaScript knowledge is helpful but not essential. Install Postman from postman.com, set up your workspace, and familiarize yourself with the interface. With these preparations, you'll be ready to dive into API testing with Postman.
Have you ever felt frustrated trying to test APIs? It can be tricky and time-consuming, right? In this guide, we'll cover practical steps for API testing with Postman and show you how Postman simplifies this process, making it more efficient and reliable.
We'll start by explaining API testing and why it's crucial for ensuring your applications function correctly. You'll learn how Postman is a user-friendly intermediary between you and APIs, eliminating the need for complex code writing.
But before we dive into Postman, let's take a step back and understand what API testing really is.
What is API testing?
API testing is the process of verifying that an application programming interface (API) functions correctly, securely, and reliably. It's like testing a vending machine: you put in a request (like pressing a button) and see if you get the right item back.
Testers send different requests to the API and make sure it responds correctly, doesn't break, and keeps information safe. This helps catch problems before real users encounter them.
What is Postman?
Postman is a helpful tool for talking to web services called APIs. It's like a friendly middleman between you and the internet. Instead of writing complicated code, Postman lets you easily send messages to APIs and understand their answers.
Postman automation testing simplifies working with APIs, whether you're building apps or checking if they work correctly.
For beginners, Postman is incredibly useful, as it provides a user-friendly interface and powerful features like Postman pre-request scripts.
When comparing Postman vs Swagger, you'll find that Postman offers robust REST and SOAP API testing capabilities.
Postman for SOAP API testing ensures that you can work with a variety of web services seamlessly. Postman is really useful for anyone who needs to use or test these online services.
Why Use Postman for REST API Testing
Postman makes API testing easy and efficient. It lets you send requests to APIs without writing complex code, making Postman an ideal choice for REST API testing. You can quickly check if APIs work correctly, save your tests, and run them again later.
It also helps you organize your work, share it with others, and automate testing. It's user-friendly, saves time, and reduces errors in API testing.
How to Install Postman
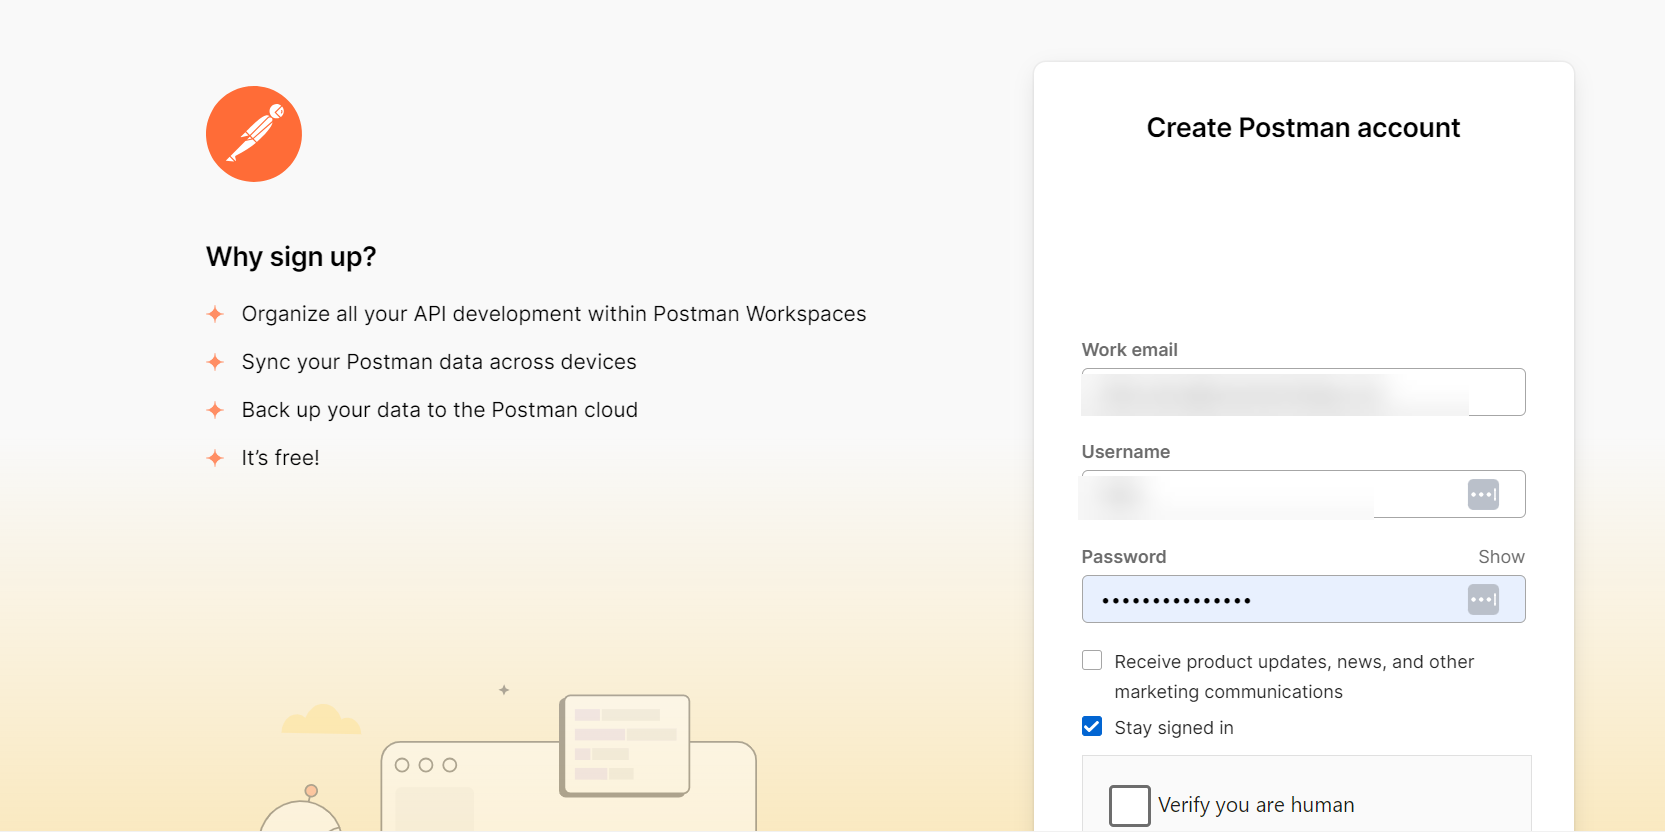
Visit postman.com to sign up for an account. The setup process is straightforward.
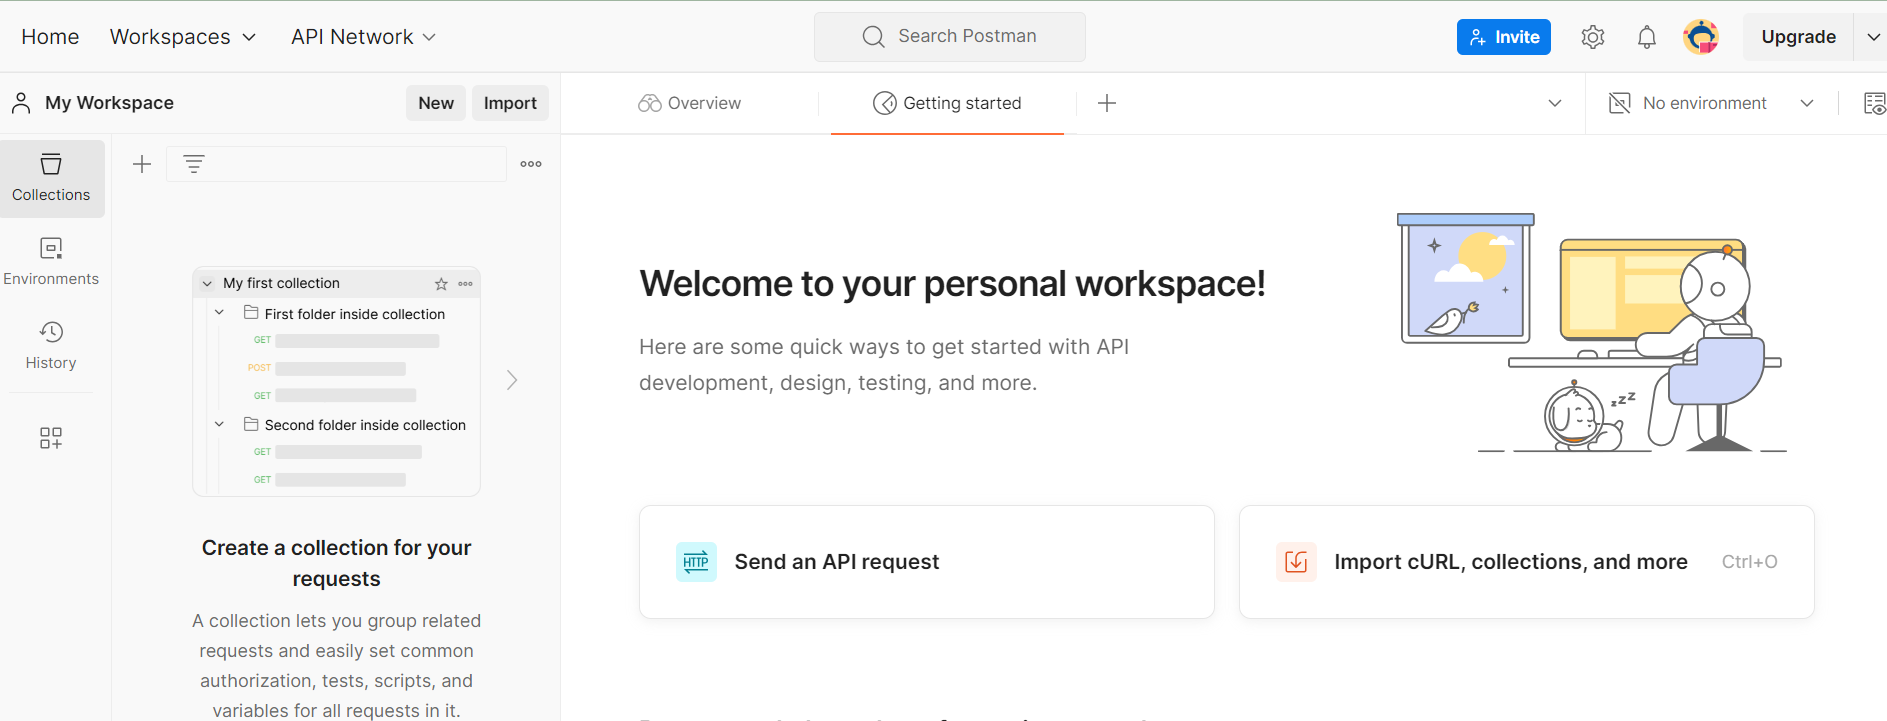
After signing up, you'll see your personal Postman workspace, which offers options to create collections, send API requests, and import existing resources to help you get started with API development and testing.
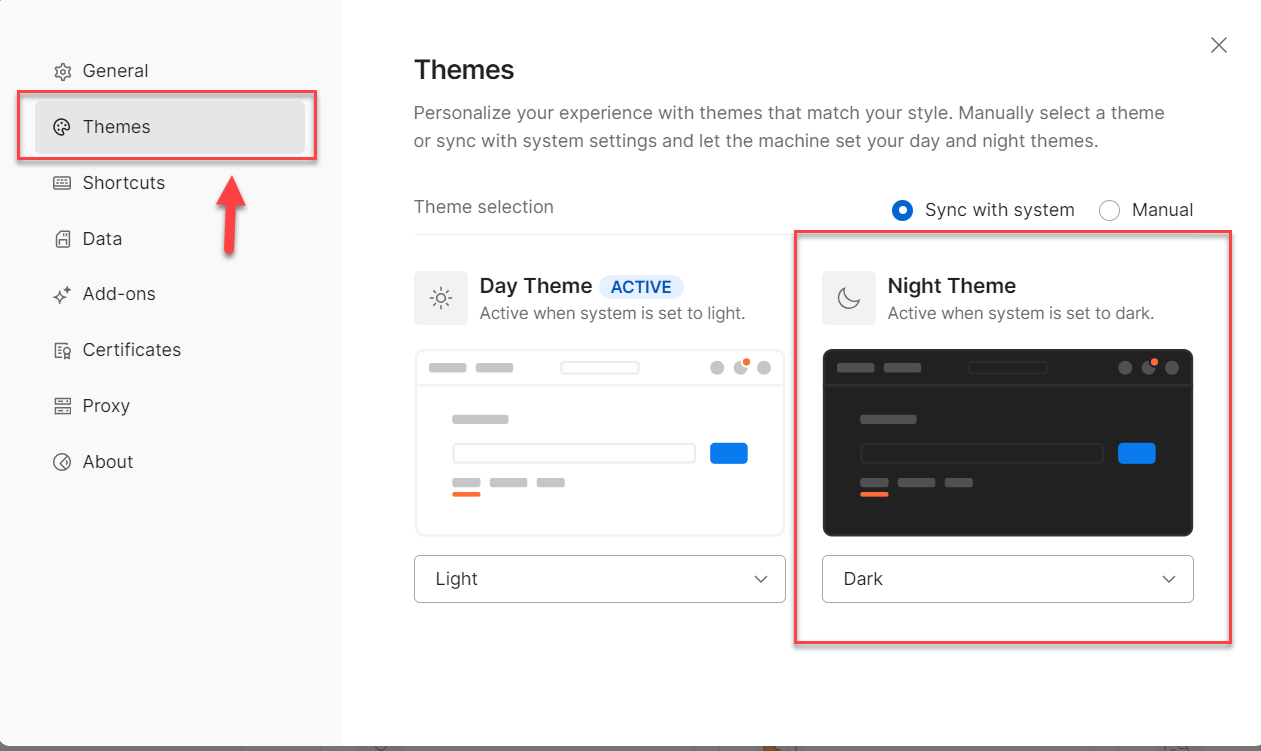
When opening Postman for the first time, I like to change it to the black theme. To do that, simply locate the settings. From the tab with themes, I'll select the black theme and simply close this.
How to Create and Run API Tests with Postman
In this Postman API testing tutorial, we'll explore API testing with Postman, focusing on practical steps. We'll start by making our first API request, understanding HTTP basics, and working with Postman Collections and Variables.
We'll learn to use different HTTP methods (GET, POST, PATCH, DELETE) and handle request parameters, including query and path variables.
We'll also cover API authentication, work with JSON, and use random test data. We'll automate our tests using JavaScript, leverage Postman's Collection Runner, and set up monitors for continuous testing. Finally, we'll introduce Newman for CLI-based collection runs and generating HTML reports.
Here are each of these steps in greater detail.
Making Your First API Request
Let's start using an API in Postman by ordering a book. The first step is to understand how to interact with the API, which begins with reviewing its documentation. This documentation provides details on how to use the API and what endpoints are available.
For this course, we’ll use an API that lets us view and order books. The documentation shows the API’s base address and available endpoints. The first endpoint that we should look into is the status endpoint.
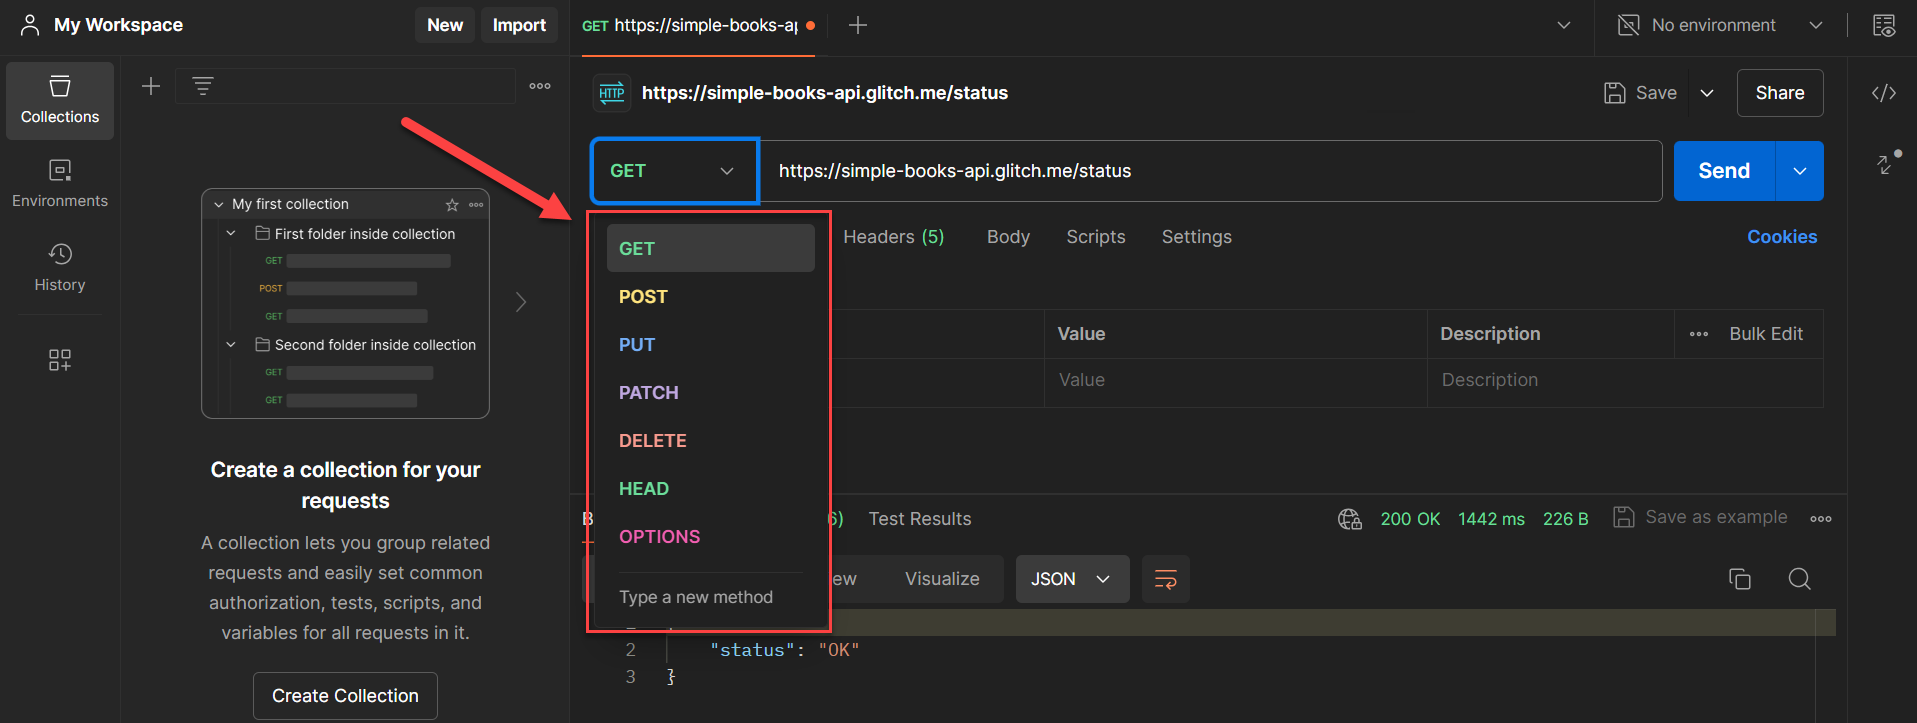
To test this, copy the API address and open Postman. Select your workspace to keep things organized. Open a new tab in Postman, paste the API address, and append "status" to it. All requests to this API must include this address here. Click the "Send" button to make the request.
The response, displayed at the bottom of the screen, should show "status okay," confirming that the API is working and ready for use.
Understanding HTTP Basics
Next, let's take a closer look at what happened. The address we’re using starts with HTTPS, which stands for Hypertext Transfer Protocol Secure. It means our connection is secure. While most APIs use HTTPS, for our demonstration, HTTP and HTTPS will work the same way.
When Postman (our client) talks to the API (our server), they exchange HTTP messages. The message Postman sends is called a request, and the message the API sends back is called a response.
In Postman, the request is set up at the top of the screen. Here, you can configure various aspects of the request. It includes the URL, which is the address of the API, and the endpoint combined into one address.
You also select the request method (like GET or POST), which we’ll discuss later. You can specify headers, and Postman automatically adds some for you.
For a GET request, you don’t need to specify a body because GET requests retrieve data rather than send it. However, for a POST request, you will need to include a body.
At the bottom of the screen, you’ll see the response. It includes the status code (e.g., 200 for success) and headers, which provide additional information like 'Content-Type' indicating JSON format ('application/json'). This helps Postman display the data correctly.
The most important part is the response body, containing the actual data returned from the server. This is where you'll find the information you requested from the API.
Postman Collections and Variables
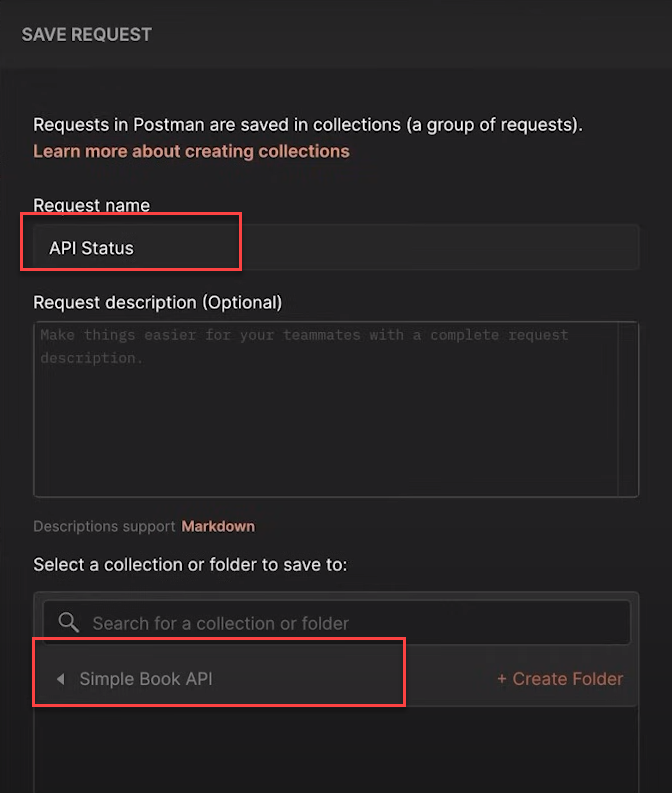
To save and reuse this request later, click Postman's 'Save' button. You can name the request, for example, 'API Status.' However, you can't save it directly; you need to create a collection first.
A collection is a list of multiple requests, usually related to the same API. If you work with multiple APIs, you'll have separate collections for each. Click 'Create Collection,' name it 'Simple Book API,' and click the check mark. The request will be saved in this collection.
Using Postman environment variables can help manage different settings and data across these collections efficiently.
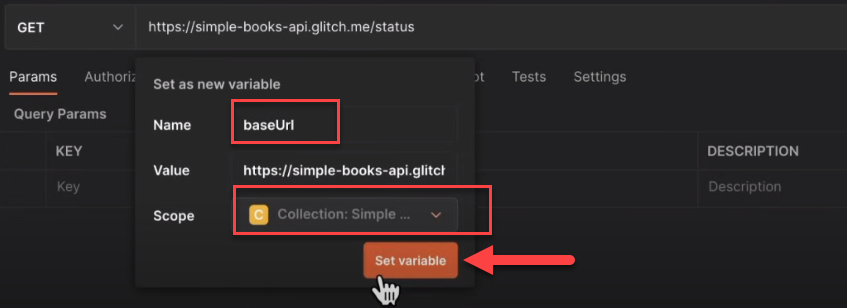
In Postman, it's best to avoid hardcoding addresses or configurations in requests. Instead, use variables. Select the address and click 'Set as Variable.' Choose 'Set as a New Variable,' name it 'base URL,' and ensure it doesn’t include the final slash.
Set the scope to 'collection' so the variable is saved within the collection. This way, you can manage the address from a single place.
When you run the request again, you’ll notice no difference. Postman replaces the variable with the address and sends the request as usual. This approach keeps everything neatly organized in one place.
Working with Request Parameters
Now, let's check the /books endpoint to get a list of books.
In Postman, open a new tab and paste the address we have. You’ll notice the base URL variable won’t resolve and will show as an 'unresolved variable' since it’s only available in the collection, and this request isn’t saved there yet. Click 'Save,' choose the 'Simple Books API' collection, and name the request 'List of Books.'
We need to send a GET request to the /books endpoint. By default, Postman sets the method to GET. Enter the base URL followed by /books, and you're ready to go.
Click the 'Send' button to see what happens. At the bottom of the screen, you'll see the response. A status of 200 means the request was successful. You'll see a list of books in JSON Format.
Query Parameters
Query parameters are extra data we can include with our request. Depending on the API, they can be mandatory or optional.
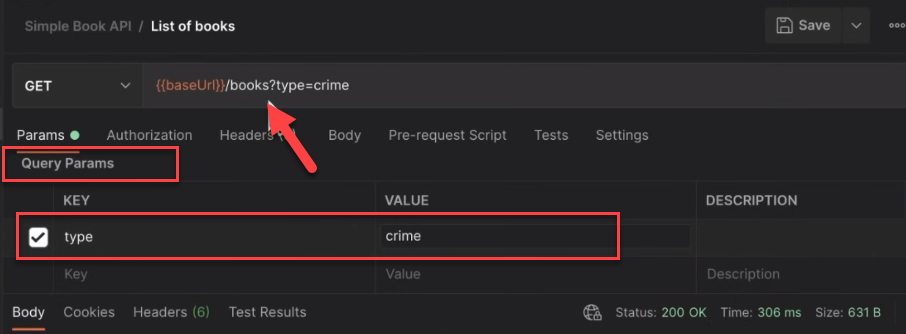
For example, in Postman, under 'Params,' you can add a query parameter like 'type' with the value 'crime.' As you type, you'll see the address update with the query parameter in the format ?type=crime.
Using this parameter, the books should be filtered to only show crime books. However, if the status changes from 200 to 400, it means there's an error.
A 400 status indicates a bad request, meaning the API understood your request but found it incorrect. The response body will often provide more details.
For example, it might say 'invalid value for query parameter type,' explaining that the 'type' parameter must be 'fiction' or 'non-fiction.' Changing 'crime' to 'fiction' will correct the error, and the response will show only a list of fiction books.
Path Variables
We now have a list of books, but there's a lot of information for each book. To get detailed information about a single book, we need to use a different endpoint.
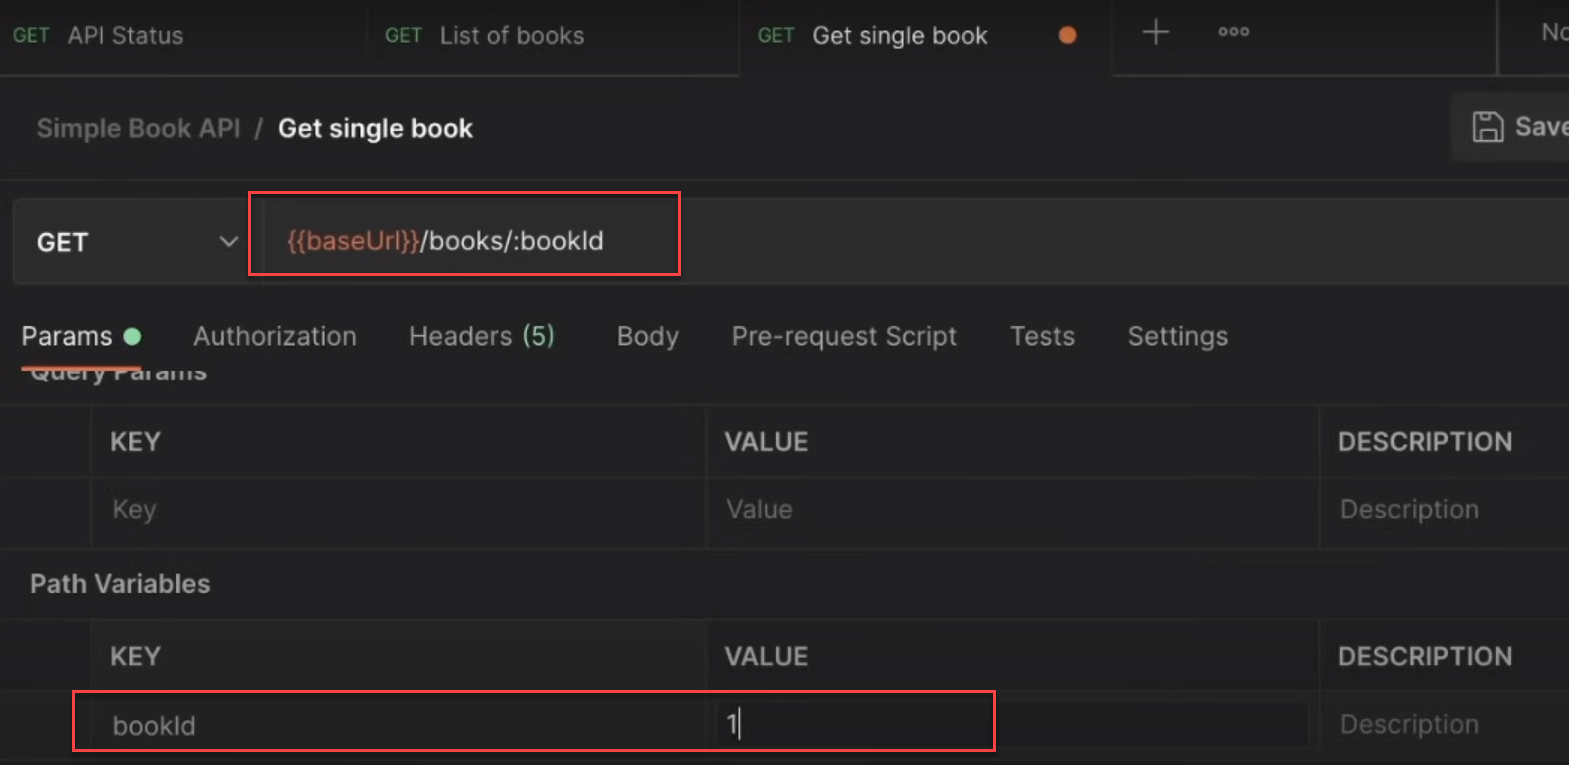
First, copy the path for the single book endpoint from the documentation. Open a new tab in Postman, paste the path, and include the base URL.
Save this request in the collection and name it "Get Single Book." Once saved, you can use the variable syntax with double curly braces {{baseURL}}.
The 'bookID' in the address is a path variable, which changes to represent the specific book you want details about. This endpoint allows us to specify the bookID to get more information on a particular book.
Let's edit the path variable 'bookID' and set it to 1. After a few seconds, you'll see that we now have detailed information for just one book.
POST Request / API Authentication
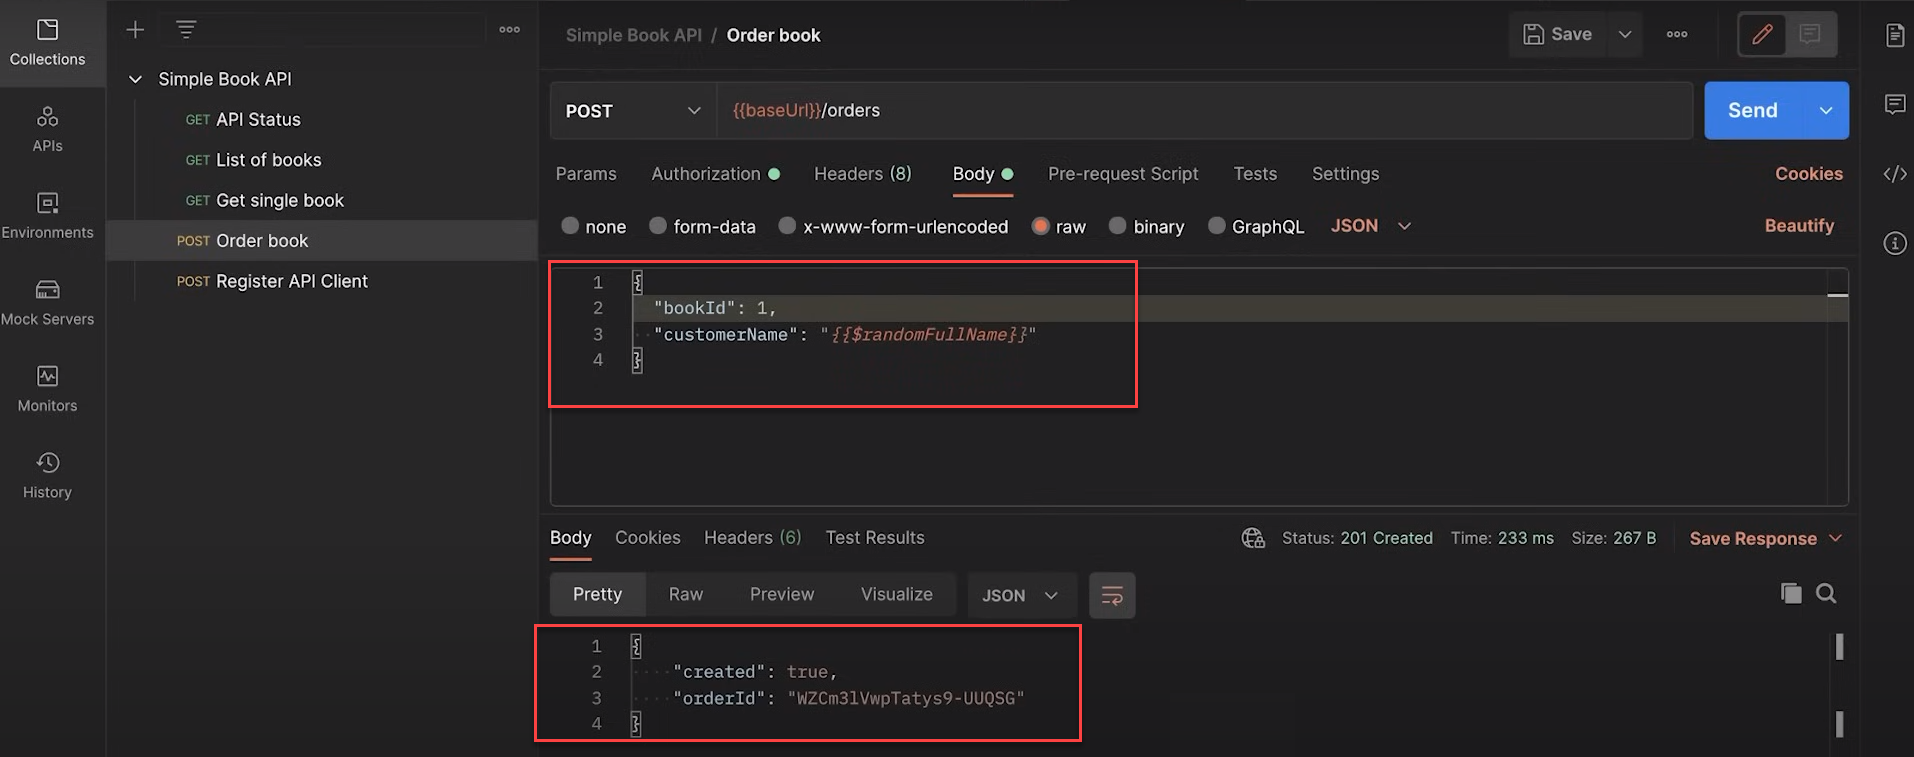
If you've identified the book you want to order, the next step is to submit an order. The endpoint we need is 'orders,' and this requires a POST request, as we are sending data.
Copy the endpoint and create a new POST request in Postman. To save time, you can duplicate an existing request in your collection by clicking the three dots next to it and selecting 'Duplicate.' Rename this new request to 'Order Book.'
Switch the method to POST since a GET request won't work for this. You'll need to provide a body for the POST request.
After setting up the request, click 'Send' to see the response. We'll get a 401 Unauthorized error with the message 'Missing Authorization Header.'
Some API endpoints, like status or books, are public and don't need authentication. However, endpoints that create data, such as placing an order, often require authentication.
To resolve this, check the API documentation for authentication details. It mentions that to submit or view an order, you need to register your API client. The API client, in our case, is Postman—client-server communication.
It means we need to register with the API so it can identify who is sending requests and creating data. APIs use various authentication methods, but a common one is obtaining an access token through registration. This token acts as a temporary password for authenticating your requests.
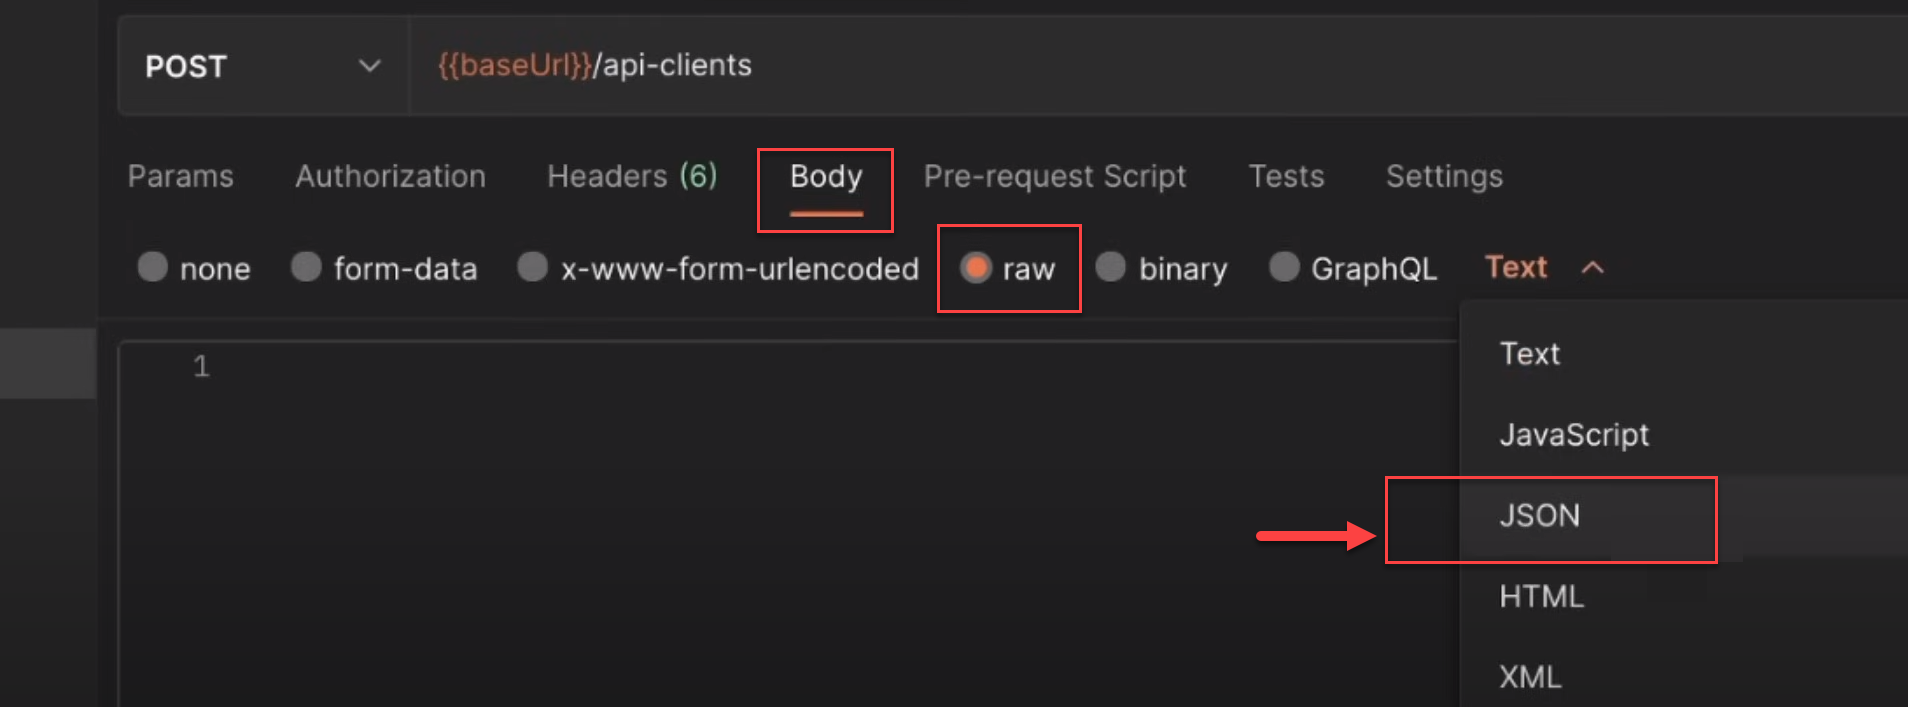
We need to submit a POST request to the /api/clients endpoint with a JSON body. First, duplicate the 'Order Book' request and rename it 'Register API Client.' Change the endpoint to /api/clients. Select the POST method, as it allows us to submit a request body.
Go to the 'Body' tab, choose 'Raw,' and select 'JSON' from the dropdown to submit the JSON request body.
It's crucial to ensure the JSON is valid. If you see red indicators, it means there's an error, such as missing double quotes.
We are sending our name and email address in this JSON.
Now, everything looks good, so I will click on Send. This time, we get a 201 Created status code, indicating success.
Like the 200 status code (OK), any status code starting with 2 generally means the request was successful. Codes starting with 4 indicate a client error, while codes starting with 5 indicate a server error.
Double-click the token to copy it, then go to your collection, click Edit, and open Variables. Enter "Access Token" as the variable name.
For security, don't provide the token in the initial value field if you're sharing this with others. Instead, paste it in the current value field, which Postman will use for your requests.
I want to ensure this access token is saved because resubmitting the request with the same data will result in an "API client already registered" error and a 409 Conflict status code. It means the client has already been registered.
To avoid this, use a different email address, which doesn’t need to be real for this API.
Now that we have the token, we can close this request and return to our POST request. Previously, we encountered a "missing authorization header" error.
APIs typically don't provide forms for username and password, so we need to include this information in our request headers. While some APIs allow adding authentication info as query parameters or in the body, it's common to use headers.
Postman has already added some headers for us, like the user agent, which identifies the requester and specifies accepted response types.
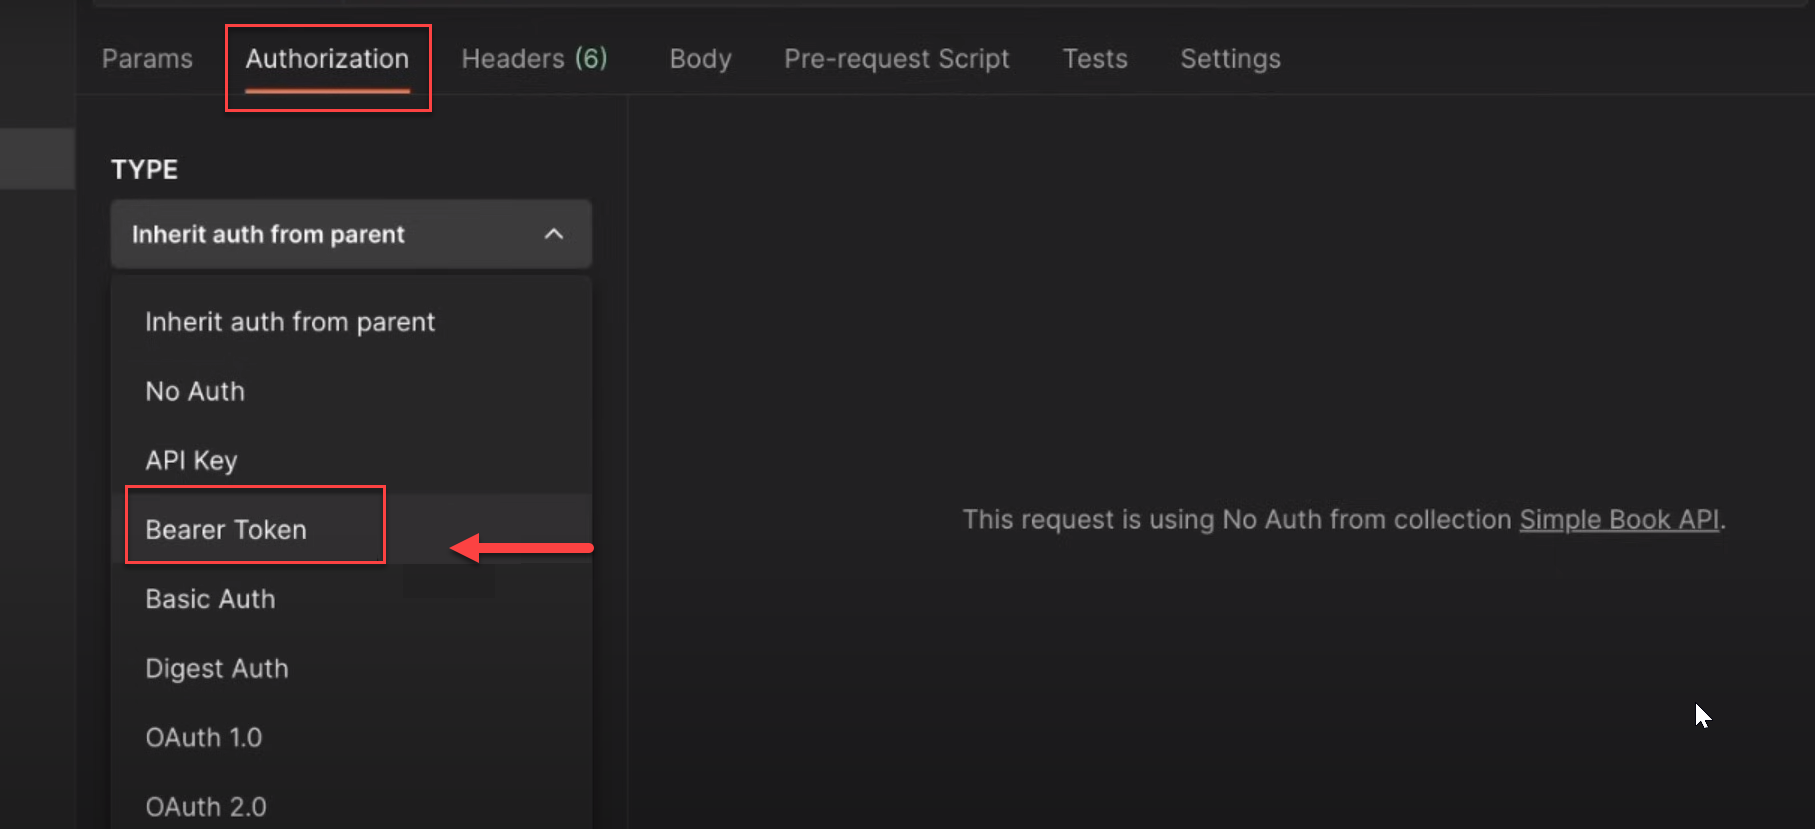
Now, we need to add the authorization header. Postman simplifies this process for us.
Click on the Authorization tab to access different types of authorization helpers. Since we have a token, select the Bearer Token option.
Instead of manually entering the token, use the variable by typing {{accessToken}}. If the request is saved in the collection, you can hover over the variable to see its value.
Postman will automatically generate the Authorization header with the correct format: "Bearer [token]." This saves us from manually configuring the header.
Now, click Send. This time, we won't get a 401 error but a 400 Bad Request indicating "invalid or missing book ID." We'll address that next.
JSON format
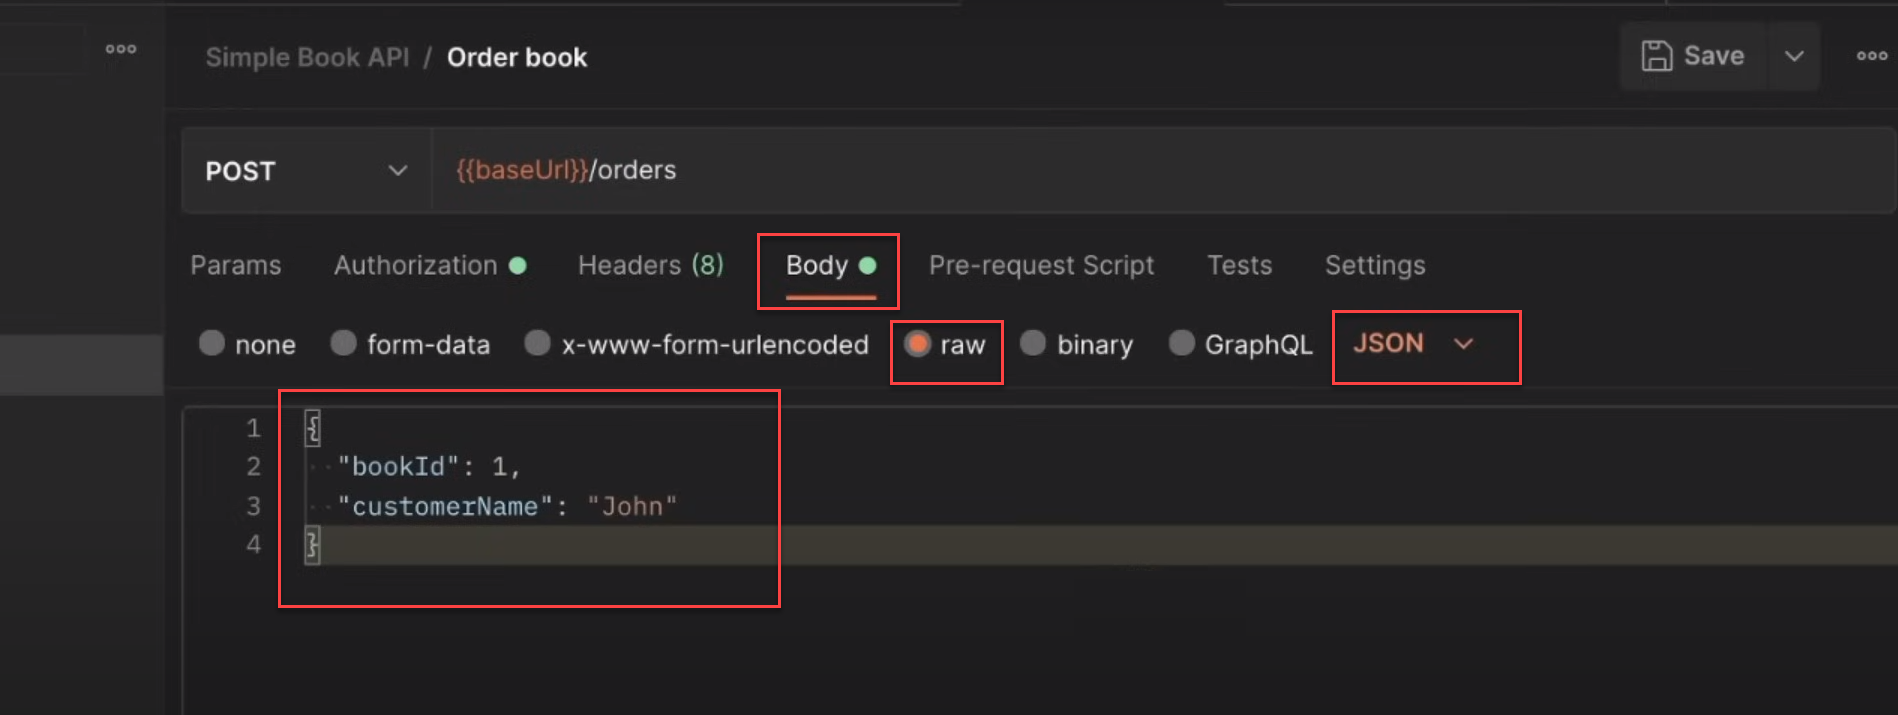
To avoid the above error, we have to submit a request body in a JSON format and include these properties.
bookid:
customerName:
Remember that you need to submit valid information to the API. If you're submitting an invalid JSON, the API will not be able to understand what you mean.
Random Test Data
When testing APIs, especially when sending data, we often reuse the same data repeatedly, which can prevent us from identifying issues. Testing with various values is beneficial to ensure the API works correctly. For instance, instead of using the same customer name like "John," we can generate random names using Postman's functionality.
To do this, replace "John" with double curly braces {{ }}, enter a dollar sign, and select a random variable, such as {{randomFullName}}. This will generate a different name each time you send a request.
The problem now is we're sending something, but we have no idea what we sent.
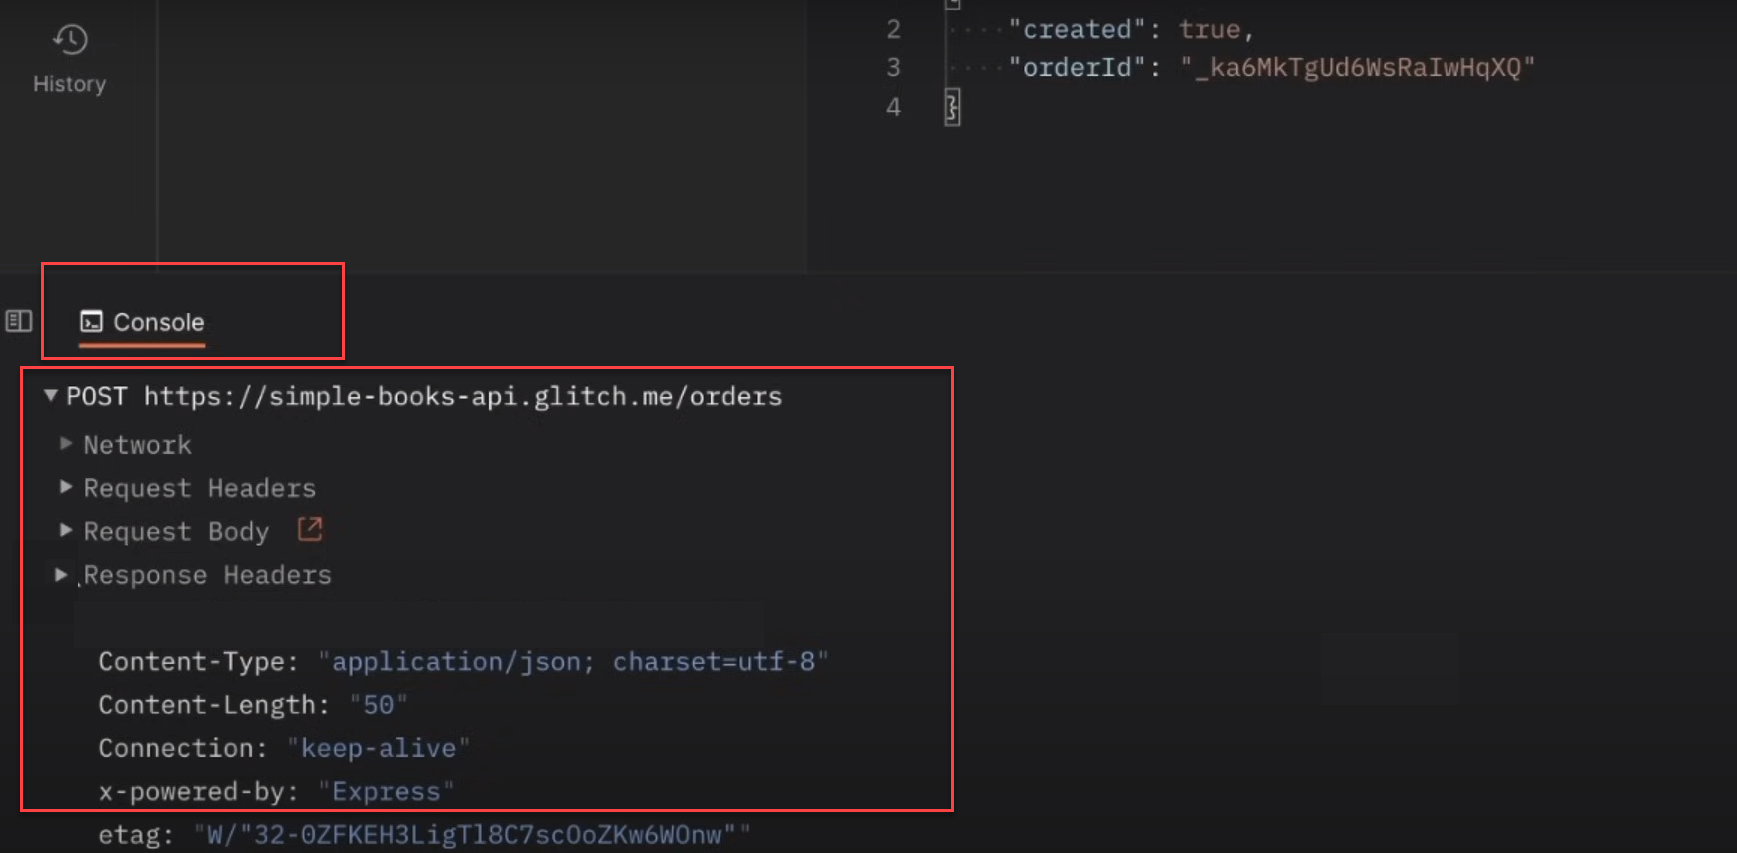
Fortunately, Postman also provides a console for debugging. Open the Postman console at the bottom of the screen, clear any unnecessary logs, and send the request again.
The console will display the full request details, including headers and the request body. This helps you see what data was sent and troubleshoot any issues.
For example, if you receive an error indicating a book is not in stock, check the console to see the book ID and customer name sent in the request. This tool is invaluable for understanding and debugging API requests.
Viewing Existing Orders
We have submitted a few orders, so let's check how many orders we have. The API documentation shows a "get all orders" endpoint, which uses the same /orders endpoint but with a GET request instead of POST.
In Postman, duplicate the previous request and rename it "Get all book orders." This duplicated request will retain the authorization header. Change the request method to GET.
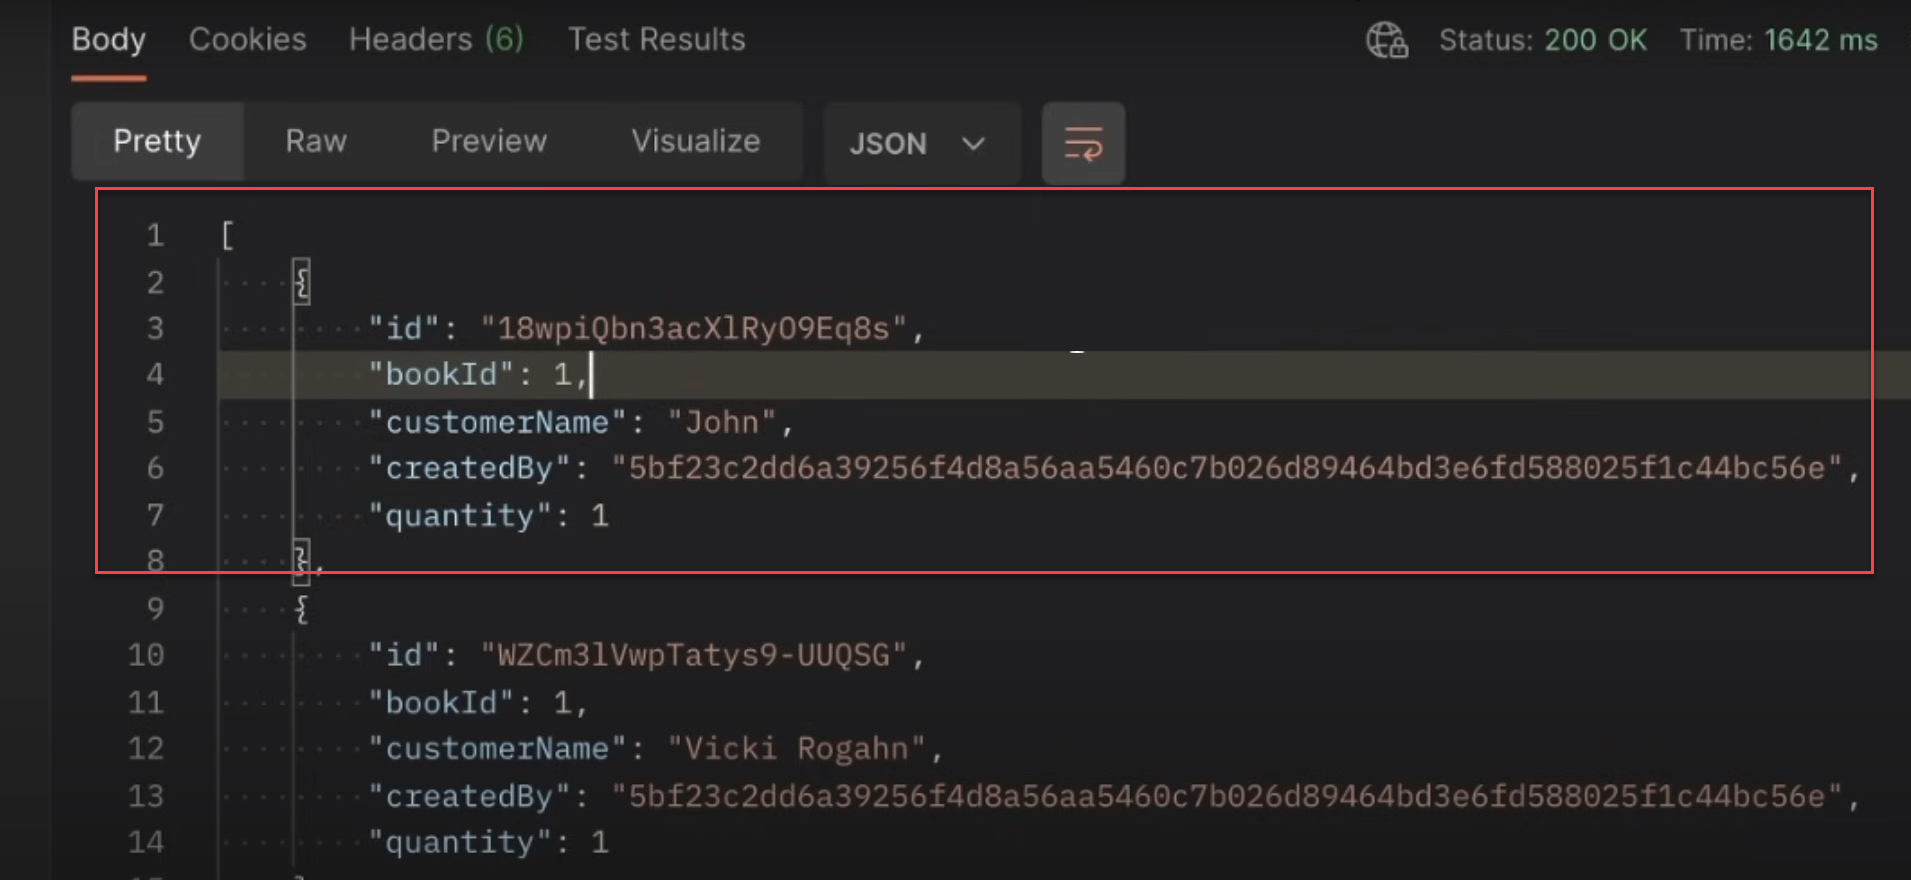
When you send this GET request, you'll receive a list of all orders, each with an order ID, book details, customer name, quantity, and other information.
The orders were created using Postman's random name generation, ensuring different customer names. This list shows all the orders we've made.
PATCH Request
I'm not happy with the customer name "John" as it's not a full name. Instead of creating a new order, let's update the existing one. The API documentation provides an "update an order" endpoint using the PATCH method to change the customer name.
To update the order, duplicate the GET request, rename it for easy identification, and switch the method to PATCH. Ensure the order ID is included.
Select the "Body" tab, choose "Raw," and set the format to JSON. Replace the customer name with a new one, using Postman's random variable if desired.
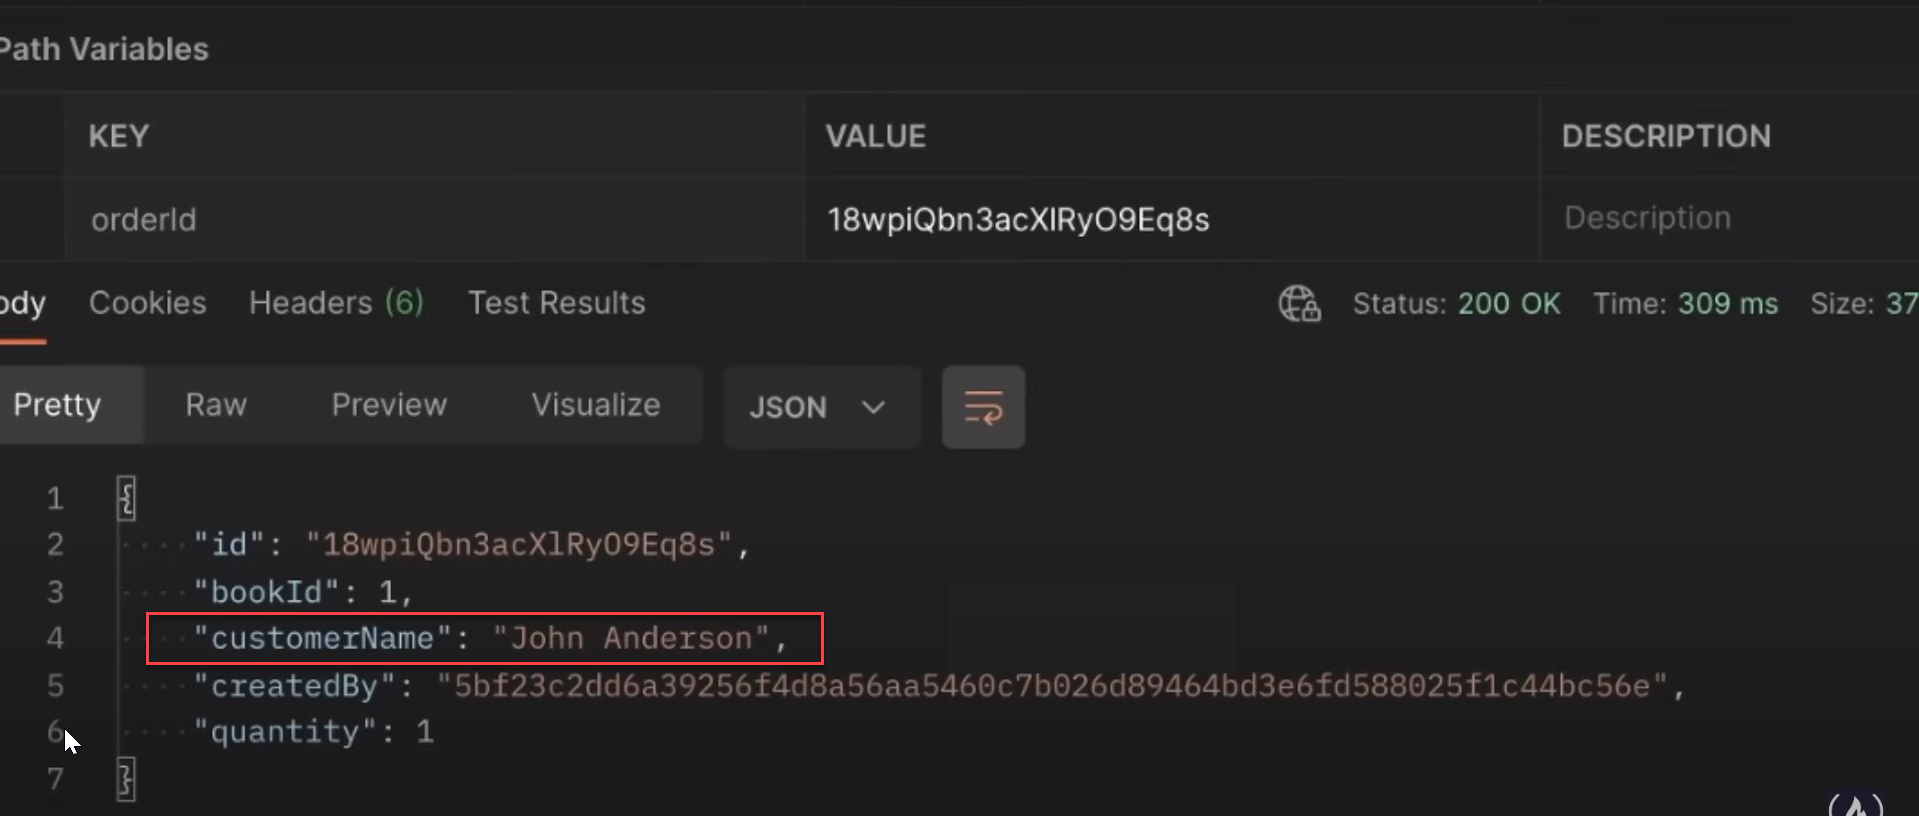
Send the request. A 204 status code indicates success, even without a response body. When you retrieve the order again, you'll see the customer name has been updated to "John Anderson," while the order ID and book details remain unchanged.
DELETE Request
If we have too many orders and need to delete some, we can use the DELETE method. While PATCH updates information, DELETE removes an order. The path for getting, updating, or deleting an order remains the same; only the HTTP method changes.
To delete an order, we don't need a request body—just the order ID. Always refer to the API documentation, as different APIs may handle requests differently.
To delete an order, duplicate an existing request and rename it "Delete Order." Change the method to DELETE. Ensure the order ID is included, then click Send. A 204 No Content status indicates success.
Verify by attempting to retrieve the deleted order; it should no longer exist, and the total number of orders will have decreased.
Save this request to the collection. If you have many open tabs, you can close them all. If there are unsaved changes, you'll be prompted to save. For temporary data tabs, click the three dots and select "Force Close All Tabs" to close without prompts.
API Test Automation with Postman
Now, we'll focus on automating the testing of this API. So far, we've worked with the API manually, but this is time-consuming and tedious. Our goal is to automate this process using Postman, allowing it to verify the API for us by writing API tests.
Your First API Test
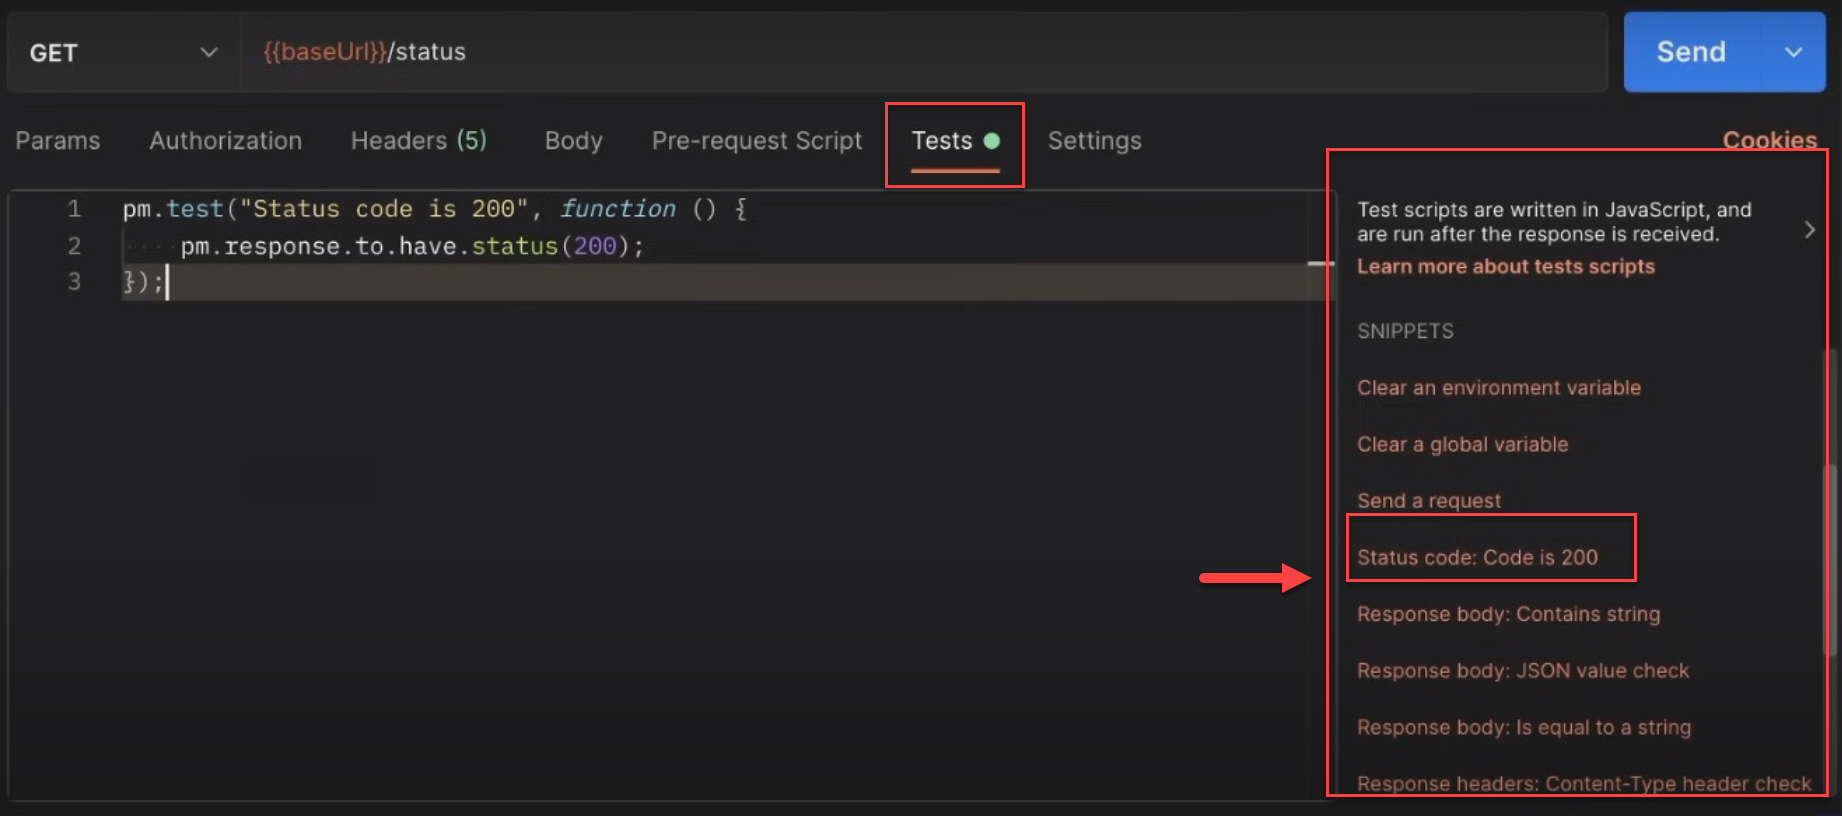
Instead of manually inspecting responses, we can write tests in JavaScript to let Postman verify the status code and response body for us. This process is done in the "Tests" tab of the request.
Postman provides code snippets that help you quickly write JavaScript tests without much coding. This is great for beginners.
To write a simple test to check if the status code is 200, scroll through the snippets and find one labeled "Status code is." Clicking on it will generate the necessary code. If you can't find it, you can type it manually: pm.response.to.have.status(200).
This code runs when the response arrives and checks if the status is 200. It's straightforward and easy to read.
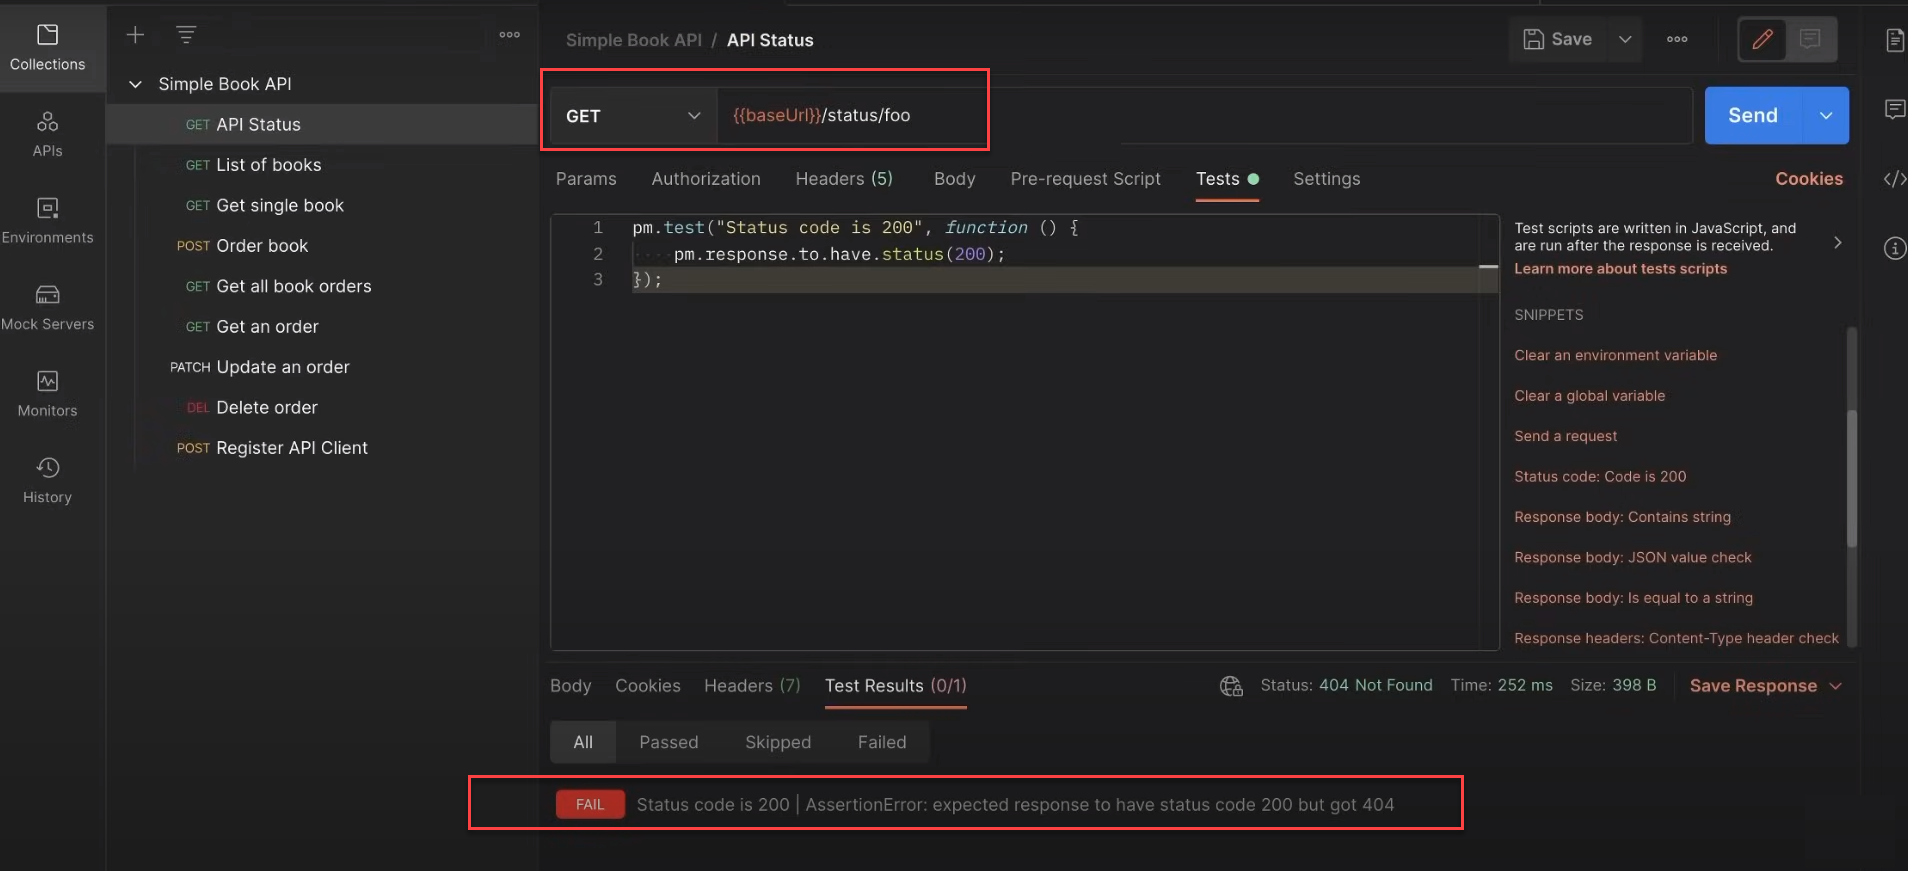
When writing tests, it's important to ensure they can fail to catch any mistakes. Tests might break or always pass, even when there's an error. To test this, change the request URL to an invalid address, like "status/foo."
This will simulate an error, causing the test to fail. You should see an error message: "expected response to have status 200 but got 404."
If the status code check is insufficient, we can also examine the response body, typically in JSON format. JSON is a simple way to send data from the API to Postman or any programming language, making it easy to use and understand.
To write a test that verifies the status is OK, we first need to parse the JSON response. Although the response appears JSON, it's text and not a JavaScript object. We can parse it with the following code:
This converts the JSON text into a JavaScript object stored in the response variable. To inspect the value of the response, use the Postman console. By default, the console doesn't record variable values unless instructed.
So, we can use, for example, console.log, which is again a function, and we'll specify in this function parameter, and that parameter is the response:
Let's open the console again, clear everything, and hit send again. You'll see the request logged by default and our console.log statement showing the JavaScript object created from the parsed JSON response. Although it looks similar to JSON, it's actually a JavaScript object.
To access the "status: okay" property, we can use:
Both lines will log the value of the status property from the response object.
This is crucial for accessing the data we need to test. If you can't see the data in the console after using console.log, there's no point in writing a test yet. Ensure you can read the data before proceeding.
Now that we have the data, let's write a test. In Postman, tests start with pm.test, which takes two parameters:
Let's hit send again. It will pass the test.
Let's make a little change to pm.expect (1). to. eql(1); —--> pm.expect (1). to. eql(2);
If it says "expected 1 to equal 2," we expect this to fail. It will say assertion error expected 1 to deeply equal 2.
How can we assert that the status is "okay"? We know the object contains this property, so we can check it directly. Instead of using a hardcoded value, use:
Send the request again, and it should pass.
If you change the expected value to something else, like "not okay," it will fail and display "expected 'okay' to deeply equal 'not okay.'"
This additional test checks that the status is "okay" along with ensuring the status code is 200. If we call a non-existent endpoint, we'll get a 404 error, and the code will fail because it won't return JSON. This simple test ensures the endpoint is working properly.
Postman Variables
Postman offers various variable scopes to manage data across your API testing workflow:
Collection variables: Specific to a single collection.
Global variables: These are available across all collections in your workspace.
Postman Environment variables: These are useful for managing different settings (e.g., local, testing, production) and easily switching between them.
These variable types help streamline your workflow by allowing you to store and reuse values like order IDs or base URLs across multiple requests.
In the previous tasks, copying and pasting the order ID from one request to another was annoying and repetitive.
Using Postman variables can make this process much easier by automatically storing and reusing values like the order ID across multiple requests, saving time and reducing errors.
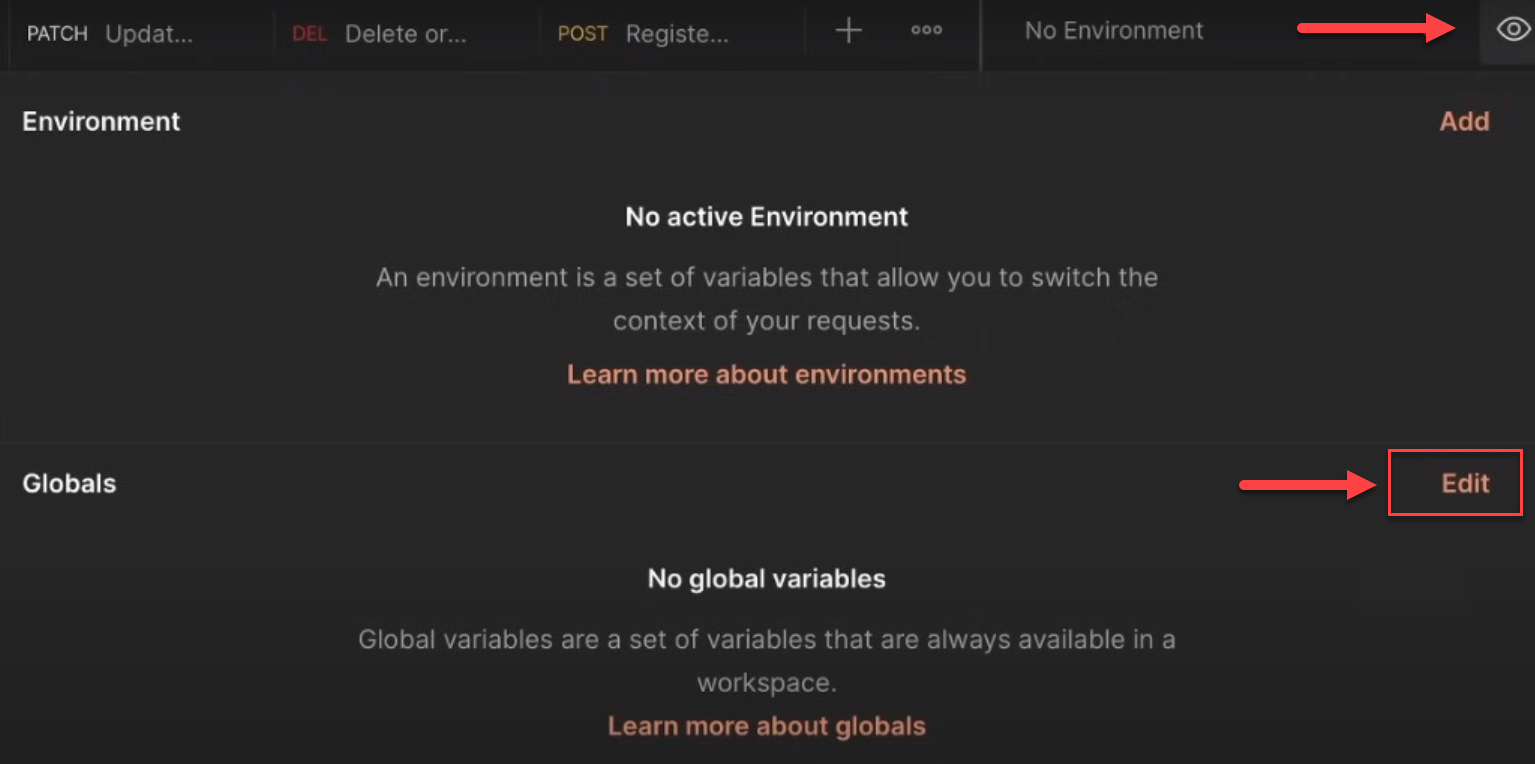
To create a global variable in Postman:
Copy the value you want to store.
Click the eye icon in the top-right corner.
Click "Edit" to add a new variable.
Name the variable (e.g., "order ID") and paste the value.
Save the variable.
You can access this variable later by clicking the eye icon again. To use it in requests, simply reference it using the appropriate syntax. When entering variable values, avoid extra spaces or line breaks.
Extracting Data from the Response
In our collection, several requests contain hard-coded data. For instance, we identified a book ID in the "List of Books" request and used this hard-coded ID in subsequent requests like "Get a Single Book" and "Order the Book." This approach is problematic because the tests will fail if the book is removed.
To address this, we can make our tests more dynamic. For example, we can filter the list of books to find the first available non-fiction book. Instead of hard-coding the ID, we'll use Postman variables to store and reuse it across requests.
Here's how we can achieve this:
Define and Parse Response:
2. Filter for Available Non-Fiction Books:
3. Set a Global Variable:
Verify the Variable:
After sending the request, check the value of bookId to ensure it has been set correctly.
5. Write a Test to Confirm Availability:
Using this process, we handle book IDs dynamically, making our tests stronger and less likely to fail when data changes.
By using Postman variables, we eliminate the need to manually update IDs in our requests, saving time and reducing errors.
Collection Runner
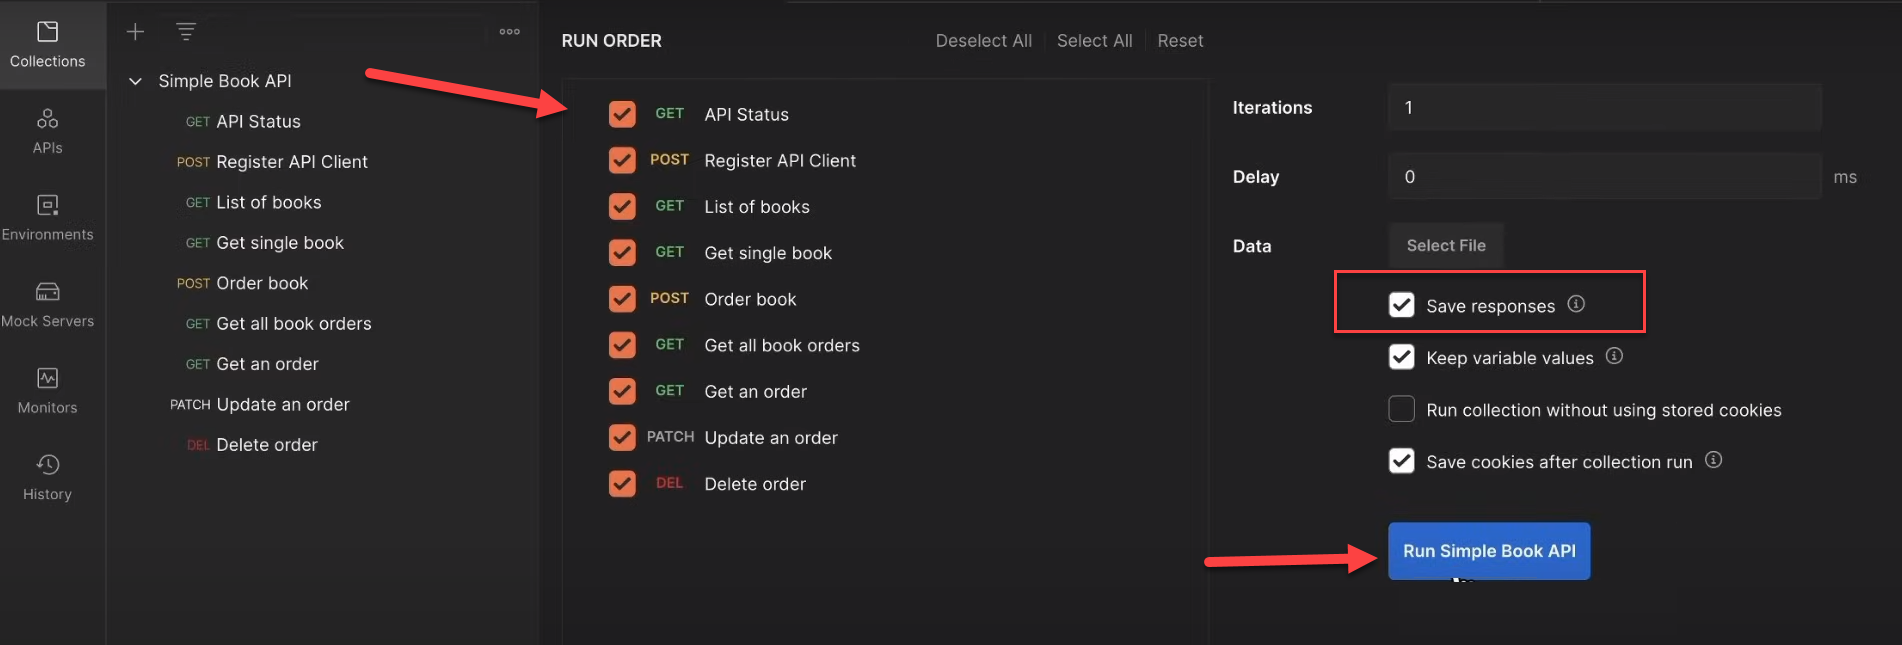
Now, we have everything needed for proper test automation. The next step is to automate our tests using Postman's Collection Runner. This tool allows us to execute all requests in a collection with one click.
To use the Collection Runner, click the "Runner" button at the bottom of the screen. This will open the Collection Runner, where you can run your entire collection easily.
To run a collection in Postman:
Drag and drop the collection into the Collection Runner.
The requests will be executed in the order they appear in the collection.
You can reorder or disable requests as needed.
Enable "Save responses" to help with troubleshooting.
Click "Run" to start the collection.
After running, you may notice some requests fail. For example, "Register API Client" might fail if you're sending duplicate data. "Get an Order" might fail if you're using a hardcoded order ID.
Postman Monitors
Postman Monitors automatically run your collection at set intervals.
To create:
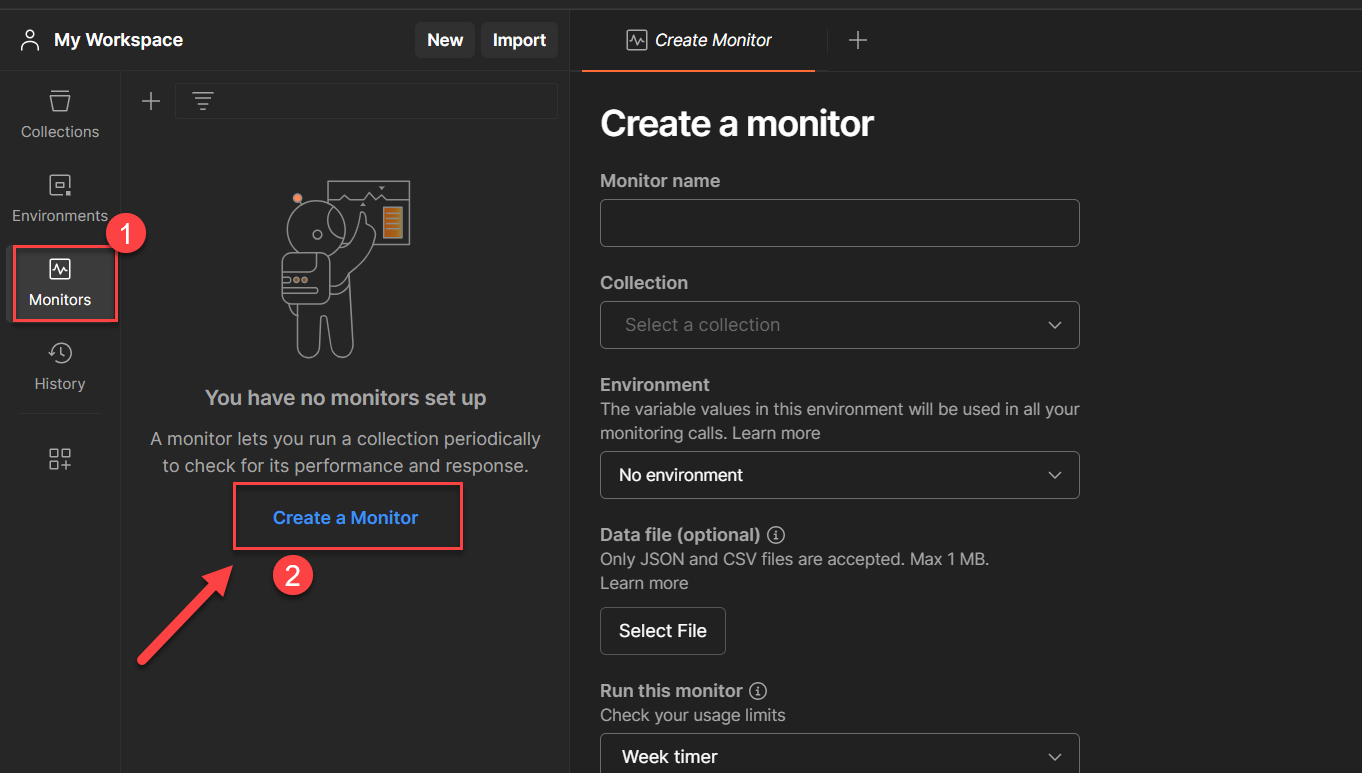
Find Monitors in the sidebar or use the collection's context menu
Name your monitor (e.g., "Check Books API")
Set run frequency (daily, weekdays, etc.)
Select the collection to monitor
Click "Create."
Monitors run on Postman's infrastructure, independent of your device.
You'll receive email notifications for failures.
Troubleshooting:
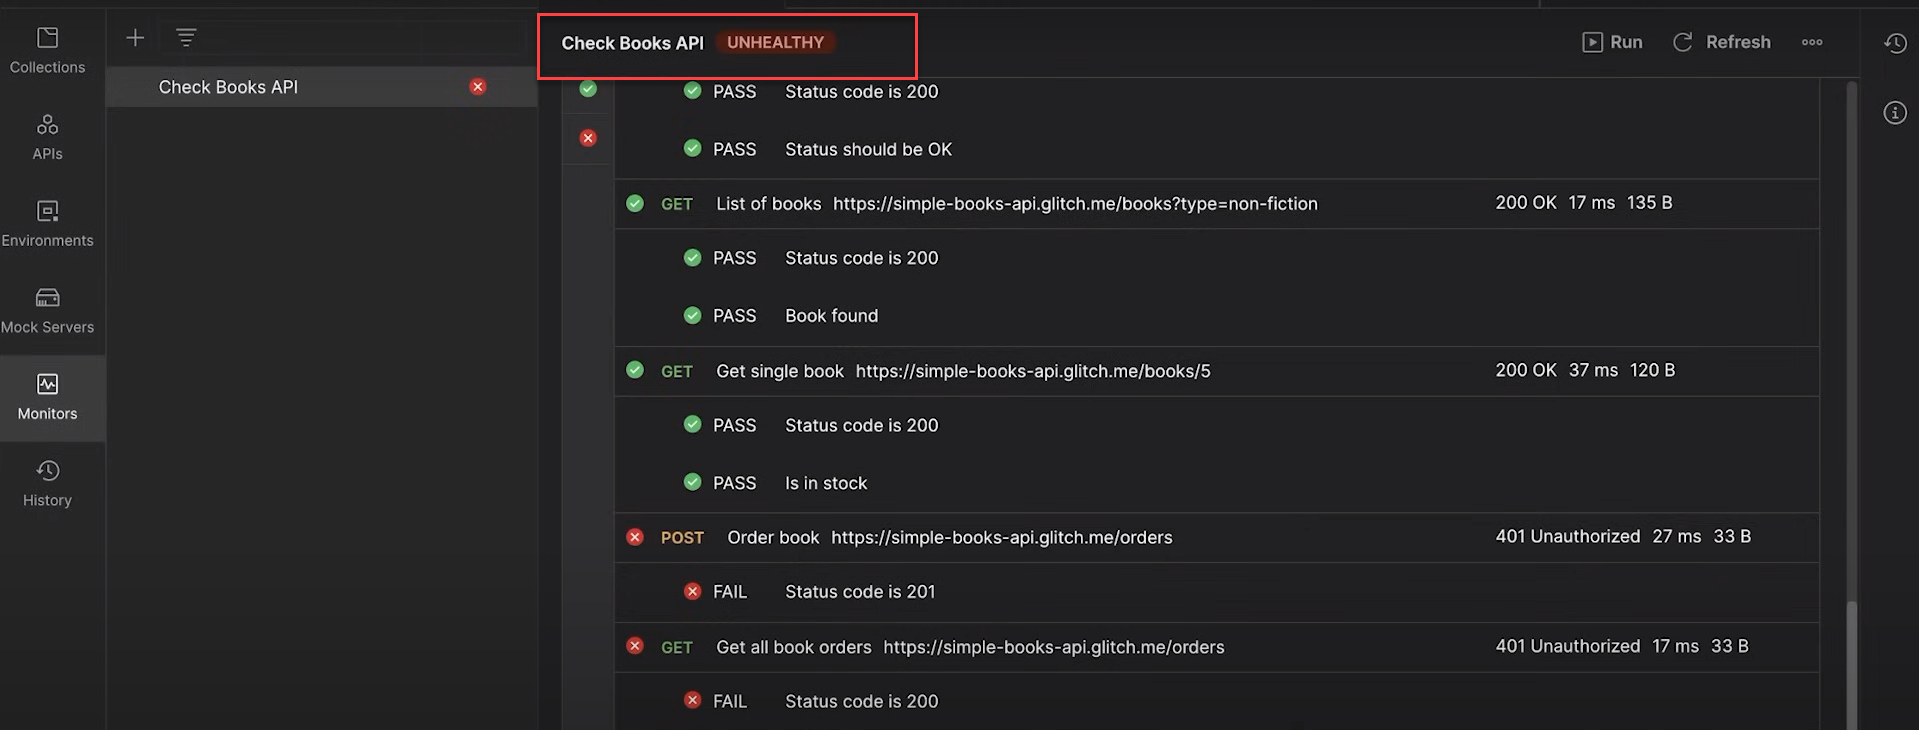
If the monitor shows "unhealthy," check the report for specifics.
Common issues include missing variables or tokens.
Fix: Ensure all necessary variables (like access tokens) are set in the initial values.
Note: Debugging monitors can be challenging due to limited information compared to local runs. However, monitors are powerful for continuous API testing when set up correctly.
Newman
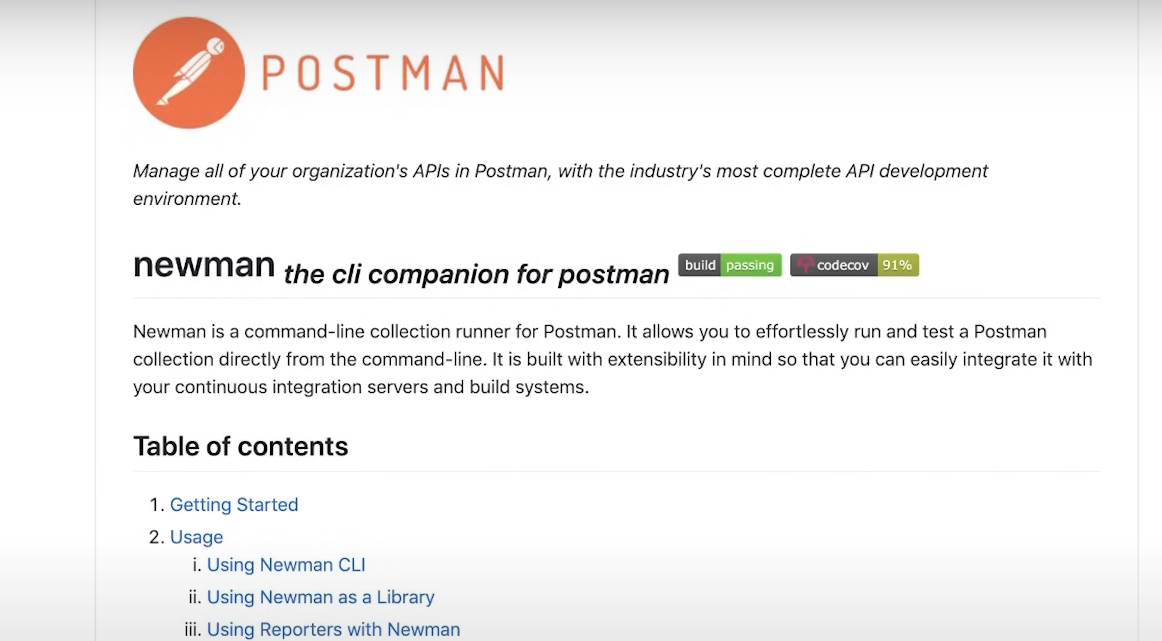
The most important tool for automating a collection run is Newman. Newman is a CLI tool that runs Postman collections and generates reports. With the Postman Newman CLI, you can run collections with API tests on professional servers like Jenkins, GitLab CI, and TeamCity.
To use Newman locally, you need Node.js installed. Details for installation are in the course notes.
First, check if Newman is installed by running:
To run a Postman collection with Newman, you can export the collection as a JSON file:
Go to your collection, click the three dots, and export it as a JSON file (e.g., postman_collection.json).
Alternatively, you can get a public link:
Click on the collection's context menu, select "Share Collection," and get a public link. Remember to update the link if you make changes to the collection.
Note that this link does not automatically update when you change something inside your collection. Every time you make a change and use this public link, you need to come back and click on "Update Link" to make those changes visible.
To run the collection with Newman, open a terminal, navigate to the folder containing your collection file, and run:
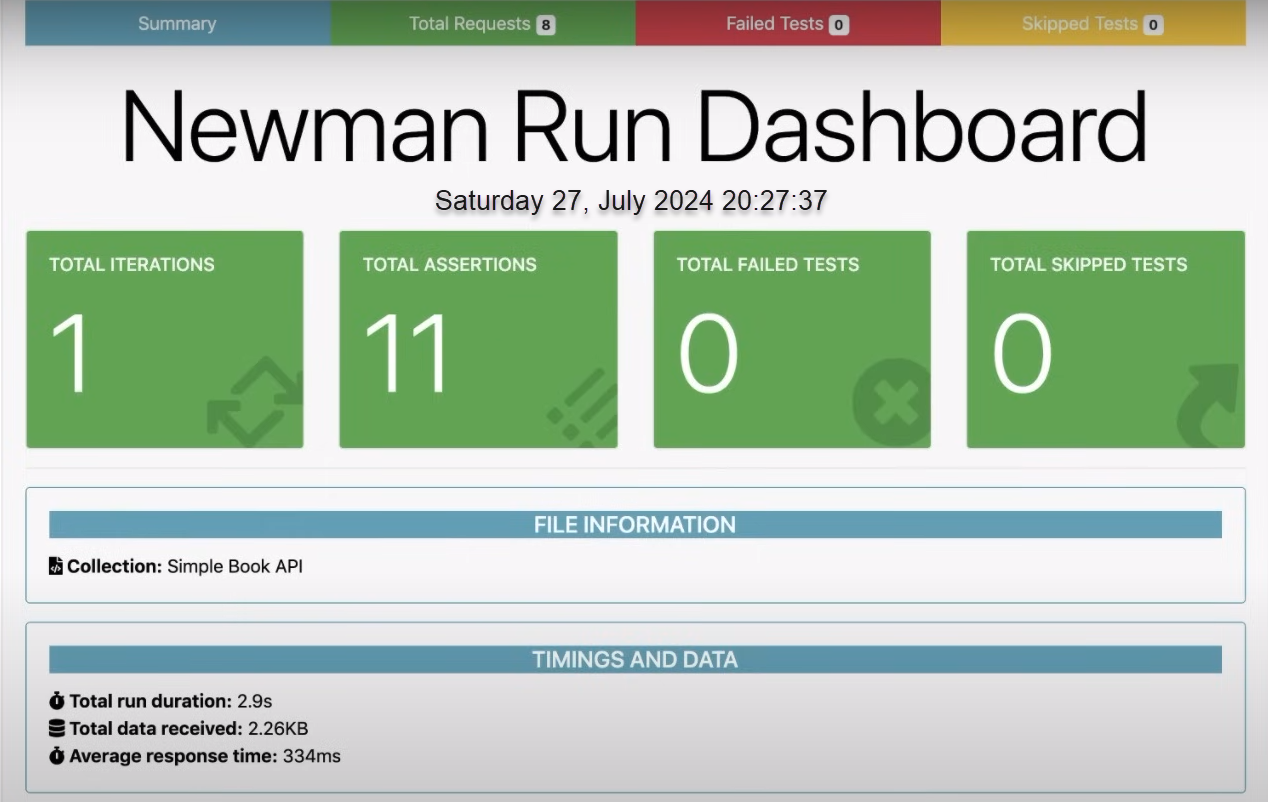
You will see that the entire execution is successful, all tests are generated properly, and everything is working fine.
HTML Reports with Newman
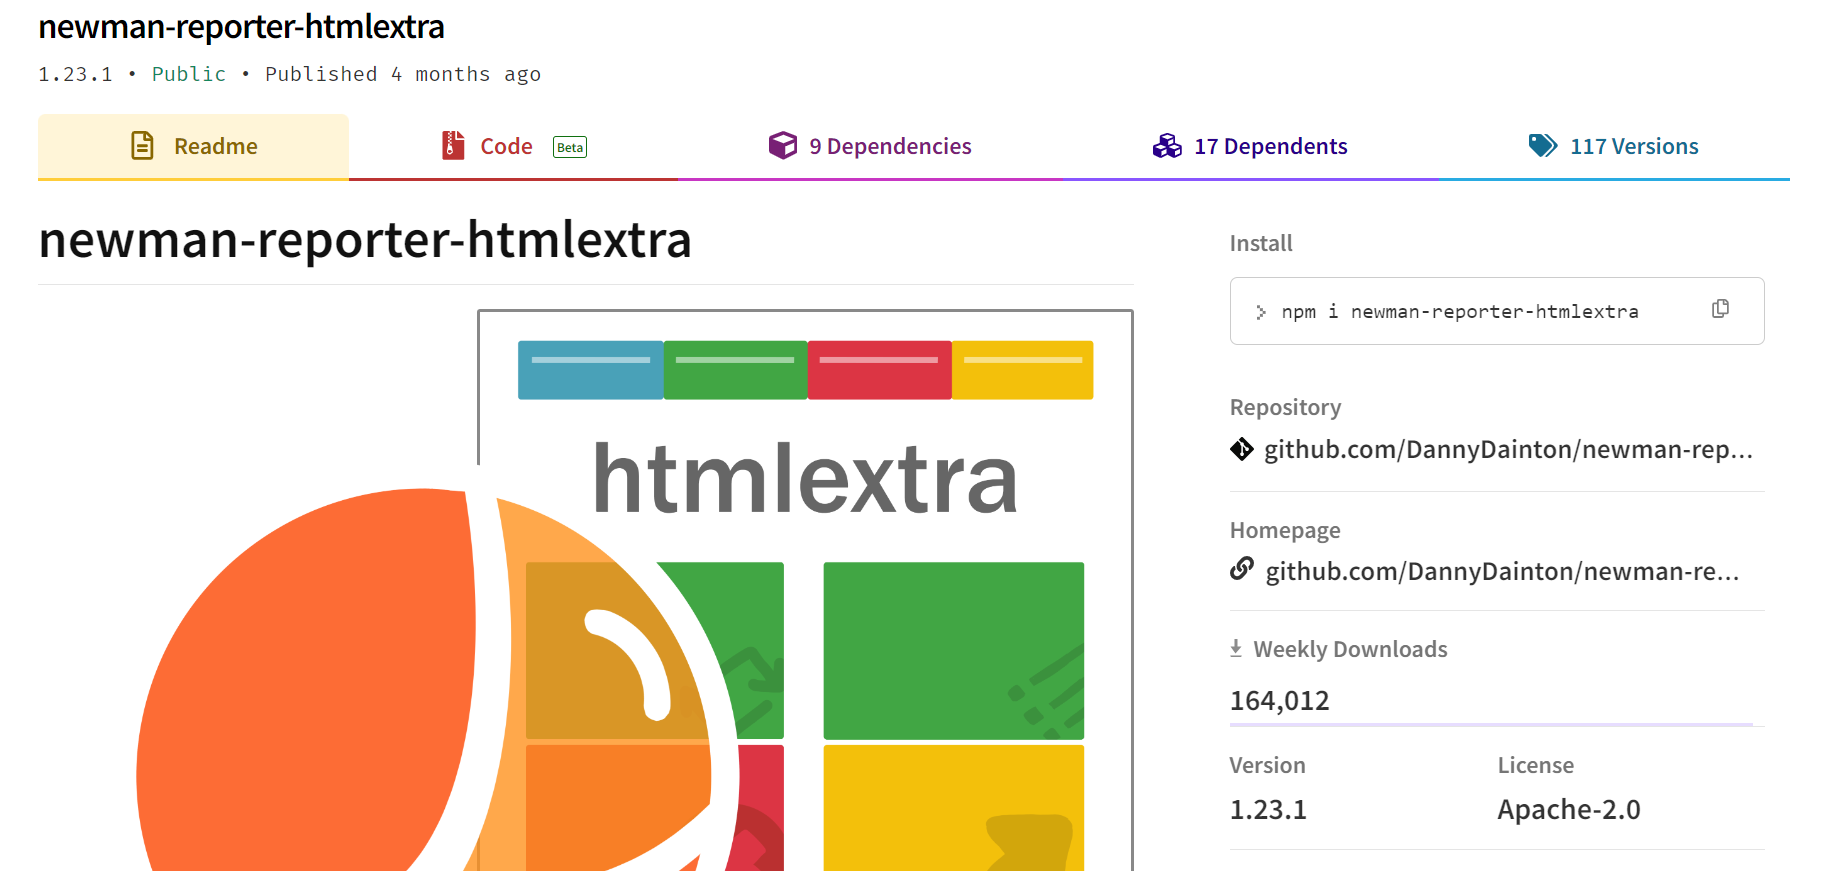
One of Newman's key features is report generation. The HTML Extra report is particularly popular in the Postman community. It offers:
An attractive, easy-to-read format
Comprehensive debugging information
Logged data, full requests, and responses
To install the HTML Extra reporter, run the following command:
To use the reporter, specify it in the newman run command.
After running the command, check the output folder. You'll find a newman folder containing the HTML report, which you can open by double-clicking on it.
The report provides an overview of all requests and responses, including details like request types, headers, and any issues such as unresolved Postman variables.
Both Newman and the HTML Extra reporter offer many configuration options. To get started, familiarize yourself with the documentation to understand the available flags and settings, such as naming reports and other customizations.
Postman CI/CD Integration
Now, I want to give you an overview of automation, the importance of Newman, and how everything you've learned fits together.
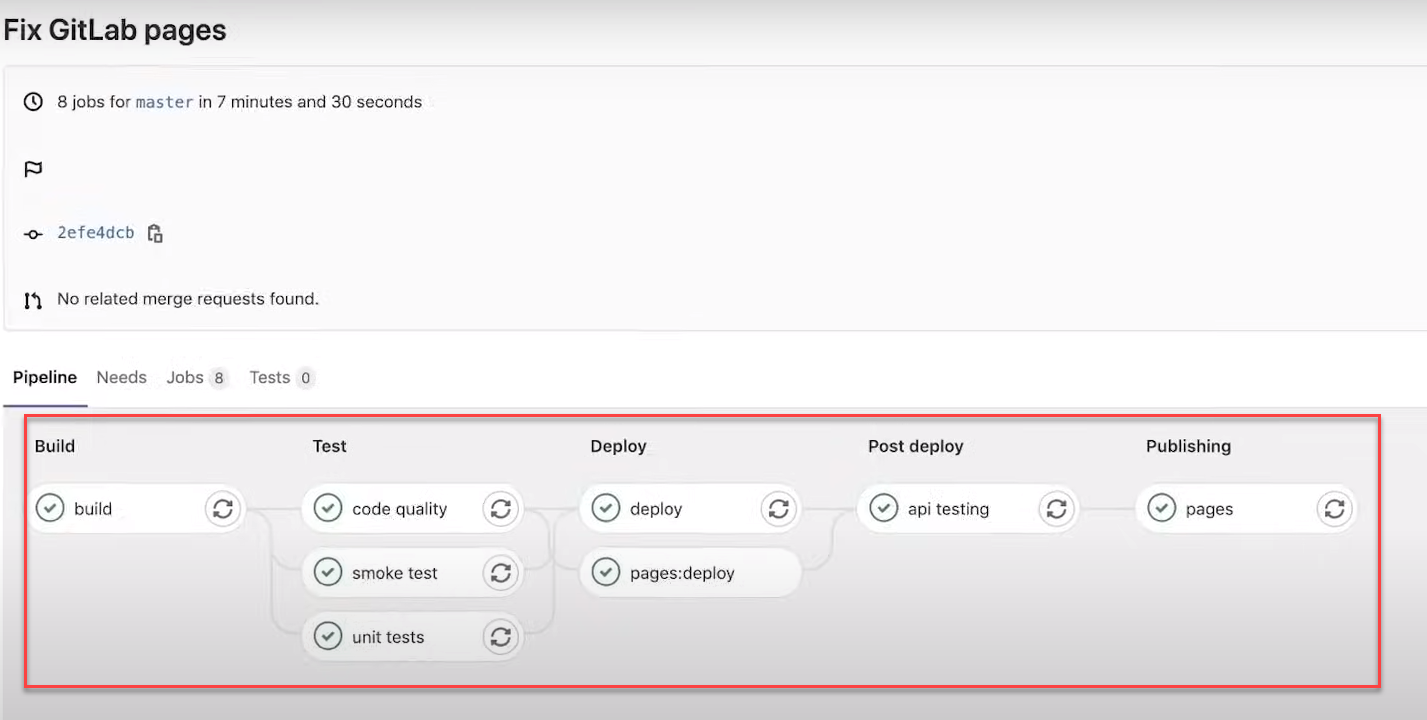
Here’s a realistic project example: Consider an API with a built pipeline. This software goes through a build process where the code is compiled and internal tests, including unit tests and code quality checks, are executed. Then, the API is deployed to a server.
After deployment, API testing is crucial. I use a Postman collection in Newman to run tests and ensure the API functions correctly.
If there are issues, Newman and the Postman tests will notify me within the pipeline. For instance, if a recent change causes problems, Newman will highlight the failed tests.
During the API testing stage, you can see Newman execution in the job details. I run a collection, specify environments, and use reporters like CLI, HTML Extra, and JUnit, to indicate where to save each report.
You can also access the Newman folder to view the HTML report, which helps debug and understand any issues. This process shows how everything fits together.
Conclusion
Throughout this journey, we've mastered the essentials of API testing using Postman. We've learned to send requests, analyze responses, and organize our work with Collections.
We've used the power of variables and explored various HTTP methods. Together, we've automated our tests using JavaScript and discovered how to run collections with Newman.
We've even generated comprehensive HTML reports and integrated our tests into CI/CD pipelines.
We've come a long way, but there's always more to learn. I encourage you to check out the JavaScript course to further enhance your skills, especially in JavaScript.
Visit our main tutorials page for more tutorials on API testing, cloud services, networking, cybersecurity, and other web development topics.
