Configuring User-ID in Palo Alto Firewall: A Guide
User-ID is a Palo Alto firewall feature that integrates seamlessly with several enterprise platforms. It also enables you visibility into usage patterns regardless of device type, establish security policies, generate reports, and perform forensics based on users and groups — not just IP addresses. The security architecture is based on three pillars: the user, the application, and the associated content. These, when used in conjunction with App-ID and Content-ID, can increase your overall security posture.
When Palo Alto firewalls are configured to enhance the security of wireless networks, IP addresses are re-assigned as users move from zones, compounding the visibility problem in an increasingly mobile workplace. Network users are not always firm employees. As a result, IP addresses are no longer a sufficient technique for monitoring and managing user behavior.
Based on employee and group identity information stored in a variety of user repositories, User-ID allows you to safely activate applications and content. It extends Microsoft Windows, Mac OSX, Apple iOS, and UNIX users' application enablement policies. In contrast to IP addresses, it analyses applications, threats, and web surfing activities based on individual users and groups of users.
It gathers user information from corporate directories such as Microsoft Active Directory, eDirectory, and Open LDAP. It also contains a captive portal, a Microsoft Exchange connector, and an XML API that allows you to extend rules to Mac OSX, Apple iOS, and UNIX users that aren't on the Active Directory network.
Want to Start Learning How to Use Palo Alto Technologies?
CBT Nuggets trainer Keith Barker has a comprehensive course that covers Palo Alto PCNSA certification. His course can assist you in passing the PCNSA exam if you are interested in validating that you have the knowledge to leverage fundamental Palo Alto firewall features.
How Does User-ID Work?
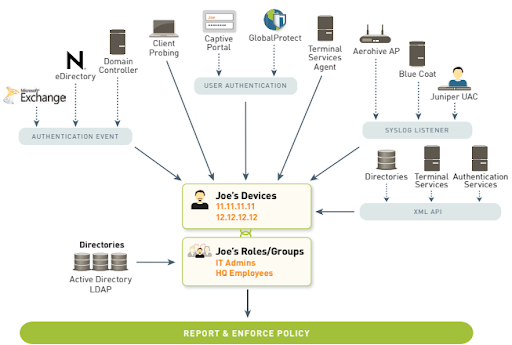
Next-generation firewall technology is integrated with a variety of user repositories and terminal services setups using User-ID. Depending on the network requirements, multiple methods can be applied to map the user identity to an IP address.
Authentication events, monitoring of terminal services, integration of directory services, and a sophisticated XML API are among the strategies used to map users. Once the apps and users have been identified, the Application Command Center (ACC) provides full visibility and control, as well as policy editing, logging, and reporting.
Authentication events: For Microsoft Active Directory, Microsoft Exchange, and Novell eDirectory settings, User-ID can be configured to monitor authentication events. User-ID can associate a user with the IP address of the device from which they log in to impose rules on the firewall by monitoring authentication events on a network.
User authentication: This method allows you to set up a challenge-response authentication sequence to collect information about the user and their IP address.
Captive portal: A captive portal can be used in situations when administrators need to set rules requiring users to authenticate to the firewall before accessing the internet. When other methods of identification fail to identify the user, a captive portal is utilized. Captive portal can be set to send an NTLM authentication request to the web browser — in addition to an explicit username and password prompt to make the authentication process invisible to the user.
GlobalProtect: Remote users using GlobalProtect to connect to the network will submit user and host information to the firewall, which may then be used for policy control.
How to Set Up User-ID in Palo Alto Firewall
Let's start with a network and pretend we have some users on that network. Also, let's pretend it's not just any network, it's a Microsoft Active Directory network — so there's a domain controller. These clients are all DHCP clients. Then there are the users who log into Active Directory.
Now, when a user logs into Active Directory on their local computer, security event logs have a record that User 1 logged in and the IP address on the local machine that they logged in with is 10.1.0.11.
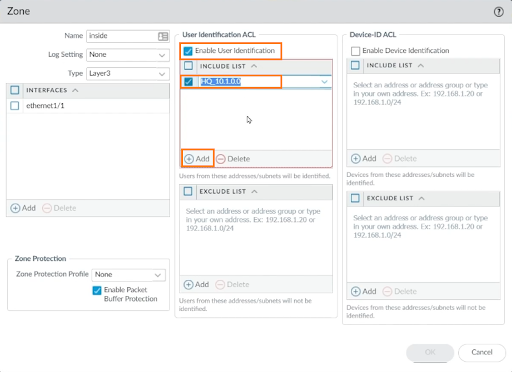
To create a user ID in Palo Alto Firewall, the first step is to enable the User-ID functionality in the zones where it will be used. To do so, go to NETWORK > Zones and select the “inside” zone to enable the feature. As a result, we'll select the inside zone.

We'll enable it under the User Identification ACL. And if you want to include only certain subnets, you can do that, as well. Click on Add, include HQ 10.0.1.0 network, and click on OK.
We must instruct this firewall on how to query Active Directory for security logs about logins with usernames and IP addresses. Go to DEVICE > User Identification > Gear icon to do so.
Enter the login, domain name, and account password. Confirm that password — and then leave Kerberos Server Profile as default in the Server Monitor Account tab.
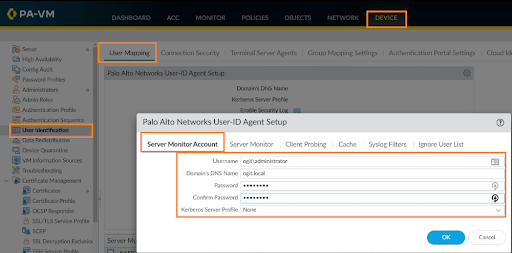
On Server Monitor and other tabs, leave everything as default, and click OK to continue.
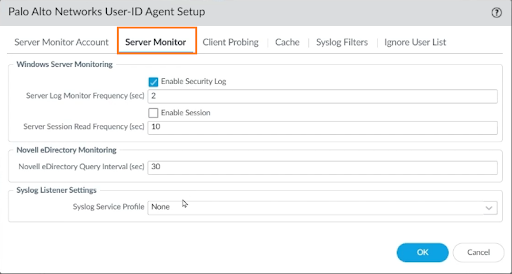
So, the next question is, what servers are we going to be asking for that information?
To specify a server, go down here to Server Monitoring, and click on Add. Enter the name, description, type, transport protocol, and network address, and click on OK.
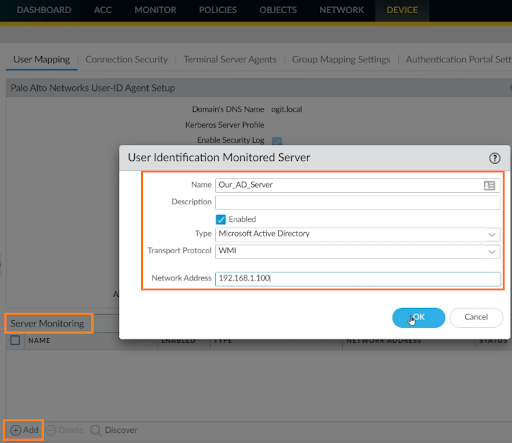
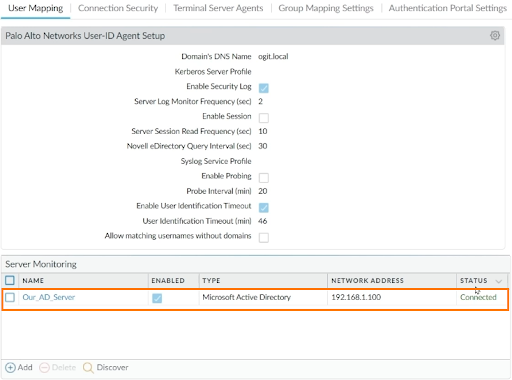
Click on Commit and Commit again to accept the changes. We can verify the status of the Active Directory server whether connected or not.
Configuring LDAP and Group Mapping
We verified that our AD server is linked, so now we'll need to determine group membership. To do group mapping, go to DEVICE > Server Profiles > LDAP > Add. Enter the profile name, and for Server List, click on Add, and enter the name, and IP address of the LDAP server.
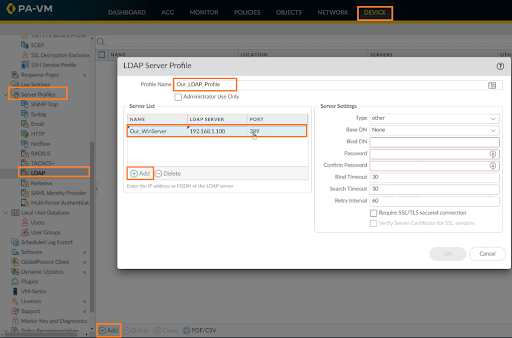
Within Server Settings, we need to specify the type of server it is. Enter the type as Active Directory, Base DN, Bind DN, password, confirm password, uncheck the “Require SSL/TLS secured condition”, leave other stuff as default, and click on OK.
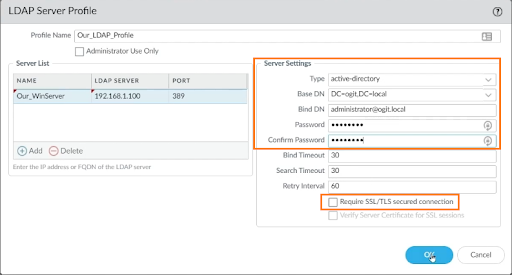
Click on Commit and Commit again to accept the changes.
We’ll now set up Group Mapping Settings. For this, go to DEVICE > User Identification > Group Member Settings > Add. Enter the name of the group mapping. In the Server Profile tab, choose the server profile that is created before (Our_LDAP_Profile in our case).
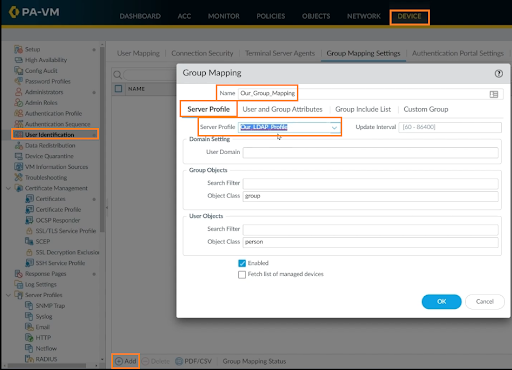
In the “Group Include List” tab, expand the DC folder (DC=ogit, DC=local in our case), and further expand cn=users.
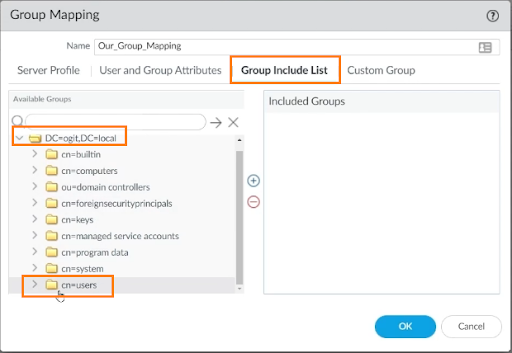
Find and add cn=domain users and cn=domain admins by clicking the + button and clicking OK to continue.
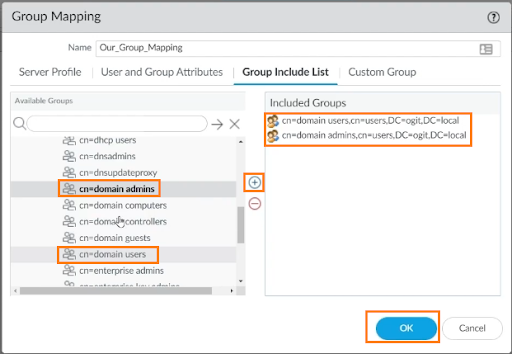
If you have made a custom group in Active Directory, you could select it here. Once we go move to our security policy rules, it'll just be these group options that we have.
Click on Commit and Commit to save the configurations. Once that commit is done, we now have the option to go to our security policy.
Configuring Security Policies With User-ID
We'll now incorporate groups with User-ID as part of our security policies.
Currently, we are not using any user identity as part of our policy rules. To do this, click on POLICIES > Security, click on the down arrow for any one of the columns shown in the screenshot, and tick the Source User.
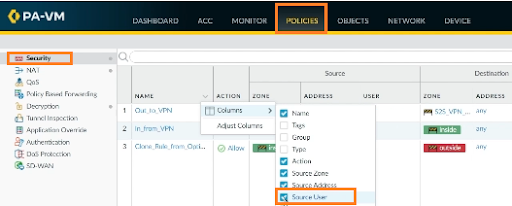
We can now see the source fields here with the address and associated user with it.
We’ll now add the security policy rule. For this, highlight rule 1, click on Add, and in the General tab, enter the name of the security policy rule.
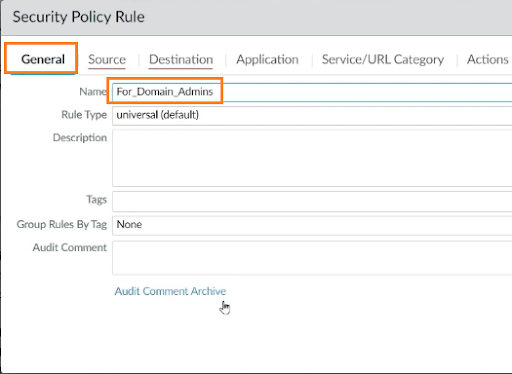
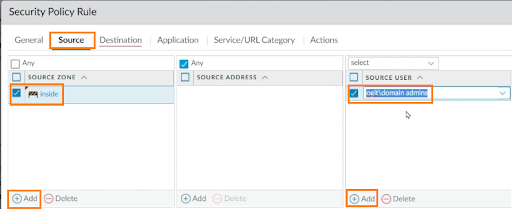
In the Source tab, click on Add, and choose “inside” as the source zone. In the Source User tab, choose ogit\domain admins.
In the Destination tab, click on Add and choose “outside” as the destination zone.
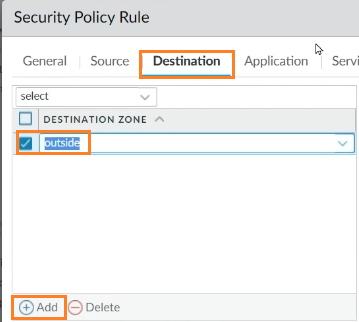
Leave everything as default and click on OK to continue. Now, drag the rule to the top of the rules list.
We’ll also create another rule for domain users by following the same above procedure except for the Source User in the Source tab where “ogit\domain users” will be selected in that case. The two new rules have been created:

Click on Commit and Commit again to save the configurations.
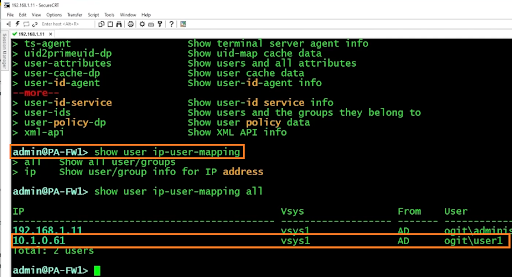
You can verify it by logging into the firewall and typing the command on the CLI “show user ip-user-mapping all”. It shows in the following screenshot that user1 is currently logging in.
Final Thoughts
This article explained how to set up User-ID in a Palo Alto firewall. User-ID is a great way to keep your organization safe online. It allows you to safely enable applications and content based on employee and group identity information. By using User-ID, you can analyze the application, threat, and web surfing activity based on individual users and groups of users.
User-ID allows you to identify users and their devices across different applications and platforms. It is an essential tool for organizations that want to extend their security policies to users who typically reside outside of their Active Directory domain.
delivered to your inbox.
By submitting this form you agree to receive marketing emails from CBT Nuggets and that you have read, understood and are able to consent to our privacy policy.